- PyModbus — A Python Modbus Stack
- Supported versions
- Summary
- Features
- Client Features
- Server Features
- Use Cases
- Example Code
- Examples Directory structure
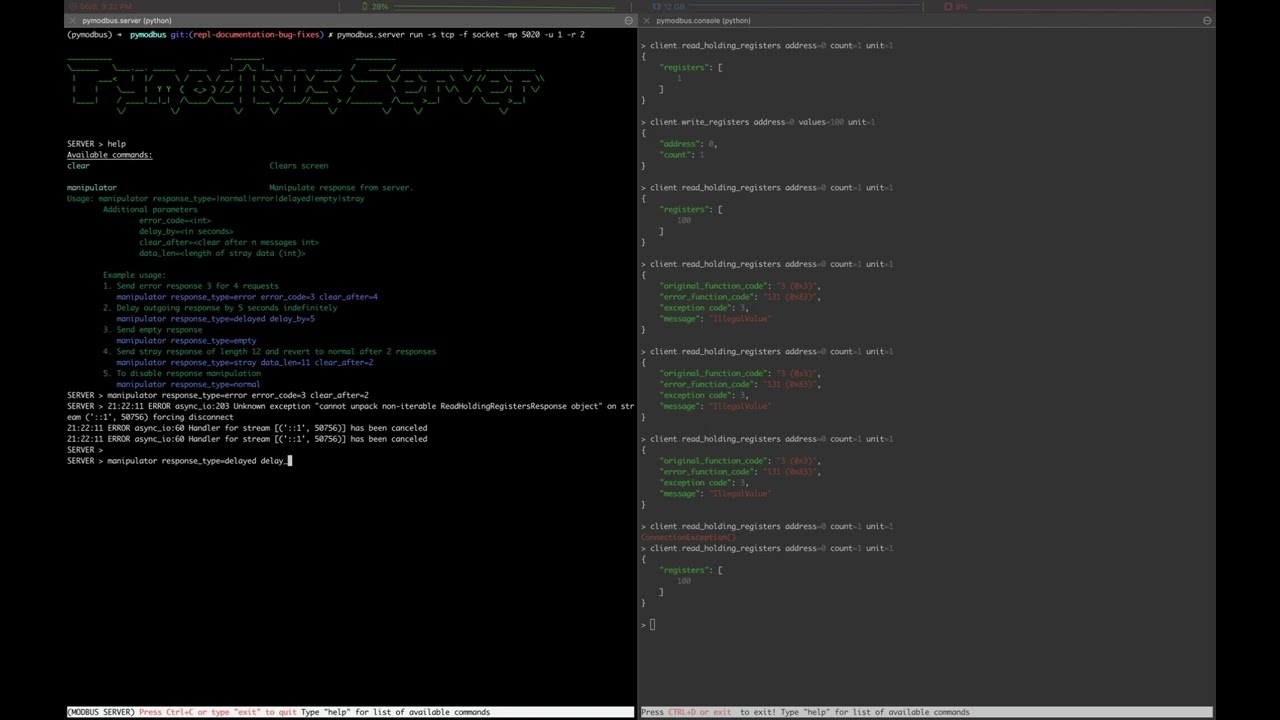
- Pymodbus REPL (Read Evaluate Print Loop)
- Pymodbus REPL Client
- Pymodbus REPL Server
- Installing
- Current Work In Progress
- Development Instructions
- Generate documentation
- Contributing
- License Information
- Quick start guide
- Package setup
- ModbusClient: init
- ModbusClient: TCP link management
- ModbusClient: available modbus requests functions
- ModbusClient: debug mode
- utils module: Modbus data mangling
PyModbus — A Python Modbus Stack
We are constantly working the modernize pymodbus and add new features, and we look for people who want to help a bit. There are challenges small and large not only programming but also documentation and testing.
Supported versions
Version 2.5.3 is the last 2.x release (python >= 2.7, no longer supported).
Version 3.3.2 is the current release (Tested with Python >= 3.8).
All API changes after 3.0.0 are documented in API_changes.rst
Summary
Pymodbus is a full Modbus protocol implementation using a synchronous or asynchronous (using asyncio) core.
The modbus protocol documentation can be found here
Supported modbus communication modes: tcp, rtu-over-tcp, udp, serial, tls
Pymodbus can be used without any third party dependencies (aside from pyserial) and is a very lightweight project.
Pymodbus also provides a lot of ready to use examples as well as a server/client simulator which can be controlled via a REST API and can be easily integrated into test suites.
The tests are run against Python 3.8, 3.9, 3.10, 3.11 on Windows, Linux and MacOS.
Features
Client Features
- Full read/write protocol on discrete and register
- Most of the extended protocol (diagnostic/file/pipe/setting/information)
- TCP, RTU-OVER-TCP, UDP, TLS, Serial ASCII, Serial RTU, and Serial Binary
- asynchronous(powered by asyncio) and synchronous versions
- Payload builder/decoder utilities
- Pymodbus REPL for quick tests
- Customizable framer to allow for custom implementations
Server Features
- Can function as a fully implemented modbus server
- TCP, RTU-OVER-TCP, UDP, TLS, Serial ASCII, Serial RTU, and Serial Binary
- asynchronous and synchronous versions
- Full server control context (device information, counters, etc)
- A number of backend contexts as datastore
Use Cases
Although most system administrators will find little need for a Modbus server on any modern hardware, they may find the need to query devices on their network for status (PDU, PDR, UPS, etc). Since the library is written in python, it allows for easy scripting and/or integration into their existing solutions.
Continuing, most monitoring software needs to be stress tested against hundreds or even thousands of devices (why this was originally written), but getting access to that many is unwieldy at best.
The pymodbus server will allow a user to test as many devices as their base operating system will allow (allow in this case means how many Virtual IP addresses are allowed).
For more information please browse the project documentation:
Example Code
For those of you that just want to get started fast, here you go:
from pymodbus.client import ModbusTcpClient client = ModbusTcpClient('127.0.0.1') client.connect() client.write_coil(1, True) result = client.read_coils(1,1) print(result.bits[0]) client.close()
For more advanced examples, check out the Examples included in the repository. If you have created any utilities that meet a specific need, feel free to submit them so others can benefit.
Examples Directory structure
examples -> Essential examples guaranteed to work (tested with our CI) ├── v2.5.3 -> Examples not updated to version 3.0.0. ├── contrib -> Examples contributed by contributors.
Also, if you have a question, please create a post in discussions q&a topic, so that others can benefit from the results.
If you think, that something in the code is broken/not running well, please open an issue, read the Template-text first and then post your issue with your setup information.
Pymodbus REPL (Read Evaluate Print Loop)
Warning The Pymodbus REPL documentation is not updated.
Pymodbus REPL Client
Pymodbus REPL comes with many handy features such as payload decoder to directly retrieve the values in desired format and supports all the diagnostic function codes directly .
For more info on REPL Client refer Pymodbus REPL Client

Pymodbus REPL Server
Pymodbus also comes with a REPL server to quickly run an asynchronous server with additional capabilities out of the box like simulating errors, delay, mangled messages etc.
For more info on REPL Server refer Pymodbus REPL Server
Installing
You can install using pip or easy install by issuing the following commands in a terminal window (make sure you have correct permissions or a virtualenv currently running):
This will install a base version of pymodbus.
To install pymodbus with options run:
- repl, installs pymodbus REPL.
- serial, installs serial drivers.
- documentation, installs tools to generate documentation.
- development, installs development tools needed to enable test/check of pymodbus changes.
Or to install a specific release:
pip install -U pymodbus==X.Y.Z
Otherwise you can pull the trunk source and install from there:
git clone git://github.com/pymodbus-dev/pymodbus.git cd pymodbus pip install -r requirements.txt
Before cloning the repo, you need to install python3 (preferable 3.10) and make a virtual environment:
python3 -m venv /path/to/new/virtual/environment
To activeate the virtual environment please do:
To get latest release (for now v3.0.0 with Python 3.8 support):
To get a specific version:
git checkout tags/vX.Y.Z -b vX.Y.Z
pip install -r requirements.txt
pip install -e .
pre-commit –install
This installs pymodbus in your virtual environment with pointers directly to the pymodbus directory, so any change you make is immediately available as if installed. It will also install pre-commit git hooks.
Either method will install all the required dependencies (at their appropriate versions) for your current python distribution.
- dev is where all development happens, this branch is not always stable.
- master is where are releases are kept.
- All releases are tagged with vX.Y.Z (e.g. v2.5.3)
- All prereleases are tagged with vX.Y.ZrcQ (e.g. v3.0.0.0rc1)
If a maintenance release of an old version is needed (e.g. v2.5.4), the release tag is used to create a branch with the same name, and maintenance development is merged here.
Current Work In Progress
The maintenance team is very small with limited capacity and few modbus devices.
However, if you would like your device tested, we accept devices via mail or by IP address.
That said, the current work mainly involves polishing the library and solving issues:
- Fixing bugs/feature requests
- Architecture documentation
- Functional testing against any reference we can find
- The remaining edges of the protocol (that we think no one uses)
Development Instructions
The current code base is compatible python >= 3.8. Here are some of the common commands to perform a range of activities
pip install -r requirements.txt install all requirements
pip install -e . source directory is “release”, useful for testing
./check_ci run the same checks as CI runs on a pull request.
OBS: tox is no longer supported.
Generate documentation
cd doc make clean make html
Contributing
Just fork the repo and raise your PR against dev branch.
We always have more work than time, so feel free to open a discussion / issue on a theme you want to solve.
License Information
- Copyright (c) 2001-2005 S.W.A.C. GmbH, Germany.
- Copyright (c) 2001-2005 S.W.A.C. Bohemia s.r.o., Czech Republic.
- Hynek Petrak, https://github.com/HynekPetrak
© Copyright See license. Revision 16d0206f .
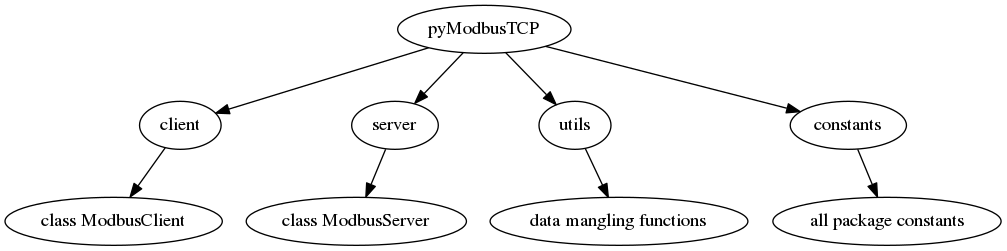
Quick start guide
pyModbusTCP give access to modbus/TCP server through the ModbusClient object. This class is define in the client module.
Since version 0.1.0, a server is available as ModbusServer class. This server is currently in test (API can change at any time).
To deal with frequent need of modbus data mangling (for example convert 32 bits IEEE float to 2×16 bits words) a special module named utils provide some helpful functions.
Package map:
Package setup
# install the last available version (stable) sudo pip3 install pyModbusTCP # or upgrade from an older version sudo pip3 install pyModbusTCP --upgrade # you can also install a specific version (here v0.1.10) sudo pip3 install pyModbusTCP==v0.1.10
git clone https://github.com/sourceperl/pyModbusTCP.git cd pyModbusTCP # here change "python" by your python target(s) version(s) (like python3.9) sudo python setup.py install
ModbusClient: init
Init module from constructor (raise ValueError if host/port error):
from pyModbusTCP.client import ModbusClient try: c = ModbusClient(host='localhost', port=502) except ValueError: print("Error with host or port params")
from pyModbusTCP.client import ModbusClient c = ModbusClient() c.host = 'localhost' c.port = 502
ModbusClient: TCP link management
Since version 0.2.0, “auto open” mode is the default behaviour to deal with TCP open/close.
The “auto open” mode keep the TCP connection always open, so the default constructor is:
c = ModbusClient(host="localhost", auto_open=True, auto_close=False)
It’s also possible to open/close TCP socket before and after each request:
c = ModbusClient(host="localhost", auto_open=True, auto_close=True)
Another way to deal with connection is to manually set it. Like this:
c = ModbusClient(host="localhost", auto_open=False, auto_close=False) # open the socket for 2 reads then close it. if c.open(): regs_list_1 = c.read_holding_registers(0, 10) regs_list_2 = c.read_holding_registers(55, 10) c.close()
ModbusClient: available modbus requests functions
| Domain | Function name | Function code | ModbusClient function |
|---|---|---|---|
| Bit | Read Discrete Inputs | 2 | read_discrete_inputs() |
| Read Coils | 1 | read_coils() | |
| Write Single Coil | 5 | write_single_coil() | |
| Write Multiple Coils | 15 | write_multiple_coils() | |
| Register | Read Input Registers | 4 | read_input_registers() |
| Read Holding Registers | 3 | read_holding_registers() | |
| Write Single Register | 6 | write_single_register() | |
| Write Multiple Registers | 16 | write_multiple_registers() | |
| Read/Write Multiple Registers | 23 | write_read_multiple_registers() | |
| Mask Write Register | 22 | n/a | |
| File | Read FIFO Queue | 24 | n/a |
| Read File Record | 20 | n/a | |
| Write File Record | 21 | n/a | |
| Read Exception Status | 7 | n/a | |
| Diagnostic | Diagnostic | 8 | n/a |
| Get Com Event Counter | 11 | n/a | |
| Get Com Event Log | 12 | n/a | |
| Report Slave ID | 17 | n/a | |
| Read Device Identification | 43 | read_device_identification() |
ModbusClient: debug mode
If need, you can enable a debug mode for ModbusClient like this:
from pyModbusTCP.client import ModbusClient c = ModbusClient(host="localhost", port=502, debug=True)
when debug is enable all debug message is print on console and you can see modbus frame:
c.read_holding_registers(0, 4)
Tx [E7 53 00 00 00 06 01] 03 00 00 00 04 Rx [E7 53 00 00 00 0B 01] 03 08 00 00 00 6F 00 00 00 00 [0, 111, 0, 0]
utils module: Modbus data mangling
When we have to deal with the variety types of registers of PLC device, we often need some data mangling. Utils part of pyModbusTCP can help you in this task. Now, let’s see some use cases.
- deal with negative numbers (two’s complement):
from pyModbusTCP import utils list_16_bits = [0x0000, 0xFFFF, 0x00FF, 0x8001] # show "[0, -1, 255, -32767]" print(utils.get_list_2comp(list_16_bits, 16)) # show "-1" print(utils.get_2comp(list_16_bits[1], 16))
- convert integer of val_size bits (default is 16) to an array of boolean:
from pyModbusTCP import utils # show "[True, False, True, False, False, False, False, False]" print(utils.get_bits_from_int(0x05, val_size=8))
from pyModbusTCP import utils list_16_bits = [0x0123, 0x4567, 0xdead, 0xbeef] # big endian sample (default) list_32_bits = utils.word_list_to_long(list_16_bits) # show "['0x1234567', '0xdeadbeef']" print([hex(i) for i in list_32_bits]) # little endian sample list_32_bits = utils.word_list_to_long(list_16_bits, big_endian=False) # show "['0x45670123', '0xbeefdead']" print([hex(i) for i in list_32_bits])
from pyModbusTCP import utils # 32 bits IEEE single precision # encode : python float 0.3 -> int 0x3e99999a # display "0x3e99999a" print(hex(utils.encode_ieee(0.3))) # decode: python int 0x3e99999a -> float 0.3 # show "0.300000011921" (it's not 0.3, precision leak with float. ) print(utils.decode_ieee(0x3e99999a)) # 64 bits IEEE double precision # encode: python float 6.62606957e-34 -> int 0x390b860bb596a559 # display "0x390b860bb596a559" print(hex(utils.encode_ieee(6.62606957e-34, double=True))) # decode: python int 0x390b860bb596a559 -> float 6.62606957e-34 # display "6.62606957e-34" print(utils.decode_ieee(0x390b860bb596a559, double=True))
© Copyright 2022, Loïc Lefebvre Revision 66f18285 .
Versions latest stable v0.2.0 v0.1.10 Downloads pdf html epub On Read the Docs Project Home Builds Free document hosting provided by Read the Docs.