- Django Many To Many Relationship Explained
- Django Many To Many relationship using ManyToManyField
- ManyToManyField in Database
- ManyToManyField ORM
- Django Many To Many relationship using ForeignKey
- Summary
- How To Use Many-to-Many Database Relationships with Flask-SQLAlchemy
- Prerequisites
- Step 1 — Setting Up the Web Application
Django Many To Many Relationship Explained
Frequently most challenging part of creating scalable and reliable applications in web development is making a good database schema. Often entities can contain shared data and could not be represented with the classic OneToMany relationship explained in the ForeignKey article. That’s why Django has built-in tools to help us represent ManyToMany relationships.
What is Many To Many relationship?
Many to Many is a way of connecting entities with one additional table (associative table). Associative table points to entities it connects. The associative table contains primary keys of entities it connects and additional optional parameters.
Django Many To Many relationship can be easily represented in 2 different ways that we will cover in this article:
- Using ManyToManyField
- Using two OneToManyFields (ForeignKey)
Django Many To Many relationship using ManyToManyField
Django ManyToManyField is a field that helps you create many to many relationships in Django. It’s also the most obvious and fastest way.
ManyToManyField syntax is as follows:
class ManyToManyField(to, **options)
ManyToManyField in Database
ManyToManyField between two models creates a third table in the database. That table contains the primary key of both models.
Let’s check out the following models in which we assume that the Book can have multiple Authors:
class Author(models.Model): first_name = models.CharField(max_length=512) last_name = models.CharField(max_length=512) class Book(models.Model): title = models.CharField(max_length=512) authors = models.ManyToManyField(Author)
Often, developers are confused in what model to put ManyToManyField. From the database point of view, it doesn’t matter. Tables are equally connected no matter where you place it. But Django admin and ORM have slight changes in behavior.
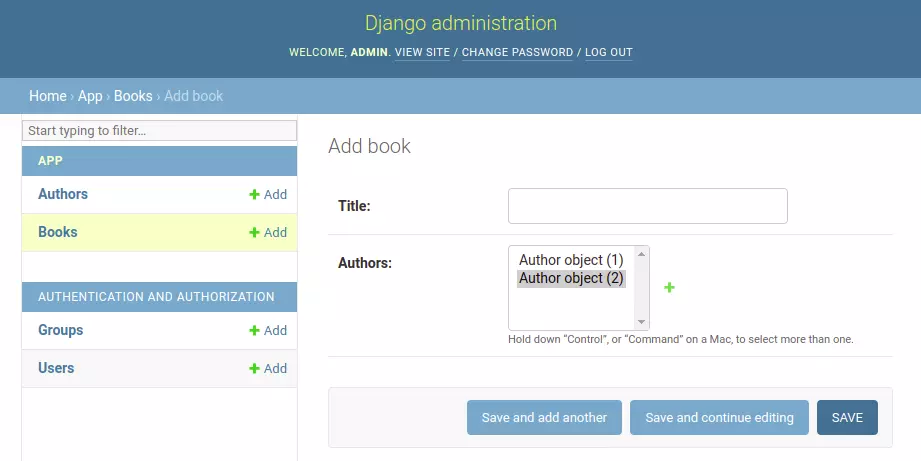
Django admin interface adds a widget for choosing related objects to a model where ManyToManyField is set. In other words, it requires adding referenced objects first. For our example, you could choose authors only when adding books, but not another way around.
After migrating the above models to the database, we get the following database schema:
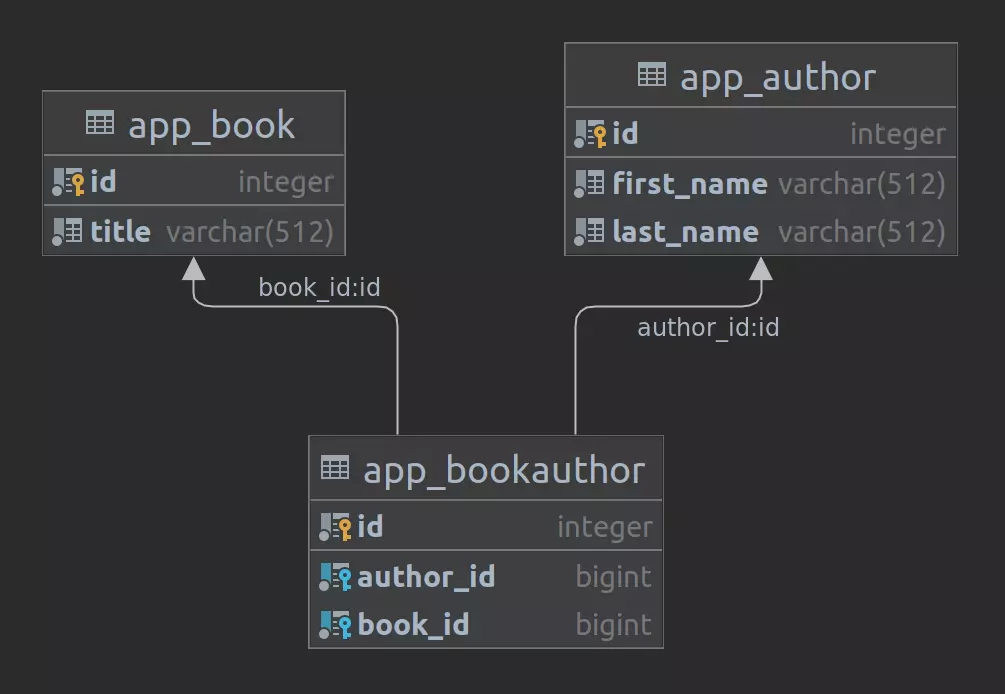
Our associate table contains book_id and author_id referencing objects from connected tables.
For example, let’s check out the book “The Talisman” written by Stephen King and Peter Straub.
>>> from app.models import Author, Book >>> a1 = Author(first_name="Stephen", last_name="King") >>> a2 = Author(first_name="Peter", last_name="Straub") >>> a1.save() >>> a2.save() >>> b1 = Book(title="The Talisman") >>> b1.save() # Can’t associate book with authors if it is not yet saved! >>> b1.authors.add(a1, a2)
Here we can see a few crucial steps. Firstly we create two authors, both of them have to be saved (if we don’t save it, ValueError appears because the object still doesn’t have id value). Then we create Book, Book also needs to be saved, or ValueError appears. Only then, we access the authors’ field using Django ORM and add both authors, affecting the book_authors table.
NOTE - Multiple many to many relations can be created using the ManyRelatedManager object and its add() method.
Our database looks like this:
| id | first_name | last_name |
| 1 | Stephen | King |
| 2 | Peter | Straub |
| id | title |
| 1 | The Talisman |
Last but not least, table that connects these two tables, book_authors table. Django by default names this table in format _ . Its columns are named _id by default.
app_book_author
| id | book_id | author_id |
| 1 | 1 | 1 |
| 2 | 1 | 2 |
Now we can see how data is connected. In this example, the first row represents Book with and Author with Row two represents Book with and Author with This way of saving resolves the problem of duplicate data in Book or Author tables.
ManyToManyField ORM
Django provides powerful tools to query models. That tool is called ORM (object-relational mapping). Django ORM is a tool used to write queries using Python instead of SQL. Python queries are eventually translated to SQL that then queries the database.
In the following examples I’ll show you some of the queries over ManyToManyField:
# We can use lookups on many to many field >>> Book.objects.filter(authors__id=1) ]> # This equals above example >>> Book.objects.filter(authors=1) ]> # Fetching all Authors connected to Book >>> Book.objects.get(id=1).authors.all() , ]> # Removing book_authors connections from b1 >>> b1.authors.clear() # Removing a1 from book_authors table connected to b1 >>> b1.authors.remove(a1)
Django Many To Many relationship using ForeignKey
Many To Many relationships and representative associative table consists of ForeignKeys, Django only made it easier to implement it with ManyToManyField. Implementing many to many relationship with ForeignKeys requires manual implementation, but it gives us more implementation possibilities such as adding more fields.
NOTE - ForeignKey is explained in the Complete guide to Django ForeignKey, and it’s recommended to understand its usage before continuing reading!
ForeignKey in Django represents one-to-many relationships, so how can we use it to make many-to-many relationships?
class Author(models.Model): first_name = models.CharField(max_length=512) last_name = models.CharField(max_length=512) class Book(models.Model): title = models.CharField(max_length=512) class BookAuthor(models.Model): author = models.ForeignKey(Author, on_delete=models.CASCADE) book = models.ForeignKey(Book, on_delete=models.CASCADE)
We had to define one more model in our models.py file. BookAuthor table in the database is automatically created when we define ManyToManyField.
Using ForeignKey implementation, we must manually define two ForeignKey fields, one connecting table to Author and one connecting table to Book. With these connections, we managed to recreate many-to-many relationship using ForeignKey.
Why use ForeignKey instead of ManyToManyField?
ForeignKey implementation of many-to-many relationship allows us to add extra fields into our model. For example, maybe we would need to keep track of the word count of every Author in the Book they wrote. This requires an additional field in the BookAuthor connection. With manual implementation, we would simply rewrite the BookAuthor model:
class BookAuthor(models.Model): author = models.ForeignKey(Author, on_delete=models.CASCADE) book = models.ForeignKey(Book, on_delete=models.CASCADE) word_count = models.IntegerField()
Summary
Many to Many relationships are industry standards and are widely used in relational databases. It’s necessary to master this concept to become a good web developer. Since Django helps us a lot, we need to know how to use these basic concepts to make suitable, functional web applications with the complex database schema.
I hope this article helped you! 🙂
How To Use Many-to-Many Database Relationships with Flask-SQLAlchemy
Flask is a lightweight Python web framework that provides useful tools and features for creating web applications in the Python Language. SQLAlchemy is an SQL toolkit that provides efficient and high-performing database access for relational databases. It provides ways to interact with several database engines such as SQLite, MySQL, and PostgreSQL. It gives you access to the database’s SQL functionalities. It also gives you an Object Relational Mapper (ORM), which allows you to make queries and handle data using Python objects and methods. Flask-SQLAlchemy is a Flask extension that makes using SQLAlchemy with Flask easier, providing you tools and methods to interact with your database in your Flask applications through SQLAlchemy.
A many-to-many database relationship is a relationship between two database tables where a record in each table can reference several records in the other table. For example, in a blog, a table for posts can have a many-to-many relationship with a table for storing authors. Each post can have many authors, and each author can write many posts. Therefore, there is a many-to-many relationship between posts and authors. For another example, in a social media application, each post may have many hashtags, and each hashtag may have many posts.
In this tutorial, you’ll modify an application built using Flask and Flask-SQLAlchemy by adding a many-to-many relationship to it. You’ll have a relationship between posts and tags, where each blog post can have several tags, and each tag can have multiple posts tagged with it.
Although you can follow this tutorial independently, it is also a continuation of the How to Use One-to-Many Database Relationships with Flask-SQLAlchemy tutorial, in which you build a multi-table database with a one-to-many relationship between posts and comments in a blogging application.
By the end of the tutorial, your application will have a new feature for adding tags to posts. Posts can be tagged with multiple tags, and each tag page will display all the posts tagged with it.
Prerequisites
- A local Python 3 programming environment. Follow the tutorial for your distribution in How To Install and Set Up a Local Programming Environment for Python 3 series. In this tutorial, we’ll call our project directory flask_app .
- An understanding of basic Flask concepts, such as routes, view functions, and templates. If you are not familiar with Flask, check out How To Create Your First Web Application Using Flask and Python and How To Use Templates in a Flask Application.
- An understanding of basic HTML concepts. You can review our How To Build a Website with HTML tutorial series for background knowledge.
- (Optional) In Step 1, you’ll clone the blogging application you’ll be working on in this tutorial. However, you can optionally work through the tutorial How to Use One-to-Many Database Relationships with Flask-SQLAlchemy. You can access the final code from this page.
Step 1 — Setting Up the Web Application
In this step, you’ll set up the blogging application to be ready for modification. You will also review the Flask-SQLAlchemy database models and the Flask routes to understand the structure of the application. If you followed the tutorial in the prerequisites section and still have the code and the virtual environment on your local machine, you can skip this step.
To demonstrate adding a many-to-many relationship to a Flask web application with Flask-SQLAlchemy, you will use the previous tutorial’s application code, which is a blogging system with the ability to add and display posts, comment on posts, and read and delete existing comments.
Clone the repository and rename it from flask-slqa-bloggy to flask_app with the following command:
Then create a new virtual environment: