- Installation on Windows
- Installation components
- Installing Python
- Source installation Dependencies
- Making Python available anywhere
- Double-click method
- Send-to method
- Kivy — Создание мобильных приложений на Python
- Принципы работы фреймворка Kivy Python
- Установка Kivy
- Kivy Basics
- Create an application
- Kivy App Life Cycle
- Running the application
- Customize the application
Installation on Windows
To install Kivy on Windows via pip , please follow the main installation guide .
Installation components
Following, are additional information linked to from some of the steps in the main installation guide , specific to Windows.
Installing Python
To install Python on Windows, download it from the main Python website and follow the installation steps. You can read about the individual installation options in the Python guide.
If you installed the Python launcher, you will be more easily able to install multiple Python versions side by side and select, which to run, at each invocation.
Source installation Dependencies
To install Kivy from source, please follow the installation guide until you reach the Kivy install step and then install the compiler below before continuing.
To install kivy from source, you need a compiler. On Windows, the Visual Studio Build Tools are required, and they are available for free. You can either:
- Download and install the complete Visual Studio IDE, which contains the build tools. This is the easiest approach and the IDE can be downloaded from here.
- The IDE is very big, so you can also download just the smaller build tools, which are used from the command line. The current download (2019) can be found on this page under “Tools for Visual Studio 2019”. More info about this topic can be found in the Kivy wiki.
Now that the compiler is installed, continue to install Kivy .
Making Python available anywhere
There are two methods for launching Python when double clicking on your *.py files.
Double-click method
If you only have one Python installed, and if you installed it using the default options, then *.py files are already associated with your Python. You can run them by double clicking them in the file manager, or by just executing their name in a console window (without having to prepend python ).
Alternatively, if they are not assigned, you can do it the following way:
- Right click on the Python file (.py file extension) in the file manager.
- From the context menu that appears, select Open With
- Browse your hard disk drive and find the python.exe file that you want to use (e.g. in the the virtual environment). Select it.
- Select “Always open the file with…” if you don’t want to repeat this procedure every time you double click a .py file.
- You are done. Open the file.
Send-to method
You can launch a .py file with Python using the Send to menu:
- Browse to the python.exe you want to use. Right click on it and copy it.
- Open Windows Explorer (the file explorer in Windows 8), and to go the address ‘shell:sendto’. You should get the special Windows directory SendTo .
- Paste the previously copied python.exe file as a shortcut.
- Rename it to python . E.g. python39 .
You can now execute your application by right clicking on the .py file -> “Send To” -> “python ”.
Kivy — Создание мобильных приложений на Python
В наши дни каждый разработчик может столкнуться с необходимостью работы над мобильным или веб-приложением на Python. В Python нет встроенных инструментов для мобильных устройств, тем не менее существуют пакеты, которые можно использовать для создания мобильных приложений. Это Kivy, PyQt и даже библиотека Toga от Beeware.
Библиотеки являются основными элементами мобильного мира Python. Однако, говоря о Kivy, нельзя игнорировать преимущества данного фреймворка при работе с мобильными приложениями. Внешний вид приложения автоматически подстраивается под все платформы, разработчику при этом не нужно компилировать код после каждой поправки. Кроме того, здесь для создания приложений можно использовать чистый синтаксис Python.
В руководстве будут разобраны следующие темы:
- Работа с виджетами Kivy;
- Планировка UI и лейауты;
- Добавление событий;
- Использование языка KV;
- Создание приложения-калькулятора;
- Упаковка приложения для iOS, Android, Windows и macOS.
Разбор данного руководства предполагает, что читатель знаком с объектно-ориентированным программированием. Для введения в курс дела можете просмотреть статью об Объектно-ориентированном программировании (ООП) в Python 3.
Принципы работы фреймворка Kivy Python
Kivy был создан в 2011 году. Данный кросс-платформенный фреймворк Python работает на Windows, Mac, Linux и Raspberry Pi. В дополнение к стандартному вводу через клавиатуру и мышь он поддерживает мультитач. Kivy даже поддерживает ускорение GPU своей графики, что во многом является следствием использования OpenGL ES2. У проекта есть лицензия MIT, поэтому библиотеку можно использовать бесплатно и вкупе с коммерческим программным обеспечением.
Во время разработки приложения через Kivy создается интуитивно понятный интерфейс (Natural user Interface), или NUI. Его главная идея в том, чтобы пользователь мог легко и быстро приспособиться к программному обеспечению без чтения инструкций.
Kivy не задействует нативные элементы управления, или виджеты. Все его виджеты настраиваются. Это значит, что приложения Kivy будут выглядеть одинаково на всех платформах. Тем не менее, это также предполагает, что внешний вид вашего приложения будет отличаться от нативных приложений пользователя. Это может стать как преимуществом, так и недостатком, все зависит от аудитории.
Установка Kivy
У Kivy есть множество зависимостей, поэтому лучше устанавливать его в виртуальную среду Python. Можно использовать встроенную библиотеку Python venv или же пакет virtualenv.
Виртуальная среда Python создается следующим образом:
Kivy Basics
Kivy depends on many libraries, such as SDL2, gstreamer, PIL, Cairo, and more. They are not all required, but depending on the platform you’re working on, they can be a pain to install. To ease your development process, we provide pre-packaged binaries for Windows, macOS and Linux.
Have a look at one of these pages for detailed installation instructions:
Alternatively, instructions for the development version can be found here:
Create an application
Creating a kivy application is as simple as:
- sub-classing the App class
- implementing its build() method so it returns a Widget instance (the root of your widget tree)
- instantiating this class, and calling its run() method.
Here is an example of a minimal application:
import kivy kivy.require('2.1.0') # replace with your current kivy version ! from kivy.app import App from kivy.uix.label import Label class MyApp(App): def build(self): return Label(text='Hello world') if __name__ == '__main__': MyApp().run()
You can save this to a text file, main.py for example, and run it.
Kivy App Life Cycle
First off, let’s get familiar with the Kivy app life cycle.
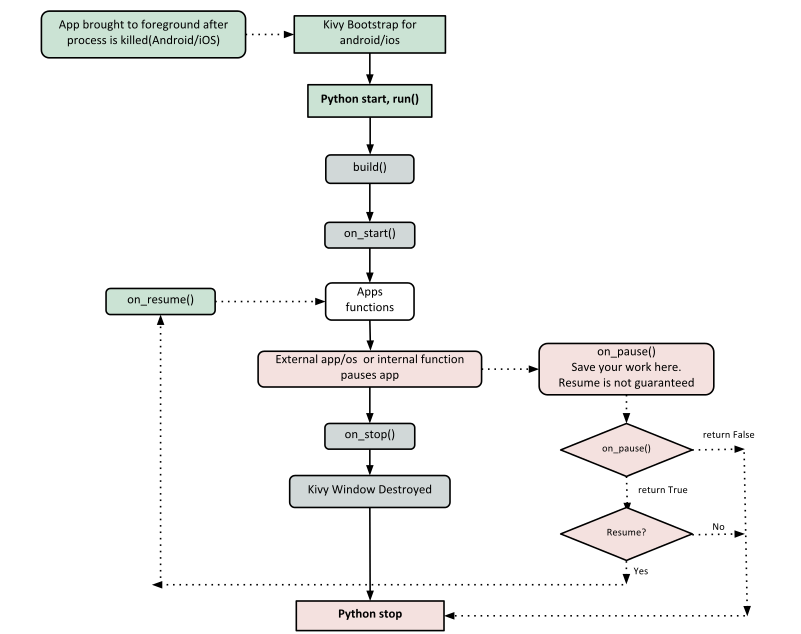
As you can see above, for all intents and purposes, our entry point into our App is the run() method, and in our case that is “MyApp().run()”. We will get back to this, but let’s start from the line:
It’s required that the base Class of your App inherits from the App class. It’s present in the kivy_installation_dir/kivy/app.py.
Go ahead and open up that file if you want to delve deeper into what the Kivy App class does. We encourage you to open the code and read through it. Kivy is based on Python and uses Sphinx for documentation, so the documentation for each class is in the actual file.
from kivy.uix.label import Label
One important thing to note here is the way packages/classes are laid out. The uix module is the section that holds the user interface elements like layouts and widgets.
This is where we are defining the Base Class of our Kivy App. You should only ever need to change the name of your app MyApp in this line.
As highlighted by the image above, show casing the Kivy App Life Cycle , this is the function where you should initialize and return your Root Widget . This is what we do on line 11:
return Label(text='Hello world')
Here we initialize a Label with text ‘Hello World’ and return its instance. This Label will be the Root Widget of this App.
Python uses indentation to denote code blocks, therefore take note that in the code provided above, at line 11 the class and function definition ends.
Now on to the portion that will make our app run at line 14 and 15:
if __name__ == '__main__': MyApp().run()
Here the class MyApp is initialized and its run() method called. This initializes and starts our Kivy application.
Running the application
To run the application, follow the instructions for your operating system:
For Windows, Linux, macOS, or the RPi. From the terminal where you installed Kivy simply run:
For Android or iOS, your application needs some complementary files to be able to run. See Create a package for Android or See Create a package for iOS for further reference.
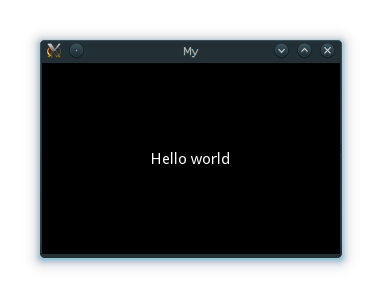
A window should open, showing a single Label (with the Text ‘Hello World’) that covers the entire window’s area. That’s all there is to it.
Customize the application
Lets extend this application a bit, say a simple UserName/Password page.
from kivy.app import App from kivy.uix.gridlayout import GridLayout from kivy.uix.label import Label from kivy.uix.textinput import TextInput class LoginScreen(GridLayout): def __init__(self, **kwargs): super(LoginScreen, self).__init__(**kwargs) self.cols = 2 self.add_widget(Label(text='User Name')) self.username = TextInput(multiline=False) self.add_widget(self.username) self.add_widget(Label(text='password')) self.password = TextInput(password=True, multiline=False) self.add_widget(self.password) class MyApp(App): def build(self): return LoginScreen() if __name__ == '__main__': MyApp().run()
At line 2 we import a Gridlayout :
from kivy.uix.gridlayout import GridLayout
This class is used as a Base for our Root Widget (LoginScreen) defined at line 7:
class LoginScreen(GridLayout):
At line 9 in the class LoginScreen, we override the method __init__() so as to add widgets and to define their behavior:
def __init__(self, **kwargs): super(LoginScreen, self).__init__(**kwargs)
One should not forget to call super in order to implement the functionality of the original class being overloaded. Also note that it is good practice not to omit the **kwargs while calling super, as they are sometimes used internally.
Moving on to Line 11 and beyond:
self.cols = 2 self.add_widget(Label(text='User Name')) self.username = TextInput(multiline=False) self.add_widget(self.username) self.add_widget(Label(text='password')) self.password = TextInput(password=True, multiline=False) self.add_widget(self.password)
We ask the GridLayout to manage its children in two columns and add a Label and a TextInput for the username and password.
Running the above code will give you a window that should look like this:
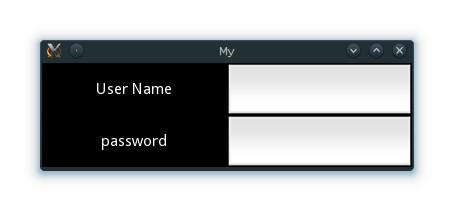
Try re-sizing the window and you will see that the widgets on screen adjust themselves according to the size of the window without you having to do anything. This is because widgets use size hinting by default.
The code above doesn’t handle the input from the user, does no validation or anything else. We will delve deeper into this and Widget size and positioning in the coming sections.