venv-update: quick, exact
venv-update is an MIT-Licensed tool to quickly and exactly synchronize a large python project’s virtualenv with its requirements.
This project ships as two separable components: pip-faster and venv-update .
Both are designed for use on large projects with hundreds of requirements and are used daily by Yelp engineers.
Why?
Generating a repeatable build of a virtualenv has many edge cases. If a requirement is removed, it should be uninstalled when the virtualenv is updated. If the version of python has changed, the only reliable solution is to re-build the virtualenv from scratch. Initially, this was exactly how we implemented updates of our virtualenv, but it slowed things down terribly. venv-update handles all of these edge cases and more, without completely starting from scratch (in the usual case).
In a large application, best practice is to “pin” versions, with requirements like package-x==1.2.3 in order to ensure that dev, staging, test, and production will all use the same code. Currently pip will always reach out to PyPI to list the versions of package-x regardless of whether the package is already installed, or whether its wheel can be found in the local cache. pip-faster adds these optimizations and others.
venv-update 
A small script designed to keep a virtualenv in sync with a changing list of requirements. The contract of venv-update is this:
The virtualenv state will be exactly the same as if you deleted and rebuilt it from scratch, but will get there in much less time.
The needs of venv-update are what drove the development of pip-faster. For more, see venv-update in detail .
pip-faster 
pip-faster is a drop-in replacement for pip. pip-faster ’s contract is:
This is especially true in the case of pinned requirements (e.g. package-x==1.2.3 ). If you’re also using venv-update (which we heartily recommend!), you can view pip-faster as an implementation detail. For more, see pip-faster in detail .
How much faster?
If we install plone (a large python application with more than 250 dependencies) we get these numbers:
| testcase | pip v8.0.2 | pip-faster | improvement |
|---|---|---|---|
| cold | 4m 39s | 4m 16s | 8% |
| noop | 7.11s | 2.40s | 196% |
| warm | 44.6s | 21.3s | 109% |
In the “cold” case, all caches are completely empty. In the “noop” case nothing needs to be done in order to update the virtualenv. In the “warm” case caches are fully populated, but the virtualenv has been completely deleted.
The Benchmarks page has more detail.
Installation
Because venv-update is meant to be the entry-point for creating your virtualenv directory and installing your packages, it’s not meant to be installed via pip; that would require a virtualenv to already exist!
Instead, the script is designed to be vendored (directly checked in) to your project. It has no dependencies other than virtualenv and the standard Python library.
Usage
By default, running venv-update will create a virtualenv named venv in the current directory, using requirements.txt in the current directory. This should be the desired default for most projects.
If you need more control, you can pass additional options to both virtualenv and pip . The command-line help gives more detail:
$ venv-update --help usage: venv-update [-hV] [options] Update a (possibly non-existent) virtualenv directory using a pip requirements file. When this script completes, the virtualenv directory should contain the same packages as if it were deleted then rebuilt. venv-update uses "trailing equal" options (e.g. venv=) to delimit groups of (conventional, dashed) options to pass to wrapped commands (virtualenv and pip). Options: venv= parameters are passed to virtualenv default: venv install= options to pip-command default: -r requirements.txt pip-command= is run after the virtualenv directory is bootstrapped default: pip-faster install --upgrade --prune bootstrap-deps= dependencies to install before pip-command= is run default: venv-update==3.1.1 Examples: # install requirements.txt to "venv" venv-update # install requirements.txt to "myenv" venv-update venv= myenv # install requirements.txt to "myenv" using Python 3.4 venv-update venv= -ppython3.4 myenv # install myreqs.txt to "venv" venv-update install= -r myreqs.txt # install requirements.txt to "venv", verbosely venv-update venv= venv -vvv install= -r requirements.txt -vvv # install requirements.txt to "venv", without pip-faster --update --prune venv-update pip-command= pip install We strongly recommend that you keep the default value of pip-command= in order to quickly and reproducibly install your requirements. You can override the packages installed during bootstrapping, prior to pip-command=, by setting bootstrap-deps= Pip options are also controllable via environment variables. See https://pip.readthedocs.org/en/stable/user_guide/#environment-variables For example: PIP_INDEX_URL=https://pypi.example.com/simple venv-update Please send issues to: https://github.com/yelp/venv-update
… in your Makefile 
venv-update is a good fit for use with make because it is idempotent and should never fail, under normal circumstances. Here’s an example Makefile:
venv: requirements.txt ./bin/venv-update .PHONY: run-some-script run-some-script: venv ./venv/bin/some-script
… with tox
tox is a useful tool for testing libraries against multiple versions of the Python interpreter. You can speed it up by telling it to use venv-update for dependency installation; not only will it avoid network access and prefer wheels, but it’s also better at syncing a virtualenv (whereas tox will often throw out an entire virtualenv and start over).
To start using venv-update inside tox, copy the venv-update script into your project (for example, at bin/venv-update ).
Then, apply a change like this to your tox.ini file:
[tox] envlist = py27,py34 + skipsdist = true [testenv] + venv_update = + /bin/venv-update \ + venv= \ + install= -r /requirements.txt - deps = -rrequirements.txt commands = + py.test tests/ pre-commit run --all-files
The exact changes will of course vary, but above is a general template. The two changes are: running venv-update as the first test command, and removing the list of deps (so that tox will never invalidate your virtualenv itself; we want to let venv-update manage that instead). The skipsdist avoids installing your package twice. In tox
Upgrade python in a virtualenv
If you happen to be using the venv module that comes with Python 3.3+, it supports an —upgrade option. Per the docs:
Upgrade the environment directory to use this version of Python, assuming Python has been upgraded in-place
python3 -m venv --upgrade ENV_DIR Did you see this? If I haven’t misunderstand that answer, you may try to create a new virtualenv on top of the old one. You just need to know which python is going to use your virtualenv (you will need to see your virtualenv version).
If your virtualenv is installed with the same python version of the old one and upgrading your virtualenv package is not an option, you may want to read this in order to install a virtualenv with the python version you want.
I’ve tested this approach (the one that create a new virtualenv on top of the old one) and it worked fine for me. I think you may have some problems if you change from python 2.6 to 2.7 or 2.7 to 3.x but if you just upgrade inside the same version (staying at 2.7 as you want) you shouldn’t have any problem, as all the packages are held in the same folders for both python versions (2.7.x and 2.7.y packages are inside your_env/lib/python2.7/).
If you change your virtualenv python version, you will need to install all your packages again for that version (or just link the packages you need into the new version packages folder, i.e: your_env/lib/python_newversion/site-packages)
Upgrade python version in visual studio code python workspace
In my earlier article, I have explained how to upgrade Python on macOS and setup Visual Studio Code project for Python development. Now we will see how to upgrade the already setup Python environment in VS Code workspace.
In my current Python workspace, the interpreter is pointing to a virtual environment with Python 3.7.4. To upgrade this to version 3.8.5, I’ve followed these steps.
Caution
When upgrading the python interpreter version in python workspace, you may encounter errors or warnings while running the project because of incompatible usage of methods or objects. So please review the release documents from python.org before upgrading and prepare an action plan to migrate the code to new version of Python.
Prerequisites
- VS Code should be setup to use Python.
- A Python virtual environment should be created for the VS Code workspace.
- Python should be upgraded on macOS to the desired version which you want to use in the VS Code workspace. Here in my case it’s 3.8.5.
Steps to upgrade Python in workspace
- Launch the Visual Studio Code python workspace.
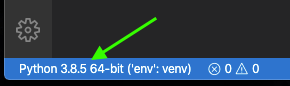
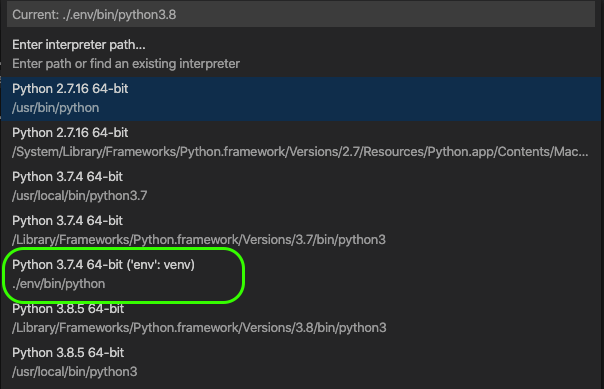
- Check the current python virtual environment version. You can check this by opening the Command Palette (by pressing Shift, Command and P keys) and select Python: Select Interpreter. This will show you the list of interpreters, both global and virtual. In my case Python 3.7.4 64-bit is the current virtual environment and 3.8.5 is listed as global environment.
- Go back to Command Palette and search and start Terminal: Create New Integrated Terminal. The terminal panel will open at the bottom.
- In the terminal run the below comment. In this comment python3.8 is important to upgrade the environment with Python 3.8.x. env is the existing name of the virtual environment.
python3.8 -m venv --upgrade env source env/bin/activate
- Restart VS Code and open the workspace.
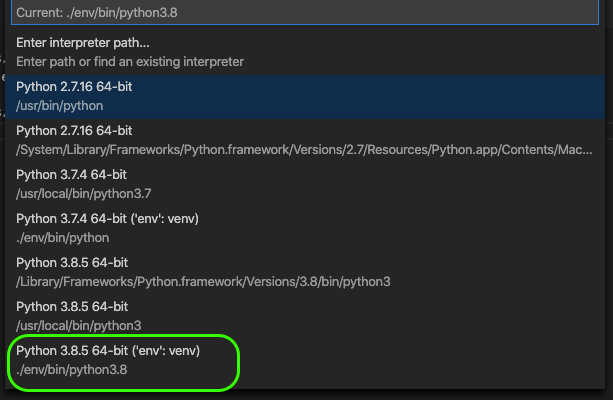
- Now go back to the Command Palette and type in and select Python: Select Interpreter again.
- You can see the newly upgraded version (3.8.5) of python virtual environment listed.

- Select the virtual environment Python 3.8.5 64-bit (‘env’: venv).
- From now on, the VS Code workspace will use the environment with the new version of Python.