- Installing NumPy
- Python and NumPy installation guide
- Recommendations
- Beginning users
- Advanced users
- Conda
- Alternative if you prefer pip/PyPI
- Python package management
- Pip & conda
- Reproducible installs
- NumPy packages & accelerated linear algebra libraries
- Troubleshooting
- How to Install NumPy
- Installing NumPy
- Step 1: Check Python Version
- Step 2: Install Pip
- Step 3: Install NumPy
- Step 4: Verify NumPy Installation
- Step 5: Import the NumPy Package
- Upgrading NumPy
Installing NumPy
The only prerequisite for installing NumPy is Python itself. If you don’t have Python yet and want the simplest way to get started, we recommend you use the Anaconda Distribution — it includes Python, NumPy, and many other commonly used packages for scientific computing and data science.
NumPy can be installed with conda , with pip , with a package manager on macOS and Linux, or from source. For more detailed instructions, consult our Python and NumPy installation guide below.
If you use conda , you can install NumPy from the defaults or conda-forge channels:
# Best practice, use an environment rather than install in the base env conda create -n my-env conda activate my-env # If you want to install from conda-forge conda config --env --add channels conda-forge # The actual install command conda install numpy If you use pip , you can install NumPy with:
Also when using pip, it’s good practice to use a virtual environment — see Reproducible Installs below for why, and this guide for details on using virtual environments.
Python and NumPy installation guide
Installing and managing packages in Python is complicated, there are a number of alternative solutions for most tasks. This guide tries to give the reader a sense of the best (or most popular) solutions, and give clear recommendations. It focuses on users of Python, NumPy, and the PyData (or numerical computing) stack on common operating systems and hardware.
Recommendations
We’ll start with recommendations based on the user’s experience level and operating system of interest. If you’re in between “beginning” and “advanced”, please go with “beginning” if you want to keep things simple, and with “advanced” if you want to work according to best practices that go a longer way in the future.
Beginning users
On all of Windows, macOS, and Linux:
- Install Anaconda (it installs all packages you need and all other tools mentioned below).
- For writing and executing code, use notebooks in JupyterLab for exploratory and interactive computing, and Spyder or Visual Studio Code for writing scripts and packages.
- Use Anaconda Navigator to manage your packages and start JupyterLab, Spyder, or Visual Studio Code.
Advanced users
Conda
- Install Miniforge.
- Keep the base conda environment minimal, and use one or more conda environments to install the package you need for the task or project you’re working on.
Alternative if you prefer pip/PyPI
For users who know, from personal preference or reading about the main differences between conda and pip below, they prefer a pip/PyPI-based solution, we recommend:
- Install Python from python.org, Homebrew, or your Linux package manager.
- Use Poetry as the most well-maintained tool that provides a dependency resolver and environment management capabilities in a similar fashion as conda does.
Python package management
Managing packages is a challenging problem, and, as a result, there are lots of tools. For web and general purpose Python development there’s a whole host of tools complementary with pip. For high-performance computing (HPC), Spack is worth considering. For most NumPy users though, conda and pip are the two most popular tools.
Pip & conda
The two main tools that install Python packages are pip and conda . Their functionality partially overlaps (e.g. both can install numpy ), however, they can also work together. We’ll discuss the major differences between pip and conda here — this is important to understand if you want to manage packages effectively.
The first difference is that conda is cross-language and it can install Python, while pip is installed for a particular Python on your system and installs other packages to that same Python install only. This also means conda can install non-Python libraries and tools you may need (e.g. compilers, CUDA, HDF5), while pip can’t.
The second difference is that pip installs from the Python Packaging Index (PyPI), while conda installs from its own channels (typically “defaults” or “conda-forge”). PyPI is the largest collection of packages by far, however, all popular packages are available for conda as well.
The third difference is that conda is an integrated solution for managing packages, dependencies and environments, while with pip you may need another tool (there are many!) for dealing with environments or complex dependencies.
Reproducible installs
As libraries get updated, results from running your code can change, or your code can break completely. It’s important to be able to reconstruct the set of packages and versions you’re using. Best practice is to:
- use a different environment per project you’re working on,
- record package names and versions using your package installer; each has its own metadata format for this:
- Conda: conda environments and environment.yml
- Pip: virtual environments and requirements.txt
- Poetry: virtual environments and pyproject.toml
NumPy packages & accelerated linear algebra libraries
NumPy doesn’t depend on any other Python packages, however, it does depend on an accelerated linear algebra library — typically Intel MKL or OpenBLAS. Users don’t have to worry about installing those (they’re automatically included in all NumPy install methods). Power users may still want to know the details, because the used BLAS can affect performance, behavior and size on disk:
- The NumPy wheels on PyPI, which is what pip installs, are built with OpenBLAS. The OpenBLAS libraries are included in the wheel. This makes the wheel larger, and if a user installs (for example) SciPy as well, they will now have two copies of OpenBLAS on disk.
- In the conda defaults channel, NumPy is built against Intel MKL. MKL is a separate package that will be installed in the users’ environment when they install NumPy.
- In the conda-forge channel, NumPy is built against a dummy “BLAS” package. When a user installs NumPy from conda-forge, that BLAS package then gets installed together with the actual library — this defaults to OpenBLAS, but it can also be MKL (from the defaults channel), or even BLIS or reference BLAS.
- The MKL package is a lot larger than OpenBLAS, it’s about 700 MB on disk while OpenBLAS is about 30 MB.
- MKL is typically a little faster and more robust than OpenBLAS.
Besides install sizes, performance and robustness, there are two more things to consider:
- Intel MKL is not open source. For normal use this is not a problem, but if a user needs to redistribute an application built with NumPy, this could be an issue.
- Both MKL and OpenBLAS will use multi-threading for function calls like np.dot , with the number of threads being determined by both a build-time option and an environment variable. Often all CPU cores will be used. This is sometimes unexpected for users; NumPy itself doesn’t auto-parallelize any function calls. It typically yields better performance, but can also be harmful — for example when using another level of parallelization with Dask, scikit-learn or multiprocessing.
Troubleshooting
If your installation fails with the message below, see Troubleshooting ImportError.
IMPORTANT: PLEASE READ THIS FOR ADVICE ON HOW TO SOLVE THIS ISSUE! Importing the numpy c-extensions failed. This error can happen for different reasons, often due to issues with your setup. How to Install NumPy
NumPy (Numerical Python) is an open-source library for the Python programming language. It is used for scientific computing and working with arrays.
Apart from its multidimensional array object, it also provides high-level functioning tools for working with arrays.
In this tutorial, you will learn how to install NumPy.
Prerequisites
- Access to a terminal window/commandline
- A user account with sudo privileges
- Python installed on your system
Installing NumPy
You can follow the steps outlined below and use the commands on most Linux, Mac, or Windows systems. Any irregularities in commands are noted along with instructions on how to modify them to your needs.
Step 1: Check Python Version
Before you can install NumPy, you need to know which Python version you have. This programming language comes preinstalled on most operating systems (except Windows; you will need to install Python on Windows manually).
Most likely, you have Python 2 or Python 3 installed, or even both versions.
To check whether you have Python 2, run the command:
The output should give you a version number.
To see if you have Python 3 on your system, enter the following in the terminal window:
In the example below, you can see both versions of Python are present.

If these commands do not work on your system, take a look at this article on How To Check Python Version In Linux, Mac, & Windows.
Note: If you need help installing a newer version of Python, refer to one of our installation guides – How to Install Python on CentOS 8, How to Install Python 3.7 on Ubuntu, or How to Install Python 3 on Windows.
Step 2: Install Pip
The easiest way to install NumPy is by using Pip. Pip a package manager for installing and managing Python software packages.
Unlike Python, Pip does not come preinstalled on most operating systems. Therefore, you need to set up the package manager that corresponds to the version of Python you have. If you have both versions of Python, install both Pip versions as well.
The commands below use the apt utility as we are installing on Ubuntu for the purposes of this article.
Install Pip (for Python 2) by running:
sudo apt install python-pipIf you need Pip for Python 3, use the command:
sudo apt install python3-pipImportant: Depending on the operating system you are using, follow the instructions in one of our Pip installation guides:
Finally, verify you have successfully installed Pip by typing pip -V and/or pip3 -V in the terminal window.

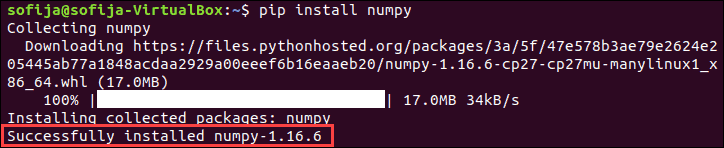
Step 3: Install NumPy
With Pip set up, you can use its command line for installing NumPy.
Install NumPy with Python 2 by typing:
Pip downloads the NumPy package and notifies you it has been successfully installed.
To install NumPy with the package manager for Python 3, run:
As this is a newer version of Python, the Numpy version also differs as you can see in the image below.
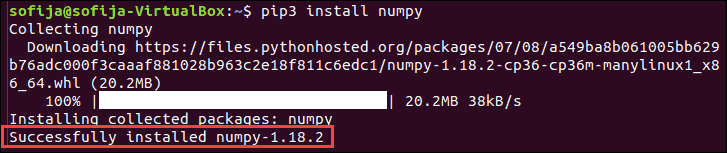
Note: The commands are the same for all operating systems except for Fedora. If you are working on this OS, the command to install NumPy with Python 3 is: python3 -m pip install numpy .
Step 4: Verify NumPy Installation
Use the show command to verify whether NumPy is now part of you Python packages:
The output should confirm you have NumPy, which version you are using, as well as where the package is stored.
Step 5: Import the NumPy Package
After installing NumPy you can import the package and set an alias for it.
To do so, move to the python prompt by typing one of the following commands:
Once you are in the python or python3 prompt you can import the new package and add an alias for it (in the example below it is np ):
Upgrading NumPy
If you already have NumPy and want to upgrade to the latest version, for Pip2 use the command:
pip install --upgrade numpyIf using Pip3, run the following command:
pip3 install --upgrade numpyBy following this guide, you should have successfully installed NumPy on your system.
Check out our introduction tutorial on Python Pandas, an open-source Python library primarily used for data analysis, which is built on top of the NumPy package and is compatible with a wide array of existing modules. The collection of tools in the Pandas package is an essential resource for preparing, transforming, and aggregating data in Python.
For more Python package tutorials, check out our other KB articles such as Best Python IDEs and more!