- Pip Freeze > Requirements.txt: A Beginner’s Guide
- Understanding Pip Freeze 🥶
- What is pip freeze ?
- How to use it? 🔨
- Advantages of using pip freeze ➕
- Understanding requirements.txt file 💡
- What is requirements.txt ?
- How to create one? 🔧
- Advantages of using Requirements.txt
- How to Use Pip Freeze > Requirements.txt 🛠️
- Explanation of the command
- Why use Pip Freeze > Requirements.txt 🤔
- Advantages of using Pip Freeze > Requirements.txt
- Common Mistakes to Avoid
- Errors to avoid
- Tips and tricks to prevent errors
- Conclusion
- FAQs
- pip freeze requirements txt
- Глобальная и локальная установка пакетов через pip
- Перенос сайта на Django на другой сервер с pip freeze и requirements.txt
- Что может потрбоваться дополнительно именно для Django
- pip freeze#
- Options#
- Examples#
- Fixing “Permission denied:” errors#
- pip freeze#
- Options#
- Examples#
- Fixing “Permission denied:” errors#
Pip Freeze > Requirements.txt: A Beginner’s Guide
Python is a popular programming language used in a variety of industries, from web development to data science. When working on a Python project, it’s important to ensure that all team members have the same versions of all the required packages installed. This is where Pip Freeze and Requirements.txt come in.
In this article, we’ll explore what Pip Freeze and Requirements.txt are, how to use them effectively, and common mistakes to avoid.
Understanding Pip Freeze 🥶
What is pip freeze ?
Pip Freeze is a command used in Python to freeze the current state of a virtual environment. This command creates a list of all the installed packages in the virtual environment, along with their versions. This list can be used later to recreate the same virtual environment on another machine.
How to use it? 🔨
Using Pip Freeze is very simple. Open a command prompt and activate your virtual environment. Then, enter the command pip freeze . This will list all the packages installed in the virtual environment along with their version numbers.
Advantages of using pip freeze ➕
Using Pip Freeze has several advantages. Firstly, it allows you to recreate the same virtual environment on another machine easily. Secondly, it ensures that everyone working on the project has the same versions of all the packages installed. This helps prevent compatibility issues and makes collaboration easier.
Understanding requirements.txt file 💡
What is requirements.txt ?
requirements.txt is a file that lists all the packages required for a project. It is used to specify which packages should be installed in a virtual environment to run the project. Each line in the file specifies a package and its version number.
How to create one? 🔧
To create a requirements.txt file, simply open a text editor and create a new file. For each package required for the project, add a new line to the file with the package name and version number, separated by an equal sign. For example, requests==2.25.1 .
Advantages of using Requirements.txt
Using Requirements.txt has several advantages. Firstly, it ensures that everyone working on the project has the same versions of all the packages installed. Secondly, it allows you to easily install all the required packages in a new virtual environment. Lastly, it makes it easier to deploy the project to a production environment.
How to Use Pip Freeze > Requirements.txt 🛠️
Explanation of the command
pip freeze > requirements.txt command combines the functionality of Pip Freeze and Requirements.txt into one command.
Why use Pip Freeze > Requirements.txt 🤔
Using Pip Freeze > Requirements.txt has several advantages. Firstly, it ensures that everyone working on the project has the same versions of all the packages installed.
Secondly, it allows you to easily install all the required packages in a new virtual environment.
Lastly, it makes it easier to deploy the project to a production environment.
Advantages of using Pip Freeze > Requirements.txt
Using Pip Freeze > Requirements.txt together has several advantages as opposed to using them separately. Firstly, it is faster and more convenient than creating a Requirements.txt file manually. Secondly, it ensures that the Requirements.txt file is up-to-date with the current state of the virtual environment. Lastly, it prevents human error and ensures accuracy by automating the process of creating a Requirements.txt file.
Common Mistakes to Avoid
Errors to avoid
There are several common mistakes to avoid when using Pip Freeze and Requirements.txt. One common mistake is forgetting to activate the virtual environment before using Pip Freeze. Another mistake is forgetting to update the Requirements.txt file when new packages are installed.
Tips and tricks to prevent errors
To prevent errors, always activate the virtual environment before using Pip Freeze. Additionally, use a text editor with syntax highlighting to create the Requirements.txt file to avoid syntax errors. Lastly, use version control software to track changes to the Requirements.txt file and prevent version conflicts.
Conclusion
In conclusion, Pip Freeze and Requirements.txt are powerful tools in Python development. Using them effectively can help prevent compatibility issues, make collaboration easier, and streamline the deployment process.
FAQs
- What is the difference between Pip Freeze and Requirements.txt?
- Pip Freeze lists all the installed packages in a virtual environment along with their version numbers. Requirements.txt lists all the required packages for a project along with their version numbers.
- How do I create a Requirements.txt file?
- Open a text editor and create a new file. For each package required for the project, add a new line to the file with the package name and version number, separated by an equal sign.
- How do I use Pip Freeze > Requirements.txt?
- Activate your virtual environment and enter the command pip freeze > requirements.txt .
- Why should I use Pip Freeze > Requirements.txt?
- Using Pip Freeze > Requirements.txt automates the process of creating a Requirements.txt file and ensures accuracy.
- What are some common mistakes to avoid when using Pip Freeze and Requirements.txt?
- Forgetting to activate the virtual environment before using Pip Freeze and forgetting to update the Requirements.txt file when new packages are installed are common mistakes to avoid.
pip freeze requirements txt
pip freeze requirements.txt — команда, которая позволяет создать текстовый документ, в котором перечислены все установленные и необходимые для работы Python приложения программные пакеты.
Самый распространенный веб-фреймворк на Python — Django, requirements.txt всегда используется при запуске Django на сервере.
Список всех пакетов можно посмотреть выполнив pip freeze — стандартный вывод производится на экран. Обычно эту информацию сохраняют в файл.
Файл оставляется в корне приложения, он оказывается нужен если проект переносится на другой сервер.
Глобальная и локальная установка пакетов через pip
Если команду выполнить авторизовавшись на сервере по ssh она выдаст список модулей установленных с помощью pip в систему глобально.
Приложения обычно запускаются в своём виртуальном окружении и со своим набором модулей. Если используется виртуальное окружение, то прежде всего нужно его активировать.
Когда имя виртуального окружения неизвестно — его можно попробовать найти выполнив в каталоге приложения find . -name activate. activate это бинарный файл активирующий окружение. Имя самого окружения будет на два уровня выше в иерархии каталогов чем файл activate.
Пример приведен на скриншоте:
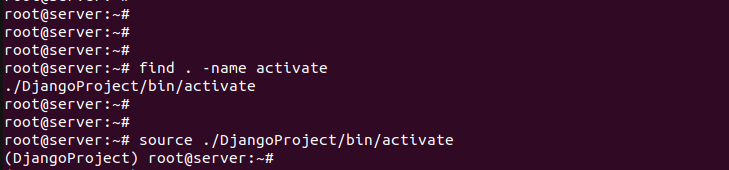
Здесь окружение называется DjangoProject, оно найдено с помощью find. Затем активировано через source. После активации работа с модулями python выполняется не глобально, а в виртуальном окружении.
На скриншоте ниже представлен пример установки модуля Django в вирутальное окружение DjangoProject.
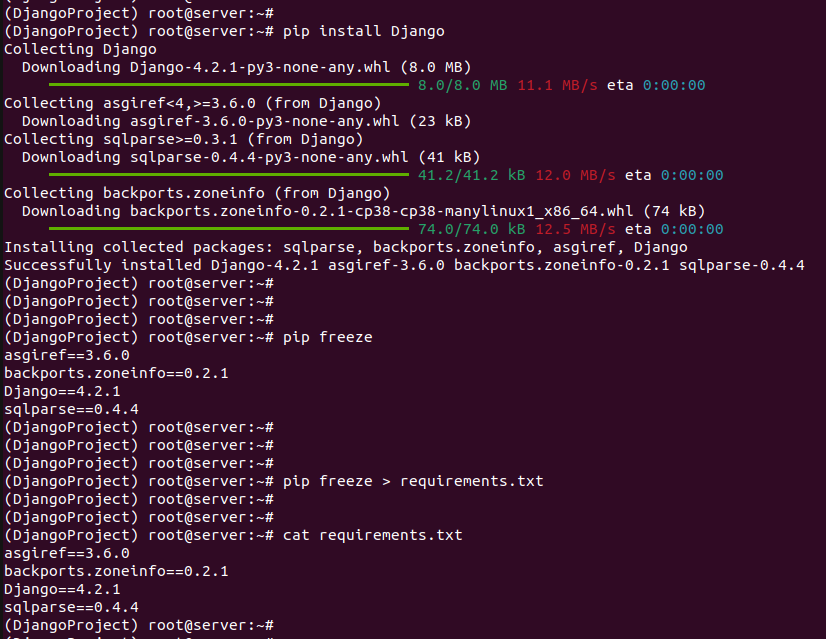
Через pip freeze выведен список установленных модулей (три из них поставились по зависимостям). Потом вывод сохранен в файл с именем requirements.txt.
Установка модулей из файла в чистое окружение выполняется командой pip install -r requirements.txt
Далее рассмотрим самую распространенную ситуацию при которой может потребоваться pip freeze и requirements.txt — перенос сайта на Django на другой сервер.
Перенос сайта на Django на другой сервер с pip freeze и requirements.txt
На сервере, с которого осуществляется перенос, выполняем следующую команду указывая путь к файлу, в котором будет сохранена информация которая потребуется для корректной работы проекта
Если используется виртуальное окружение — команду нужно выполнять в нем.
Виртуальное окружение для любого проекта можно активировать выполнив source /project-folder/bin/activate
Затем копируются файлы приложения и requirements.txt. При необходимости на новом сервере создается виртуальное окружение. На новом сервере должна быть такая же версия Python и желательно такой же дистрибутив Linux.
Создаются такие же каталоги, виртуальное окружение, настраивается веб-сервер. Примеры настройки веб-сервера можно посомтреть в материалах по ссылкам в конце статьи.
Установка всех пакетов по списку в новое окружение на новом сервере производится при выполнении
Внесение изменений в requirements.txt вручную является не самой лучшей практикой.
Автоматическая установка пакетов из этого файла в большинстве случаев окажется невозможна.
Что может потрбоваться дополнительно именно для Django
Часто после переноса проект запускается, статическое содержимое (изображения, стили) при этом не отдается
Чтобы решить этот вопрос нужно выполнить команду
Она позволяет собрать статику в STATIC_ROOT.
При этом если существуют файлы с одинаковым именем обработан будет только один из них (какой файл использует сайт можно выяснить при помощи findstatic — используется:
В выводе будут все файлы изображений, CSS стилей и т.п.; также команду можно запускать с ключом —first .
В этом случае в вывод попадет только первое вхождение, далее поиск прекратится.
В dev режиме проект запускается с указанием файла django-admin.py и имени проекта
python django-admin.py startproject projectname
Для запуска в рабочем режиме обычно используется gunicorn или uwcgi в качестве сервера приложений и Nginx в качестве веб-сервера.
Читайте про запуск проекта на Python с помощью gunicorn и про деплой Flask с uwsgi
pip freeze#
Output installed packages in requirements format. packages are listed in a case-insensitive sorted order.
Options#
-r , —requirement
Examples#
$ python -m pip freeze docutils==0.11 Jinja2==2.7.2 MarkupSafe==0.19 Pygments==1.6 Sphinx==1.2.2
C:\> py -m pip freeze docutils==0.11 Jinja2==2.7.2 MarkupSafe==0.19 Pygments==1.6 Sphinx==1.2.2
env1/bin/python -m pip freeze > requirements.txt env2/bin/python -m pip install -r requirements.txt
env1\bin\python -m pip freeze > requirements.txt env2\bin\python -m pip install -r requirements.txt
Fixing “Permission denied:” errors#
The purpose of this section of documentation is to provide practical suggestions to users seeing a “Permission denied” error on pip freeze .
This error occurs, for instance, when the command is installed only for another user, and the current user doesn’t have the permission to execute the other user’s command.
To solve that issue, you can try one of the following:
- Install the command for yourself (e.g. in your home directory).
- Ask the system admin to allow this command for all users.
- Check and correct the PATH variable of your own environment.
- Check the ACL (Access-Control List) for this command.