- Создание бота на основе discord.py. Часть 1
- В данной части
- Создание сервера
- Включаем режим разработчика
- Получение токена
- Добавление бота на сервер
- Установка библиотеки
- Первые строчки кода
- Заключение
- Welcome to discord.py
- Getting started
- Getting help
- Extensions
- Manuals
- Meta
- Introduction
- Prerequisites
- Installing
- Virtual Environments
- Basic Concepts
- Quickstart
- A Minimal Bot
Создание бота на основе discord.py. Часть 1
Это первая статья про создание бота для Discord. В конце статьи находятся ссылки на следующие части, со временем они будут дополняться. Статьи следуют друг за другом, без каких-либо «информационных дыр». Если нашли опечатку или неточность, отпишите о проблеме в комментариях или в личных сообщениях, максимально оперативно всё поправим! А теперь переходим непосредственно к созданию бота.
В данной части
- Создание тестового сервера
- Включение режима разработчика
- Создание приложения и получение токена
- Добавление бота на сервер
- Установка библиотеки discord.py
- Первые строчки кода
Создание сервера
Гайд будет максимально подробный, поэтому и начинать будем с создания тестового сервера. Зачем он нужен? Лишь для вашего удобства и безопасности, если у вас уже есть большой сервер, тем более не стоит сразу добавлять на него разрабатываемого бота. Никто не защищён от багов и дыр в безопасности.

- Заходим в дискорд
- Слева видим список серверов, листаем в самый низ до кнопки «Создать сервер«.
- Создаём сервер по любому из предложенных шаблонов.
Включаем режим разработчика
Это необязательно, но очень желательно. В режиме разработчика появляются некоторые полезные элементы для удобства разработки, например, в меню пользователя появляется пункт, который позволяет скопировать его ID.

Чтобы включить этот режим, заходим в настройки.

В категории «Настройки приложения» ищем «Расширенные«.

И включаем режим разработчика.

Получение токена
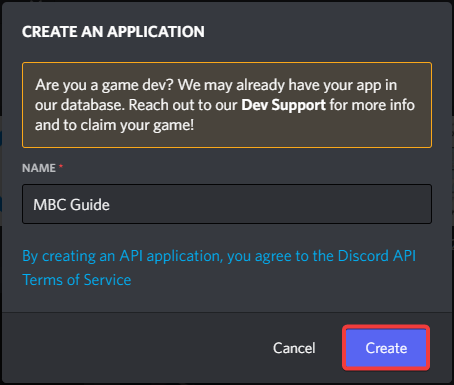
Для начала нам нужно зайти на страницу создание приложений и нажать New Application.

После этого вам предложат назвать ваше приложение (Потом можно будет изменить).
После создания, попадаем на страницу настройки приложения. В меню выбираем «Bot«.

На данной странице нажимаем на «Add Bot«. Скопируем токен и сохраним его.

Так же, сразу можно выдать дополнительные разрешения боту, чтобы потом об этом не задумываться.

Добавление бота на сервер
В меню ищем пункт OAuth2 –> URL Generator.

В поле SCOPES выбираем bot и applications.commands. В появившемся ниже поле выбираем Administrator, это более удобно для тестирования. Но когда бот будет работать в продакшене, лучше выставлять только те права, которые правда нужны, потому что никто не защищён от потери токена, а с правами администратора это может стать очень большой проблемой.

Копируем появившеюся ниже ссылку и вставляем в адресную строку браузера. Если у вас не выполнен вход в браузере, его необходимо произвести. После чего выбираем тестовый сервер из списка и нажимаем «Продолжить» и далее «Авторизовать«.

Ура! Наш бот на тестовом сервере!

Установка библиотеки
Для начала нужно установить python, данный этап не расписан, но желательно установить версию 3.10 (Последняя версия на момент написания 3.10.5). Если у вас Windows, для проверки можете использовать следующую команду
В ответ получите версию вашего python. Устанавливать будем не стабильную, а разрабатываемую версию, для этого пропишем следующую команду. (Это можно делать уже внутри проекта). Хотя некоторые IDE устанавливаю git вместе с собой, можете скачать его отдельно.
py -m pip install git+https://github.com/rapptz/discord.pyЕсли всё же хотите установить стабильную, релизную версию, пропишите следующую команду.
py -3 -m pip install -U discord.py py -3 -m pip install -U discord.py[voice]Подробнее про установку библиотеки и саму библиотеку можно прочитать тут.
Первые строчки кода
Пришло время писать код! Программирование в статьях будет происходить в PyCharm, хоть это и довольно тяжёлая IDEA, она удобная и бесплатная для студентов.
Не советую создавать проект через внутренний интерфейс, может появиться множество ненужных папок и файлов, вместо этого создадим папку проекта вручную и откроем как пустой проект.
Для этого заходим в PyCharm, далее File –> Open.

P.s. Не обращайте внимания на другую тему IDE.
В появившемся окне ищем созданную папку, выбираем её и нажимаем «Ok«. Обратите внимание на то, что нужно просто нажать по папке, а не проваливаться в неё.

Если PyCharm автоматически не создал main.py, создайте его вручную.
Вставляем код ниже и запускаем.
import discord # Подключаем библиотеку from discord.ext import commands intents = discord.Intents.default() # Подключаем "Разрешения" intents.message_content = True # Задаём префикс и интенты bot = commands.Bot(command_prefix='>', intents=intents) # С помощью декоратора создаём первую команду @bot.command() async def ping(ctx): await ctx.send('pong') bot.run('token') 
В консоли вы увидите логи запуска бота. Они могут быть красными, не бойтесь, сначала прочитайте сами сообщения, они скорее, всего просто информационные.

Идём в дискорд и используем нашу первую команду.

Немного объясним данную структуру. Поскольку это обычная команда, вся информация хранится в ctx(Переменная одноимённого класса). Она имеет следующие поля:
['args', 'author', 'bot', 'channel', 'cog', 'command', 'command_failed', 'guild', 'invoked_parents', 'invoked_subcommand', 'invoked_with', 'kwargs', 'me', 'message', 'prefix', 'subcommand_passed', 'valid', 'voice_client']['fetch_message', 'history', 'invoke', 'pins', 'reinvoke', 'reply', 'send', 'send_help', 'trigger_typing', 'typing']Если вы знакомы с синтаксисом языка, то данный список можно получить с помощью встроенной функции dir.
На более правильно прочитать документацию про Context.
Заключение
Сразу отвечу всем комментаторам. Да — подобных статей море, в том числе есть официальная документация. Но поскольку в моих планах есть создать серию статей, я хотел бы, что бы в них было описано всё, начиная с самых азов.
И небольшое примечание. Статьи строятся на основании того, что у вас есть опыт и знания программирования на python.
Welcome to discord.py
discord.py is a modern, easy to use, feature-rich, and async ready API wrapper for Discord.
- Modern Pythonic API using async / await syntax
- Sane rate limit handling that prevents 429s
- Command extension to aid with bot creation
- Easy to use with an object oriented design
- Optimised for both speed and memory
Getting started
Is this your first time using the library? This is the place to get started!
- First steps:Introduction | Quickstart | Setting Up Logging
- Working with Discord:Creating a Bot Account | A Primer to Gateway Intents
- Examples: Many examples are available in the repository.
Getting help
If you’re having trouble with something, these resources might help.
- Try the Frequently Asked Questions first, it’s got answers to all common questions.
- Ask us and hang out with us in our Discord server.
- If you’re looking for something specific, try the index or searching .
- Report bugs in the issue tracker.
- Ask in our GitHub discussions page.
Extensions
These extensions help you during development when it comes to common tasks.
Manuals
These pages go into great detail about everything the API can do.
Meta
If you’re looking for something related to the project itself, it’s here.
Introduction
This is the documentation for discord.py, a library for Python to aid in creating applications that utilise the Discord API.
Prerequisites
discord.py works with Python 3.8 or higher. Support for earlier versions of Python is not provided. Python 2.7 or lower is not supported. Python 3.7 or lower is not supported.
Installing
You can get the library directly from PyPI:
python3 -m pip install -U discord.py
If you are using Windows, then the following should be used instead:
py -3 -m pip install -U discord.py
To get voice support, you should use discord.py[voice] instead of discord.py , e.g.
python3 -m pip install -U discord.py[voice]
On Linux environments, installing voice requires getting the following dependencies:
For a Debian-based system, the following command will get these dependencies:
$ apt install libffi-dev libnacl-dev python3-dev
Remember to check your permissions!
Virtual Environments
Sometimes you want to keep libraries from polluting system installs or use a different version of libraries than the ones installed on the system. You might also not have permissions to install libraries system-wide. For this purpose, the standard library as of Python 3.3 comes with a concept called “Virtual Environment”s to help maintain these separate versions.
A more in-depth tutorial is found on Virtual Environments and Packages .
However, for the quick and dirty:
- Go to your project’s working directory:
$ cd your-bot-source $ python3 -m venv bot-env Congratulations. You now have a virtual environment all set up.
Scripts executed with py -3 will ignore any currently active virtual environment, as the -3 specifies a global scope.
Basic Concepts
discord.py revolves around the concept of events . An event is something you listen to and then respond to. For example, when a message happens, you will receive an event about it that you can respond to.
A quick example to showcase how events work:
# This example requires the 'message_content' intent. import discord class MyClient(discord.Client): async def on_ready(self): print(f'Logged on as self.user>!') async def on_message(self, message): print(f'Message from message.author>: message.content>') intents = discord.Intents.default() intents.message_content = True client = MyClient(intents=intents) client.run('my token goes here')
Quickstart
This page gives a brief introduction to the library. It assumes you have the library installed, if you don’t check the Installing portion.
A Minimal Bot
Let’s make a bot that responds to a specific message and walk you through it.
It looks something like this:
# This example requires the 'message_content' intent. import discord intents = discord.Intents.default() intents.message_content = True client = discord.Client(intents=intents) @client.event async def on_ready(): print(f'We have logged in as client.user>') @client.event async def on_message(message): if message.author == client.user: return if message.content.startswith('$hello'): await message.channel.send('Hello!') client.run('your token here')
Let’s name this file example_bot.py . Make sure not to name it discord.py as that’ll conflict with the library.
There’s a lot going on here, so let’s walk you through it step by step.
- The first line just imports the library, if this raises a ModuleNotFoundError or ImportError then head on over to Installing section to properly install.
- Next, we create an instance of a Client . This client is our connection to Discord.
- We then use the Client.event() decorator to register an event. This library has many events. Since this library is asynchronous, we do things in a “callback” style manner. A callback is essentially a function that is called when something happens. In our case, the on_ready() event is called when the bot has finished logging in and setting things up and the on_message() event is called when the bot has received a message.
- Since the on_message() event triggers for every message received, we have to make sure that we ignore messages from ourselves. We do this by checking if the Message.author is the same as the Client.user .
- Afterwards, we check if the Message.content starts with ‘$hello’ . If it does, then we send a message in the channel it was used in with ‘Hello!’ . This is a basic way of handling commands, which can be later automated with the discord.ext.commands – Bot commands framework framework.
- Finally, we run the bot with our login token. If you need help getting your token or creating a bot, look in the Creating a Bot Account section.
Now that we’ve made a bot, we have to run the bot. Luckily, this is simple since this is just a Python script, we can run it directly.
Now you can try playing around with your basic bot.
© Copyright 2015-present, Rapptz. Created using Sphinx 4.4.0.