- Python OpenCV: Drawing circles
- Introduction
- The code
- Testing the code
- Python cv2 draw circle
- Drawing Line
- Drawing Rectangle
- Drawing Circle
- Drawing Ellipse
- Drawing Polygon
- Adding Text to Images:
- Result
- Additional Resources
- Exercises
- Quick Guide for Drawing Circle in OpenCV Python using cv2.circle() with Examples
- Circle in OpenCV Python : cv2.circle()
- Syntax
- Examples of cv2.circle() in Python OpenCV
- Import Required Libraries
- Utility Function to Create Empty Image
- Example – 1: Draw Simple Circle with cv2.circle()
- Example – 2: Draw Filled Circle with cv2.circle()
- Example – 3 : Draw Circle on Image with cv2.circle()
- Conclusion
Python OpenCV: Drawing circles
In this tutorial, we will check how to draw circles in an image with OpenCV and Python.
Introduction
In this tutorial, we will check how to draw circles in an image with OpenCV and Python.
One common task when using OpenCV is detecting regions of interest with some computer algorithm vision. So, it makes sense for the programmer to be able to highlight those regions of interest in some way.
Thus, OpenCV offers a decent amount of drawing functions, which we can leverage to draw forms in images. So, as already mentioned, in this tutorial we will check how to draw circles in images.
One important thing to highlight is that when drawing in the image the coordinates referential works as shown in figure 1. The origin is at the top left corner of the image and we specify the x coordinate from left to right and the y coordinate from the top to the bottom. Also, the coordinates are specified in pixels.

Figure 1 – Referential when drawing in OpenCV.
This tutorial was tested on version 3.2.0 of OpenCV.
The code
As usual, we start by importing the cv2 module, so we have access to all the OpenCV functionalities we will need.
Then, we need to read the image in which we want to draw some circles. To do it, we simple need to use the imread function, passing as input the path of the image in the file system.
image = cv2.imread('C:/Users/N/Desktop/Test.jpg') Now, to draw a circle on the image, we simply need to call the circle function of the cv2 module. Note that this function will not return a new image but rather draw the circle on the image we will pass as input.
But, as long as we don’t save this edited image, the circle will be drawn in the image we have in memory and not in the original file we have read, so these functions can be used safely.
As first input, the circle function receives the image on which we want to draw the circle. As second, it receives a tuple with the x and y coordinates of the center of the circle.
As third argument, we need to pass the radius of the circle and as fourth, we need to specify another tuple with the color of the circle, in BGR (Blue, Green and Red) format.
These are the mandatory parameters we need to pass in order to draw the circle, but there are some optional ones that assume default values if not specified.
So, we will first draw a green circle at coordinates x = 100 and y = 0, and with a radius of 25 pixels.
cv2.circle(image,(100, 0), 25, (0,255,0))
Next, we will draw a circle at coordinates x= 0 and y = 100, also with a radius of 25 pixels. Its color will be red.
cv2.circle(image,(0, 100), 25, (0,0,255))
Note that in the previous calls, we did not specified what will be the thickness of the circle outline. But this value is actually one of the optional parameters we can pass to the circle function, which defaults to 1 pixel. So, the previous two circles will have a thickness of 1 pixel.
Just to illustrate the use of this parameter, we will now draw a circle at coordinates x = 100 and y = 100, a radius of 50 and with a blue color. Additionally, we will pass a fifth parameter, which will correspond to the thickness of the circle outline, with a value of 3 pixels.
cv2.circle(image,(100, 100), 50, (255,0,0), 3)
Finally, we will display the image with the drawn circles and wait for a key event. When that event happens, we will destroy the window where the image was being displayed and finish the execution. The final source code is shown below and already includes these last calls.
import cv2 image = cv2.imread('C:/Users/N/Desktop/Test.jpg') cv2.circle(image,(100, 0), 25, (0,255,0)) cv2.circle(image,(0, 100), 25, (0,0,255)) cv2.circle(image,(100, 100), 50, (255,0,0), 3) cv2.imshow('Test image',image) cv2.waitKey(0) cv2.destroyAllWindows()
Testing the code
To test the code, simply run the previous program in your Python environment of choice, point to an existing image in your file system. You should get an output similar to figure 2.

Figure 2 – Drawing circles in an image with OpenCV.
As can be seen, all the three circles were drawn in the specified coordinates, with the corresponding radius, colors and thicknesses.
Note that for the first two circles we specified the top and left halves, respectively, would be drawn outside the image borders, which is why the circles are cut.
Python cv2 draw circle
In all the above functions, you will see some common arguments as given below:
- img : The image where you want to draw the shapes
- color : Color of the shape. for BGR, pass it as a tuple, eg: (255,0,0) for blue. For grayscale, just pass the scalar value.
- thickness : Thickness of the line or circle etc. If -1 is passed for closed figures like circles, it will fill the shape. default thickness = 1
- lineType : Type of line, whether 8-connected, anti-aliased line etc. By default, it is 8-connected.cv.LINE_AA gives anti-aliased line which looks great for curves.
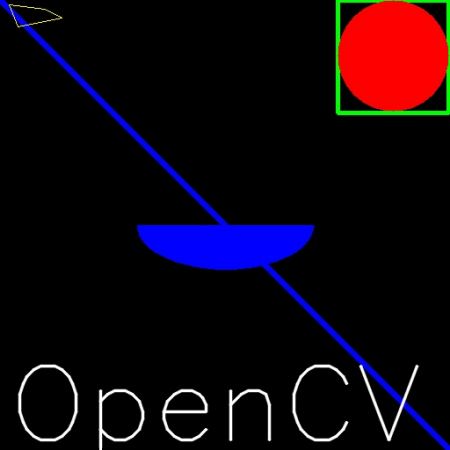
Drawing Line
To draw a line, you need to pass starting and ending coordinates of line. We will create a black image and draw a blue line on it from top-left to bottom-right corners.
Drawing Rectangle
To draw a rectangle, you need top-left corner and bottom-right corner of rectangle. This time we will draw a green rectangle at the top-right corner of image.
Drawing Circle
To draw a circle, you need its center coordinates and radius. We will draw a circle inside the rectangle drawn above.
Drawing Ellipse
To draw the ellipse, we need to pass several arguments. One argument is the center location (x,y). Next argument is axes lengths (major axis length, minor axis length). angle is the angle of rotation of ellipse in anti-clockwise direction. startAngle and endAngle denotes the starting and ending of ellipse arc measured in clockwise direction from major axis. i.e. giving values 0 and 360 gives the full ellipse. For more details, check the documentation of cv.ellipse(). Below example draws a half ellipse at the center of the image.
Drawing Polygon
To draw a polygon, first you need coordinates of vertices. Make those points into an array of shape ROWSx1x2 where ROWS are number of vertices and it should be of type int32. Here we draw a small polygon of with four vertices in yellow color.
Note If third argument is False, you will get a polylines joining all the points, not a closed shape. cv.polylines() can be used to draw multiple lines. Just create a list of all the lines you want to draw and pass it to the function. All lines will be drawn individually. It is a much better and faster way to draw a group of lines than calling cv.line() for each line.
Adding Text to Images:
To put texts in images, you need specify following things.
- Text data that you want to write
- Position coordinates of where you want put it (i.e. bottom-left corner where data starts).
- Font type (Check cv.putText() docs for supported fonts)
- Font Scale (specifies the size of font)
- regular things like color, thickness, lineType etc. For better look, lineType = cv.LINE_AA is recommended.
We will write OpenCV on our image in white color.
Result
So it is time to see the final result of our drawing. As you studied in previous articles, display the image to see it.
Additional Resources
Exercises

Generated on Wed Jul 19 2023 23:42:43 for OpenCV by 1.8.13
Quick Guide for Drawing Circle in OpenCV Python using cv2.circle() with Examples

In this article, we will go through a tutorial for drawing circles in OpenCV Python by using cv2.circle() function. You may have to draw circles in OpenCV for marking an object in an image or for other creative purposes. We will explain to you cv2.circle() syntax along with few examples for a better understanding for beginners.
Circle in OpenCV Python : cv2.circle()
We can draw circle in OpenCV python quite easily by using cv2.circle() function. Let us see the syntax of this function below –
Syntax
cv2.circle(img, center, radius, color, thickness)
- img – It is the image on which the circle has to be drawn.
- center – It is the coordinates of the center of the circle
- radius – It is the radius of the circle.
- color – It is the color of the circle in RGB.
- thickness – It is the thickness of the circle line.
It does not return anything and draws the circle on the original image in place, this means the circle is drawn permanently on the image.
Examples of cv2.circle() in Python OpenCV
Import Required Libraries
Before starting the examples let us first import the required libraries as shown below –
import cv2 import numpy as np import matplotlib.pyplot as plt %matplotlib inline
Utility Function to Create Empty Image
We will create a utility function that creates an empty image of the size 512×512 and 3 color channels on which we will draw circles for examples.
def generate_empty_image(): return np.ones(shape=(512,512,3), dtype=np.int16)
Let us see this function in action by calling it below.
sample_img = generate_empty_image() plt.imshow(sample_img)
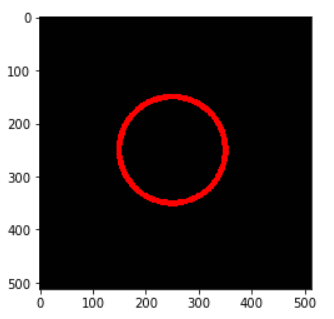
Example – 1: Draw Simple Circle with cv2.circle()
In the first example, we will draw a simple circle on the empty image whose line is red in color and line thickness is 10.
We generate the blank image and pass it to cv2.circle() along with the center coordinates of the circle, the radius of the circle, the RGB value of red (255,0,0), and line thickness = 10.
image1 = generate_empty_image() cv2.circle(img=image1, center = (250,250), radius =100, color =(255,0,0), thickness=10) plt.imshow(image1)
Example – 2: Draw Filled Circle with cv2.circle()
In this example, we are going to draw a filled circle on the blank image. The color of the fill is green.
In OpenCV to fill the circle we use the thickness = -1 in the cv2.circle() function.
image2 = generate_empty_image() cv2.circle(img=image2, center = (250,250), radius =100, color =(0,255,0), thickness=-1) plt.imshow(image2)

Example – 3 : Draw Circle on Image with cv2.circle()
In this example, we will draw a circle on a cat image in red color. We have manually calculated the values of center and radius so that the circle is drawn properly on the cat’s face.
image3 = cv2.imread('cat.jpg') cv2.circle(img=image3, center = (700,400), radius =350, color =(255,0,0), thickness=10) plt.imshow(image3) 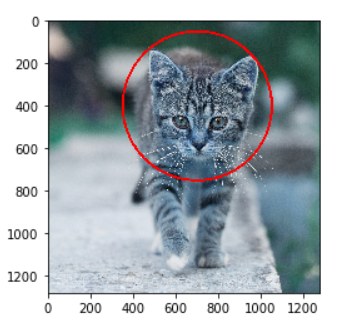
Conclusion
Hope you found this quick tutorial on drawing circles in OpenCV quite helpful. We covered the syntax of the cv2 circle() function along with various examples for a better understanding of beginners.