py_compile — Compile Python source files
The py_compile module provides a function to generate a byte-code file from a source file, and another function used when the module source file is invoked as a script.
Though not often needed, this function can be useful when installing modules for shared use, especially if some of the users may not have permission to write the byte-code cache files in the directory containing the source code.
exception py_compile. PyCompileError 
Exception raised when an error occurs while attempting to compile the file.
py_compile. compile ( file , cfile = None , dfile = None , doraise = False , optimize = — 1 , invalidation_mode = PycInvalidationMode.TIMESTAMP , quiet = 0 ) 
Compile a source file to byte-code and write out the byte-code cache file. The source code is loaded from the file named file. The byte-code is written to cfile, which defaults to the PEP 3147/ PEP 488 path, ending in .pyc . For example, if file is /foo/bar/baz.py cfile will default to /foo/bar/__pycache__/baz.cpython-32.pyc for Python 3.2. If dfile is specified, it is used instead of file as the name of the source file from which source lines are obtained for display in exception tracebacks. If doraise is true, a PyCompileError is raised when an error is encountered while compiling file. If doraise is false (the default), an error string is written to sys.stderr , but no exception is raised. This function returns the path to byte-compiled file, i.e. whatever cfile value was used.
The doraise and quiet arguments determine how errors are handled while compiling file. If quiet is 0 or 1, and doraise is false, the default behaviour is enabled: an error string is written to sys.stderr , and the function returns None instead of a path. If doraise is true, a PyCompileError is raised instead. However if quiet is 2, no message is written, and doraise has no effect.
If the path that cfile becomes (either explicitly specified or computed) is a symlink or non-regular file, FileExistsError will be raised. This is to act as a warning that import will turn those paths into regular files if it is allowed to write byte-compiled files to those paths. This is a side-effect of import using file renaming to place the final byte-compiled file into place to prevent concurrent file writing issues.
optimize controls the optimization level and is passed to the built-in compile() function. The default of -1 selects the optimization level of the current interpreter.
invalidation_mode should be a member of the PycInvalidationMode enum and controls how the generated bytecode cache is invalidated at runtime. The default is PycInvalidationMode.CHECKED_HASH if the SOURCE_DATE_EPOCH environment variable is set, otherwise the default is PycInvalidationMode.TIMESTAMP .
Changed in version 3.2: Changed default value of cfile to be PEP 3147-compliant. Previous default was file + ‘c’ ( ‘o’ if optimization was enabled). Also added the optimize parameter.
Changed in version 3.4: Changed code to use importlib for the byte-code cache file writing. This means file creation/writing semantics now match what importlib does, e.g. permissions, write-and-move semantics, etc. Also added the caveat that FileExistsError is raised if cfile is a symlink or non-regular file.
Changed in version 3.7: The invalidation_mode parameter was added as specified in PEP 552. If the SOURCE_DATE_EPOCH environment variable is set, invalidation_mode will be forced to PycInvalidationMode.CHECKED_HASH .
Changed in version 3.7.2: The SOURCE_DATE_EPOCH environment variable no longer overrides the value of the invalidation_mode argument, and determines its default value instead.
Changed in version 3.8: The quiet parameter was added.
A enumeration of possible methods the interpreter can use to determine whether a bytecode file is up to date with a source file. The .pyc file indicates the desired invalidation mode in its header. See Cached bytecode invalidation for more information on how Python invalidates .pyc files at runtime.
The .pyc file includes the timestamp and size of the source file, which Python will compare against the metadata of the source file at runtime to determine if the .pyc file needs to be regenerated.
The .pyc file includes a hash of the source file content, which Python will compare against the source at runtime to determine if the .pyc file needs to be regenerated.
Like CHECKED_HASH , the .pyc file includes a hash of the source file content. However, Python will at runtime assume the .pyc file is up to date and not validate the .pyc against the source file at all.
This option is useful when the .pycs are kept up to date by some system external to Python like a build system.
Command-Line Interface
This module can be invoked as a script to compile several source files. The files named in filenames are compiled and the resulting bytecode is cached in the normal manner. This program does not search a directory structure to locate source files; it only compiles files named explicitly. The exit status is nonzero if one of the files could not be compiled.
Positional arguments are files to compile. If — is the only parameter, the list of files is taken from standard input.
Changed in version 3.2: Added support for — .
Changed in version 3.10: Added support for -q .
Utilities to compile all Python source files in a directory tree.
Как создать exe файл для Python кода с помощью PyInstaller
Установка PyInstaller не отличается от установки любой другой библиотеки Python.
Вот так можно проверить версию PyInstaller.
Я использую PyInstaller версии 4.2.
Создание exe файла с помощью PyInstaller
PyInstaller собирает в один пакет Python-приложение и все необходимые ему библиотеки следующим образом:
- Считывает файл скрипта.
- Анализирует код для выявления всех зависимостей, необходимых для работы.
- Создает файл spec, который содержит название скрипта, библиотеки-зависимости, любые файлы, включая те параметры, которые были переданы в команду PyInstaller.
- Собирает копии всех библиотек и файлов вместе с активным интерпретатором Python.
- Создает папку BUILD в папке со скриптом и записывает логи вместе с рабочими файлами в BUILD.
- Создает папку DIST в папке со скриптом, если она еще не существует.
- Записывает все необходимые файлы вместе со скриптом или в одну папку, или в один исполняемый файл.
Если использовать параметр команды onedir или -D при генерации исполняемого файла, тогда все будет помещено в одну папку. Это поведение по умолчанию. Если же использовать параметр onefile или -F , то все окажется в одном исполняемом файле.
Возьмем в качестве примера простейший скрипт на Python c названием simple.py, который содержит такой код.
import time name = input("Введите ваше имя ") print("Ваше имя ", name) time.sleep(5)Создадим один исполняемый файл. В командной строке введите:
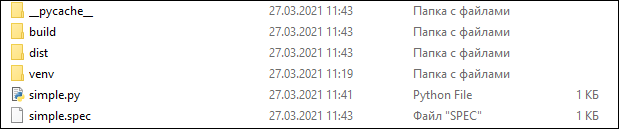
pyinstaller --onefile simple.pyПосле завершения установки будет две папки, BUILD и DIST, а также новый файл с расширением .spec. Spec-файл будет называться так же, как и файл скрипта.
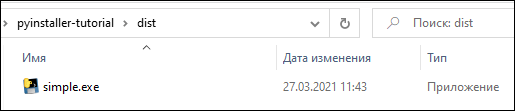
Python создает каталог распространения, который содержит основной исполняемый файл, а также все динамические библиотеки.
Вот что произойдет после запуска файла.
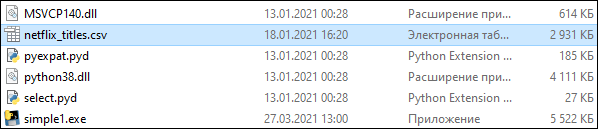
Также, открыв spec-файл, можно увидеть раздел datas, в котором указывается, что файл netflix_titles.csv копируется в текущую директорию.
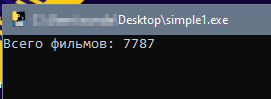
. a = Analysis(['simple1.py'], pathex=['E:\\myProject\\pyinstaller-tutorial'], binaries=[], datas=[('netflix_titles.csv', '.')], .Запустим файл simple1.exe, появится консоль с выводом: Всего фильмов: 7787 .
Добавление файлов с данными и параметр onefile
Если задать параметр --onefile , то PyInstaller распаковывает все файлы в папку TEMP, выполняет скрипт и удаляет TEMP. Если вместе с add-data указать onefile, то нужно считать данные из папки. Путь папки меняется и похож на «_MEIxxxxxx-folder».
import time import sys import os # pip install pandas import pandas as pd def count_records(): os.chdir(sys._MEIPASS) data = pd.read_csv('netflix_titles.csv') print("Всего фильмов:", data.shape[0]) if __name__ == "__main__": count_records() time.sleep(5)Скрипт обновлен для чтения папки TEMP и файлов с данными. Создадим exe-файл с помощью onefile и add-data.
pyinstaller --onefile --add-data "netflix_titles.csv;." simple1.pyПосле успешного создания файл simple1.exe появится в папке DIST.
Можно скопировать исполняемый файл на рабочий стол и запустить, чтобы убедиться, что нет никакой ошибки, связанной с отсутствием файла.
Дополнительные импорты с помощью Hidden Imports
Исполняемому файлу требуются все импорты, которые нужны Python-скрипту. Иногда PyInstaller может пропустить динамические импорты или импорты второго уровня, возвращая ошибку ImportError: No module named …
Для решения этой ошибки нужно передать название недостающей библиотеки в hidden-import.
Например, чтобы добавить библиотеку os, нужно написать вот так:
pyinstaller --onefile --add-data "netflix_titles.csv;." — hidden-import "os" simple1.pyФайл spec
Файл spec — это первый файл, который PyInstaller создает, чтобы закодировать содержимое скрипта Python вместе с параметрами, переданными при запуске.
PyInstaller считывает содержимое файла для создания исполняемого файла, определяя все, что может понадобиться для него.
Файл с расширением .spec сохраняется по умолчанию в текущей директории.
Если у вас есть какое-либо из нижеперечисленных требований, то вы можете изменить файл спецификации:
- Собрать в один бандл с исполняемым файлы данных.
- Включить другие исполняемые файлы: .dll или .so.
- С помощью библиотек собрать в один бандл несколько программы.
Например, есть скрипт simpleModel.py, который использует TensorFlow и выводит номер версии этой библиотеки.
import time import tensorflow as tf def view_model(): print(tf.__version__) if __name__ == "__main__" : model = view_model() time.sleep(5)Компилируем модель с помощью PyInstaller:
pyinstaller -F simpleModel.pyПосле успешной компиляции запускаем исполняемый файл, который возвращает следующую ошибку.
. File "site-packages\tensorflow_core\python_init_.py", line 49, in ImportError: cannot import name 'pywrap_tensorflow' from 'tensorflow_core.python'Исправим ее, обновив файл spec. Одно из решений — создать файл spec.
$ pyi-makespec simpleModel.py -F wrote E:\pyinstaller-tutorial\simpleModel.spec now run pyinstaller.py to build the executableКоманда pyi-makespec создает spec-файл по умолчанию, содержащий все параметры, которые можно указать в командной строке. Файл simpleModel.spec создается в текущей директории.
Поскольку был использован параметр --onefile , то внутри файла будет только раздел exe.
. exe = EXE(pyz, a.scripts, a.binaries, a.zipfiles, a.datas, [], name='simpleModel', debug=False, bootloader_ignore_signals=False, strip=False, upx=True, upx_exclude=[], runtime_tmpdir=None, console=True )Если использовать параметр по умолчанию или onedir, то вместе с exe-разделом будет также и раздел collect.
Можно открыть simpleModel.spec и добавить следующий текст для создания хуков.
# -*- mode: python ; coding: utf-8 -*- block_cipher = None import os spec_root = os.path.realpath(SPECPATH) options = [] from PyInstaller.utils.hooks import collect_submodules, collect_data_files tf_hidden_imports = collect_submodules('tensorflow_core') tf_datas = collect_data_files('tensorflow_core', subdir=None, include_py_files=True) a = Analysis(['simpleModel.py'], pathex=['E:\\myProject\\pyinstaller-tutorial'], binaries=[], datas=tf_datas + [], hiddenimports=tf_hidden_imports + [], hookspath=[], .Создаем хуки и добавляем их в hidden imports и раздел данных.
Хуки
Файлы хуков расширяют возможность PyInstaller обрабатывать такие требования, как необходимость включать дополнительные данные или импортировать динамические библиотеки.
Обычно пакеты Python используют нормальные методы для импорта своих зависимостей, но в отдельных случаях, как например TensorFlow, существует необходимость импорта динамических библиотек. PyInstaller не может найти все библиотеки, или же их может быть слишком много. В таком случае рекомендуется использовать вспомогательный инструмент для импорта из PyInstaller.utils.hooks и собрать все подмодули для библиотеки.
Скомпилируем модель после обновления файла simpleModel.spec.
pyinstaller simpleModel.specСкопируем исполняемый файл на рабочий стол и увидим, что теперь он корректно отображает версию TensorFlow.
Вывод:
PyInstaller предлагает несколько вариантов создания простых и сложных исполняемых файлов из Python-скриптов:
- Исполняемый файл может собрать в один бандл все требуемые данные с помощью параметра --add-data .
- Исполняемый файл и зависимые данные с библиотеками можно собрать в один файл или папку с помощью --onefile или --onedir соответственно.
- Динамические импорты и библиотеки второго уровня можно включить с помощью hidden-imports .
- Файл spec позволяет создать исполняемый файл для обработки скрытых импортов и других файлов данных с помощью хуков.