- Serial communication using Python (PySerial) and Arduino/AVR/PIC Micro on Linux
- Communication Between Arduino & Python
- Attention: Mid-Senior Engineer Earning $80k/yr+ Ready to Break $100k-$200k/yr
- What You Need
- Check The Video Tutorial
- Setup Process
- Writing the Arduino Sketch to Communicate to Python
- Writing Python Script
- Testing the Build
- How to Control Arduino with Python 3.7 and 3.9
- Other Arduino and Python Projects to Try
- Attention: Mid-Senior Engineer Earning $80k/yr+ Ready to Break $100k-$200k/yr
- 8 Responses
- Leave a Reply Cancel reply
Serial communication using Python (PySerial) and Arduino/AVR/PIC Micro on Linux

A short tutorial on how to setup a serial port communication between a Linux PC/Laptop and a AVR/PIC/MSP430 Microcontroller or Arduino using PySerial and Python.
- Setting up permissions to read and write to a Linux serial port,
- How to solve the /dev/ttyUSB0 or /dev/ttyACM0 access denied error.
- How to add a user to tty and dialoutgroups.
- How to solve dmesg :read kernel buffer failed :Operation not permitted error
Please note that this tutorial is Linux specific .
Sourcecodes
| [user@localhost]$ python3 _No_PythonCodes_in_Repo.py |
to run the codes in repo on Linux systems.Most of the codes do not have a #!/bin/python3 header.
- Please note that the source codes on the website show only the relevant sections to highlight the process of programming the serial port.
- Please use the complete source codes from our github repo when building your own program.
Installing Pyserial on Linux
On most Linux distro’s python is installed by default.
Here I am using Ubuntu 20.04 LTS version and pySerial is not installed by default in my system.


Serial Port naming on Linux,
In Linux there is no concept of COM number, instead the
- hardware serial ports are numbered as ttyS0,ttyS1 etc ,
- USB to Serial Converters as ttyUSB0,ttyUSB1 etc.
- Arduino’s as ttyACM0
Connect your Arduino to the USB port and issue a
“ sudo dmesg | tail ”
You have to use sudo in front of dmesg otherwise you will get a dmesg :read kernel buffer failed :Operation not permitted error.

Here Arduino is identified as ttyACM0 on Ubuntu
For USB to Serial converters like USB2SERIAL,
You can connect them to your USB port and issue a “ sudo dmesg | tail” command at the terminal.

So in Linux change the second line to
SerialObj = serial.Serial(‘ /dev/ttyUSB0 ‘)
for USB to serial Converters
SerialObj = serial.Serial(‘ /dev/ttyACM0 ‘)
for Arduino
Serial Port Permissions under Linux
On most Linux system access to serial ports (USB based Virtual Serial Port or Hardware Ports) are restricted due to security reasons.
If you tried to access the serial port you will get a ttyUSB0 or ttyACM0 access denied error.
On Linux to access the serial port the user must be part of 2 groups
You should add yourself to these two groups using the usermod command.
Please note that you should have permission to run the sudo command (part of the Sudo group in Ubuntu) or part of the wheel group in Centos/RHEL/Rocky Linux.
Adding a user to tty and dialout groups for serial port access.
sudo usermod -a -G tty [username]
sudo usermod -a -G dialout [username]
replace [username] with your username Eg rahul or molly.
The -a makes sure that you are appending the user to the groups .if -a is missing you will get unsubscribed from all other groups except tty and dialout.
After the commands are run,
Logoff from your account and then log back in so that changes are saved.

Adding the user molly to dialout and tty groups on Ubuntu 20.04 LTS (Debian based)

Adding the user rahul to dialout and tty groups on Rocky Linux (Centos/RHEL/Fedora derivative)
Make sure to Log off after running the commands.
Opening a serial port on Linux using Python
To test whether our commands have worked, we will write a small code to open a serial port connection.
SerialPortObj = serial.Serial(‘ /dev/ttyUSB0 ‘)
This the bare minimum required to open the connection.
On our Repo you will find a similar file called «SerTest.py» which has a little bit more bells and whistles than the one shown above.I will be using that in the screenshots posted below.
Replace / d ev /t tyU S B 0 with your serial port number.
Make the script executable by using chmod command.
| chmod +x your_python_file.py |
if the script is successful ,properties of your serial port will be printed on the terminal.

Code running on ubuntu 20.04 LTS

code running on Rocky Linux 8.
Receiving data from Arduino/ Microcontroller
Here we will receive string send by the arduino using a python script and display it on the screen.
Replace / d ev /t tyU S B 0 with your serial port number.
Make the script executable by using chmod command.
Execute the script using the below command.
| python3 _5_PySerial-Receive_String.py |
The file _5_PySerial-Receive_String.py does not have the #!/bin/python3 header so we have to explicitly specify to use python3 as shown above.

Communication Between Arduino & Python
Disclosure: Some of the links below are affiliate links. This means that, at zero cost to you, I will earn an affiliate commission if you click through the link and finalize a purchase. Learn Robotics is a participant in the Amazon Services LLC Associates Program, an affiliate advertising program designed to provide a way for websites to earn advertising revenues by advertising and linking to Amazon.com.

Attention: Mid-Senior Engineer Earning $80k/yr+ Ready to Break $100k-$200k/yr
Experienced Engineers: Upgrade to a $100k-$200k Robotics Career in 90 days or Less
Apply to work with our Robotics Career Consultants in our 12-Week Premium Mentorship Program.
Recently I started learning Python, and I was amazed by the simplicity and capabilities. So, I thought let’s connect it to Arduino, and see what I can do with it.
Communication between Arduino and Python isn’t a new concept, There are many modules available for Python that help in the process. In this tutorial, I’m going to use ‘pyserial‘ package for communication. For this, you will need a basic understanding of Python and Arduino. I’m using ‘Python 2.7‘ here.
Once you learn how to communicate between these two environments you can use it for multiple projects. Python is a great tool for image processing, object detection, and color recognition which can be used in various robotics projects.
What You Need
Check The Video Tutorial
Setup Process
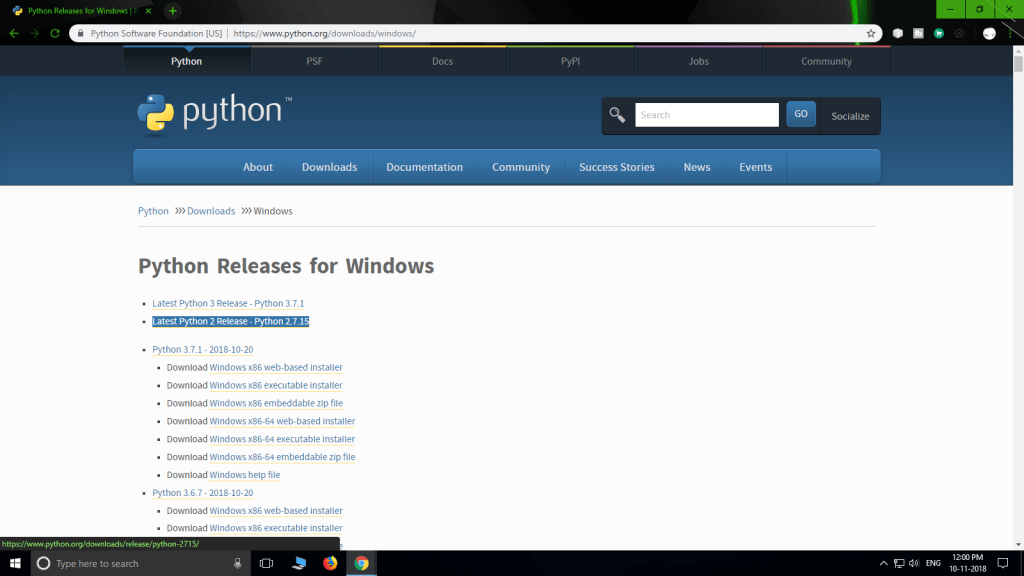
- Download and install Python 2.7.x compatible with your OS. If you use Linux, Python is probably already installed. I use Windows 10, so I installed Python for Windows.
- Once it is properly installed, set environmental variables so it can be accessed from CMD.
- Now to communicate between Arduino and Python, we need to install a Python module called “pyserial“. To install modules we use the command “pip install“.
- Open up a CMD terminal, and type pip install pyserial this will install the module required for Serial communication.
With these steps done, we are ready to start programming.
First Download the Arduino and Python example codes, below or follow along with this tutorial.

Writing the Arduino Sketch to Communicate to Python
Open up the Arduino Sketch, LED.ino.
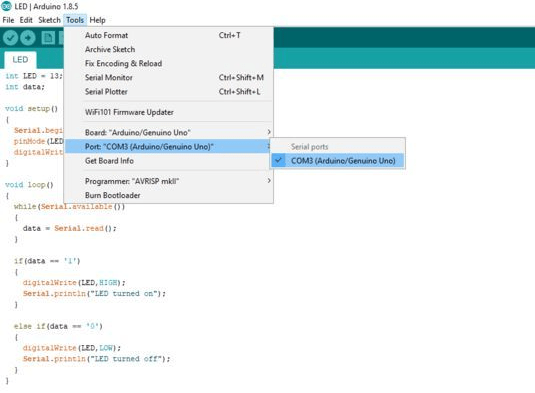
Now select the board & correct COM port and upload the code.
After the sketch is uploaded Goto >> Tools >> Serial Monitor, Enter ‘1’ to turn the LED on and ‘0’ to turn it off. We used the built-in LED (pin 13) in the code, but you can connect an external LED to pin 13, 220-ohm resistor, and GND.
Writing Python Script
Next, let’s write the python code. But first, note the COM port to which the Arduino is connected. Mine is “COM3”. You can find it out from Tools >> Port or through Device Manager. We will need it in the next step.
Open the example Python script first in Python IDLE. Goto >> Files >> Open.
Now in the script, you have to make a small change. The COM port to which the Arduino is connected needs to be added to the script. In the example code, replace ‘COM’ with your COM port.
Tip: If you’re on a Mac, open up the Arduino IDE, Goto Tools >> Port, and copy the port address into your python code.
Testing the Build
After writing and editing the script in IDLE, save it as LED.py (Hit Ctrl + S to save).
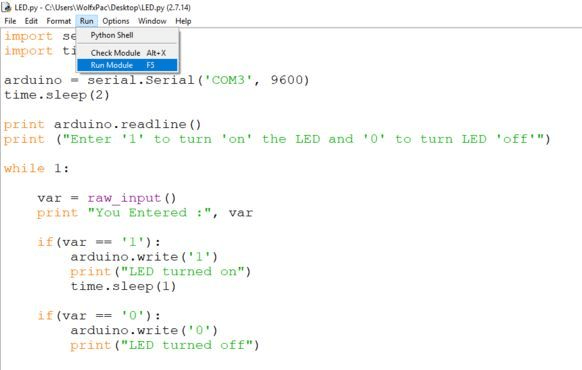
Now before running the program, close the Arduino IDE. We need the COM port to be available for serial communication, so both programs can’t be running simultaneously.
Finally, you can RUN the code. Go ahead and hit F5 to run the script.
You will see a screen asking for input. Just enter ‘1’ or ‘0’ to turn the LED on/off. If the LED does not respond for the first time just close the IDLE and unplug Arduino and plug it again and retry.

If you can control the LED, you have successfully established communication between Arduino and Python.
How to Control Arduino with Python 3.7 and 3.9
For Python 3.7, you need to make a few minor adjustments to the code. A special thanks to Paulo, for his improvement to this project and for providing us with the sample code for Python 3.7. Give it a try, and let us know how it goes!
Tip: If you get an error: ModuleNotFoundError: No module named ‘serial’, then you’ll need to install the pyserial module for the version of Python that you want to use. This code works on Python 3.9 as well. To install pyserial on python 3.9, you can use the command python3.9 -m pip install pyserial .
import serial import time arduino = serial.Serial(port = 'COM3', timeout=0) time.sleep(2) while True: print ("Enter '1' to turn 'on' the LED and '0' to turn LED 'off'") var = str(input()) print ("You Entered :", var) if(var == '1'): arduino.write(str.encode('1')) print("LED turned on") time.sleep(1) if(var == '0'): arduino.write(str.encode('0')) print("LED turned off") Other Arduino and Python Projects to Try
Now, you’re ready to try out our other Arduino and Python Projects.
I hope you enjoyed this tutorial. Let me know what you think in the comments, below!

Attention: Mid-Senior Engineer Earning $80k/yr+ Ready to Break $100k-$200k/yr
Experienced Engineers: Upgrade to a $100k-$200k Robotics Career in 90 days or Less
Apply to work with our Robotics Career Consultants in our 12-Week Premium Mentorship Program.
8 Responses

Paulo Yun Cha says:
Hi! Nice project! btw, Python 3.7 requires some updates regarding to the code above import serial
import time arduino = serial.Serial(port = **, timeout=0)
time.sleep(2) while True: print (“Enter ‘1’ to turn ‘on’ the LED and ‘0’ to turn LED ‘off’”) var = str(input())
print (“You Entered :”, var) if(var == ‘1’):
arduino.write(str.encode(‘1’))
print(“LED turned on”)
time.sleep(1) if(var == ‘0’):
arduino.write(str.encode(‘0’))
print(“LED turned off”)
Leave a Reply Cancel reply
This site uses Akismet to reduce spam. Learn how your comment data is processed.