- Simple HTML form design examples with code (CSS and JavaScript)
- HTML form design examples with code
- Get HTML control values using JavaScript
- How to reset Project details form using JavaScript
- HTML Forms
- Example
- The Element
- The Element
- Text Fields
- Example
- The Element
- Radio Buttons
- Example
- Checkboxes
- Example
- The Submit Button
- Example
- Example
Simple HTML form design examples with code (CSS and JavaScript)
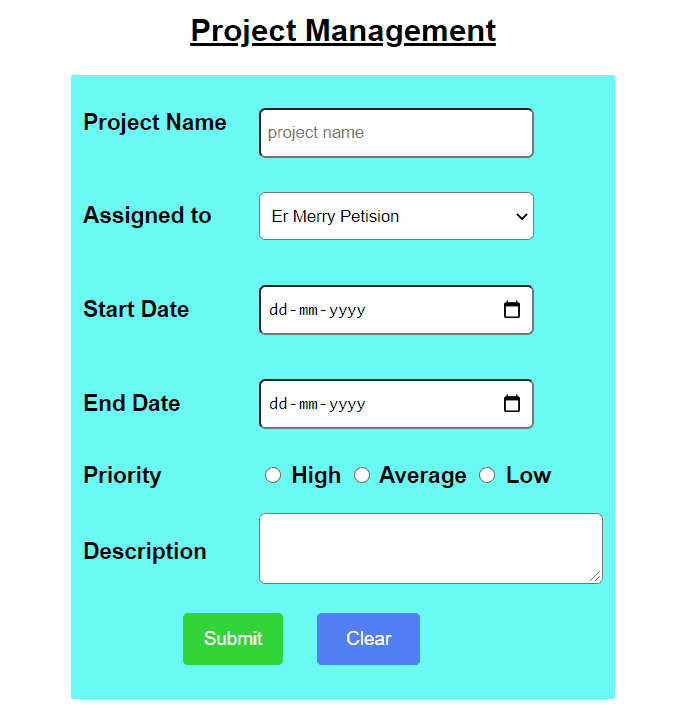
Let us try to create a simple HTML form with JavaScript and CSS. Here, we will design project details form using HTML, CSS. And also we will validate the HTML form using JavaScript. So, here is the HTML form design example with code.
HTML form design examples with code
Now, let us see how to create the project Details form using HTML and CSS. First, we will create an HTML page by using a code editor like Sublime, Atom, Visual Studio code, etc. Here, we will use Visual Studio code to create a project details form.
To create a project details form, first, we create an HTML page using .html extension (e.g. index.html)
Here we use different types of HTML controls:
- Textbox
- Table
- Dropdown
- Date
- Radio button
- Text area
- Submit button
- Reset button
Below you can see the HTML code:
Project Management
Project Name Project Name Assigned to Assigned to Start Date Start Date End Date End Date Priority Priority High Average Low Description Description
Apart from this, we use external .css (for e.g. Style.css) file to style the HTML control. To apply styles in HTML control, it is best practice to attach the external CSS file using a link tag.
And also we will see how to make the project details form responsive.
First, we style the heading (h2) which is Project Management.
- First style the font using font-family: Arial, font-size: 25px, font-style: normal and font-weight: bold, color: black.
- Then we align the text to the center using text-align: center and also we decorate the text using text-decoration: underline.
We will apply style on the table tag (table) and table tag is used to create table in Html.
- To set the background-color of the table, we use background-color property i.e. background-color: rgb(107, 250, 243).
- To set the font size, font-weight, and font family of all the fonts present in the table, we use font-size, font-family, and font-weight property i.e. font-size: 18px,font-family: Arial, Helvetica, sans-serif, and font-weight: bold.
- To set the border radius of the table, we use border-radius property in the table i.e. border-radius: 5px.
Now, we will see how to style text box by adding CSS.
- We add box-sizing to add border and padding to the height and width of the text box. To set box-sizing in the input text box, box-sizing: border-box.
- Then we set width:80% to the text box.
- We add padding 10px on the top and bottom and 5 px on the right and left.
- We add margin-top as 15px, and margin-right as 15px
- We add border-radius as 5px, to give curve style at the edge of the text box.
We will see how to apply style on the date field in html using CSS.
- We add box-sizing to apply border and padding to the height and width of the date field box. To set box-sizing in the input text box, box-sizing: border-box.
- Then we set width:80% to the date field.
- We add padding 8px on the top and bottom and 5 px on the right and left of the date field.
- We add a margin of 8px on the top and bottom and 0 on the right and left.
- We add border-radius as 5px, to give curve style at the edge of the date field.
We will see how to apply styles on the dropdown html control using CSS.
- We add box-sizing to apply border and padding to the height and width of the dropdown. To set box-sizing in the input text box, box-sizing: border-box.
- Then we set width:80% to the dropdown.
- We add a margin of 8px on the top and bottom and 0 on the right and left.
- We add padding 10px on the top and bottom and 5 px on the right and left.
- We add border radius as 5px, to give curve style at the edge of the dropdown list.
We will see how to apply style to the multiline text area/text area using CSS.
- We add padding to all sides of the text area is 2px.
- Then we apply line-height as 1(without unit means it will multiply with element font size), which means the height of the line.
- We add border-radius as 5px, to apply curve style at the edge of the text area box.
In HTML, we add class attribute to the reset button as So in CSS, we can denote class as ‘.’ (e.g. .reset1). We will see how to apply a style to the reset button and submit button.
- Then we set the width: 30% to the reset button.
- We will set Background-color of the reset button as background color: #547ef3.
- We add color to the button, which will change the color of the button as well as the text. To set color: white.
- Add padding 12px on the top and bottom and 8px on the right and left.
- We will add margin-right as 50px.
- Then we add margin-left as -50px.
- Add border-radius as 4px, it will curve the border to 4px of the reset button.
- We will add cursor property to the reset button, it will show when the mouse cursor will point to the reset button. To set the property, cursor: pointer.
- Set the font size of the text, to set the font-size attribute, font-size: 15px.
- We will set the margin-top as auto and set the background color when the pointer will hover on the top of the button.
In the same way, we can apply styles on the submit button. To apply styles on submit button refer to the below code.
button[type=submit] < width: 65%; padding: 12px 8px; margin-left: 80px; margin-top: auto; /* margin-bottom: 20px; */ margin-right: -20px; border: none; border-radius: 4px; cursor: pointer; background-color: #33d439; color: white; font-size: 15px; >button[type=submit]:hover
We will hide the th i.e. header cell and the second reset button, to denote the header cell we use a class called= row1, and to denote the second reset button we use a class called reset2 and we will use both the attribute to make the form responsive.
Follow the below CSS code to hide the column and button.
Here we will see how to make the form responsive by using media query in CSS.
This style apply for the screen size having minimum width 180px and maximum width 600px.
Now we will apply style on table to make the form responsive
- To align all the text to the left. For this text-align:left
- Padding auto for all sides of the table.
- Margin auto for the top of the table.
We will apply style to hide table data which is denoted by the class called col1.
- First we will apply visibility hidden, but in visibility property it will hide the element but it take the space of the element.
- But in display = none then it will hide the element and it will not take the space of the element.
For header cell, we will apply style to make the header cell visible which is denoted by the class called row1.
- So we will set property visibility =visible
- Then we will set Property display=block.
Then we will apply style on the submit button.
- The width of the submit button is 30%.
- We will apply margin-left = -120px, to make the button towards the left.
Next, we will apply a style on the reset button 1 which is denoted by the class called reset1, and reset button 2 which is denoted by the class called reset2
We will hide the reset1 by applying style visibility: hidden and display: none and visible the reset2 and replace the reset1 button. For this follow the below code.
@media only screen and (min-width:180px) and (max-width:600px) < table< text-align: left; padding: auto; margin-top: auto; >.col1 < visibility: hidden; display: none; >.row1 < visibility: visible; display: block; >button[type=submit] < width:30%; margin-left:-120px; >.reset1 < visibility: hidden; display: none; >.reset2 < visibility: visible; display: block; width: 30%; background-color: #547ef3; color: white; padding: 12px; margin-right: auto; margin-left: 160px; border: none; border-radius: 4px; cursor: pointer; font-size: 15px; margin-bottom: 20px; margin-top: -60px; >.reset2:hover < background-color: #584ca0; >>
Get HTML control values using JavaScript
Now, we will learn how to validate the HTML controls and also how to get value from HTML controls using JavaScript.
First we will add the reference JavaScript file (e.g. index.js) using script tag in HTML.
We will use functions to validate and retrieve (i.e. submitProjectDetails()) when we click on the submit button it will show the value if the value is entered in the field or else it will show the field is empty on the alert box.
To see how to validate and retrieve value from Html control, let’s take the first Html control i.e. Project Name field.
We will use the getElementById to get the value of the element having the ID attribute and the specific value, and then we will store that value in a variable. For example var ProjectName= document.getElementById(pName).
Then we will validate and retrieve value from the field by using that variable. We use if-else, to check the validation and to get the value.
if (ProjectName.value == “”) < alert(“Project name field cannot be empty”); >else
If the project name field is empty then it will show the alert i.e. Project Name field cannot be empty.

else it will show the value which is enter by the user.

In the same way, you can validate and retrieve value from all the HTML controls. Refer to the below JavaScript code.
function submitProjectDetails() < var ProjectName = document.getElementById("PName") var pAssigned = document.getElementById("projectAssigned") var sDate = document.getElementById("SDate") var eDate = document.getElementById("EDate") var Prior = document.querySelector('input[name="priority"]') var Description = document.getElementById("description") // project name validation if (ProjectName.value == "") < alert("Project name field cannot be empty"); >else < alert(ProjectName.value); >// Assigned to validation var person = pAssigned.options[pAssigned.selectedIndex].value; if (person == "" || person=="Select") < alert("Project Assigned to field cannot be empty"); >else < alert(pAssigned.options[pAssigned.selectedIndex].value); >// Date validation // start date if (sDate.value == "") < alert(" Please Enter the Starting date"); >else < alert(document.getElementById("SDate").value); >// End date if (eDate.value == 0) < alert("Please enter the end date "); >else < alert(document.getElementById("EDate").value); >//priority validation var Prior = document.querySelector('input[name="priority"]:checked'); if (Prior != null) < alert("The priority of project is:" + Prior.value); >else < alert("You did not select the priority of the project"); >// description validation if (Description.value == "") < alert("You did not write the project description"); >else < alert(document.getElementById("description").value); >>How to reset Project details form using JavaScript
Here, we will see how to reset project details form using JavaScript.
To reset we use a function called resetProjectDetails(), inside this function, we set the HTML field as empty using javascript.
For example: document.getElementById(“PName”).value = ‘ ‘;
In same way you can reset all the field of the Project details form. Refer the below code to reset.
function resetProjectDetails()
You may like the following tutorials:
Here is a simple HTML form design examples with code.
- HTML form design examples with code
- HTML form validation using JavaScript
- Get HTML control values using JavaScript
- How to reset a HTML form using JavaScript
After working for more than 15 years in Microsoft technologies like SharePoint, Office 365, and Power Platform (Power Apps, Power Automate, and Power BI), I thought will share my SharePoint expertise knowledge with the world. Our audiences are from the United States, Canada, the United Kingdom, Australia, New Zealand, etc. For my expertise knowledge and SharePoint tutorials, Microsoft has been awarded a Microsoft SharePoint MVP (9 times). I have also worked in companies like HP, TCS, KPIT, etc.
HTML Forms
An HTML form is used to collect user input. The user input is most often sent to a server for processing.
Example
The Element
The HTML element is used to create an HTML form for user input:
The element is a container for different types of input elements, such as: text fields, checkboxes, radio buttons, submit buttons, etc.
All the different form elements are covered in this chapter: HTML Form Elements.
The Element
The HTML element is the most used form element.
An element can be displayed in many ways, depending on the type attribute.
| Type | Description |
|---|---|
| Displays a single-line text input field | |
| Displays a radio button (for selecting one of many choices) | |
| Displays a checkbox (for selecting zero or more of many choices) | |
| Displays a submit button (for submitting the form) | |
| Displays a clickable button |
All the different input types are covered in this chapter: HTML Input Types.
Text Fields
The defines a single-line input field for text input.
Example
A form with input fields for text:
This is how the HTML code above will be displayed in a browser:
Note: The form itself is not visible. Also note that the default width of an input field is 20 characters.
The Element
Notice the use of the element in the example above.
The tag defines a label for many form elements.
The element is useful for screen-reader users, because the screen-reader will read out loud the label when the user focuses on the input element.
The element also helps users who have difficulty clicking on very small regions (such as radio buttons or checkboxes) — because when the user clicks the text within the element, it toggles the radio button/checkbox.
The for attribute of the tag should be equal to the id attribute of the element to bind them together.
Radio Buttons
The defines a radio button.
Radio buttons let a user select ONE of a limited number of choices.
Example
A form with radio buttons:
Choose your favorite Web language:
This is how the HTML code above will be displayed in a browser:
Choose your favorite Web language:
Checkboxes
The defines a checkbox.
Checkboxes let a user select ZERO or MORE options of a limited number of choices.
Example
This is how the HTML code above will be displayed in a browser:
I have a bike
I have a car
I have a boat
The Submit Button
The defines a button for submitting the form data to a form-handler.
The form-handler is typically a file on the server with a script for processing input data.
The form-handler is specified in the form’s action attribute.
Example
A form with a submit button:
This is how the HTML code above will be displayed in a browser:
The Name Attribute for
Notice that each input field must have a name attribute to be submitted.
If the name attribute is omitted, the value of the input field will not be sent at all.
Example
This example will not submit the value of the «First name» input field: