- : The Progress Indicator element
- Try it
- Attributes
- Examples
- Кастомизация HTML5 progress element
- Step Progress Bar with HTML CSS & JavaScript (Free Code)
- Step Progress Bar HTML CSS JavaScript
- How to Create Multi Step Progress Bar in HTML CSS
- Step 1: Basic Structure of Step Progress Bar
- Step 2: Add Multi Step to Progress Bar
- Step 3: Responsive Step Progress control button
- Step 4: Activate the Step Progress Bar with JavaScript
: The Progress Indicator element
The HTML element displays an indicator showing the completion progress of a task, typically displayed as a progress bar.
Try it
| Content categories | Flow content, phrasing content, labelable content, palpable content. |
|---|---|
| Permitted content | Phrasing content, but there must be no element among its descendants. |
| Tag omission | None, both the starting and ending tag are mandatory. |
| Permitted parents | Any element that accepts phrasing content. |
| Implicit ARIA role | progressbar |
| Permitted ARIA roles | No role permitted |
| DOM interface | HTMLProgressElement |
Attributes
This element includes the global attributes.
This attribute describes how much work the task indicated by the progress element requires. The max attribute, if present, must have a value greater than 0 and be a valid floating point number. The default value is 1 .
This attribute specifies how much of the task that has been completed. It must be a valid floating point number between 0 and max , or between 0 and 1 if max is omitted. If there is no value attribute, the progress bar is indeterminate; this indicates that an activity is ongoing with no indication of how long it is expected to take.
Note: The :indeterminate pseudo-class can be used to match against indeterminate progress bars. To change the progress bar to indeterminate after giving it a value you must remove the value attribute with element.removeAttribute(‘value’) .
Examples
progress value="70" max="100">70 %progress>
Кастомизация HTML5 progress element

Прогрессбар — элемент вроде и редко встречающийся на сайтах (в отличии от селектов, чекбоксов, инпутов и прочего), но все равно без него не обойдется ни один ui-kit.
На данный момент HTML5 предоставляет нам нативный элемент progress, базовый функционал которого поддерживается практически всеми современными браузерами (caniuse.com/#feat=progress).
Но на базовых возможностях стилизации представляемых скажем IE11, мягко говоря далеко не уедешь. Все же хочется чтобы прогрессбары были с анимацией, градиентом, плавной сменой ползунка прогресса, и самое главное с выводом значения в процентах.
В этой статье я попытаюсь показать способ кастомизации прогрессбара, исходя из двух условий:
- Никакого JS. Вся стилизация делается исключительно средствами CSS;
- При последующей работе с кастомизированным прогрессбаром, мы должны работать исключительно с ним (менять значение и не думать о том что нужно поменять ширину ползунка или подставить правильный процент).
document.getElementById('progress').value = '50'; Сразу скажу что при верстке я всегда стараюсь использовать средства CSS по максимуму, на столько на сколько это возможно не прибегая к помощи JS. Так что такой способ может показаться кому-то излишним. Так же в примере будет использован препроцессор, так как без него очень долго писать нужные стили. Я предпочитаю LESS, но при написании статьи я так и не нашел ни одной вменяемой песочницы с поддержкой LESS. Так что в примере будет SCSS.
Итак, начнем с базовой HTML разметки:
.progress < font: 12px Arial, Tahoma, sans-serif; position: relative; overflow: hidden; >.progress progress < position: absolute; width: 0; height: 0; overflow: hidden; left: -777px; >.progress-bar < overflow: hidden; background: #ac92ec; width: 0; height: 100%; position: absolute; top: 0; left: 0; >.progress-value < color: #333; display: block; line-height: 21px; text-align: center; >.progress-bg
@keyframes progress_bar < 0% < background-position: 0 0; >100% < background-position: -40px 0; >> .progress-bar < transition: width 1s linear; >.progress-bar:after
И самый главный момент, — это проставление width для прогресса, и числового значения в процентах. Тут все просто, логика будет следующая:
.progress progress[value="1"] + .progress-value:before < content: "1%"; >.progress progress[value="1"] ~ .progress-bg .progress-bar
Как не сложно догадаться, таких правил нам нужно ровно 100, для этого нам и нужны препроцессоры:
@for $i from 0 through 100 < .progress progress[value="#"] < & + .progress-value:before < content : '#%' > & ~ .progress-bg .progress-bar < width: $i * 1% >> > .generate-progress(@n, @i: 0) when (@i =< @n) < .progress progress[value="@"] < & + .progress-value:before < content : '@%' > & ~ .progress-bg .progress-bar < width: @i * 1% >> .generate-progress(@n, (@i + 1)); > .generate-progress(100); Безусловно здесь есть большой минус — много CSS на выходе. Но по мне плюсы этого метода перекрывают огромный CSS код.
Step Progress Bar with HTML CSS & JavaScript (Free Code)
![]()
If you want to create progress bar with steps then this tutorial will help you. In this article you will learn how to create Step Progress Bar using Html, CSS, and JavaScript.
Earlier I have shown many other types of progress bar designs like an animated progress bars, circular progress bar etc. I have already shared with you the design of multi-step form with a progress bar. If you are looking for the best BRANDING & UX DESIGN company then you can take help of Andy Edge.
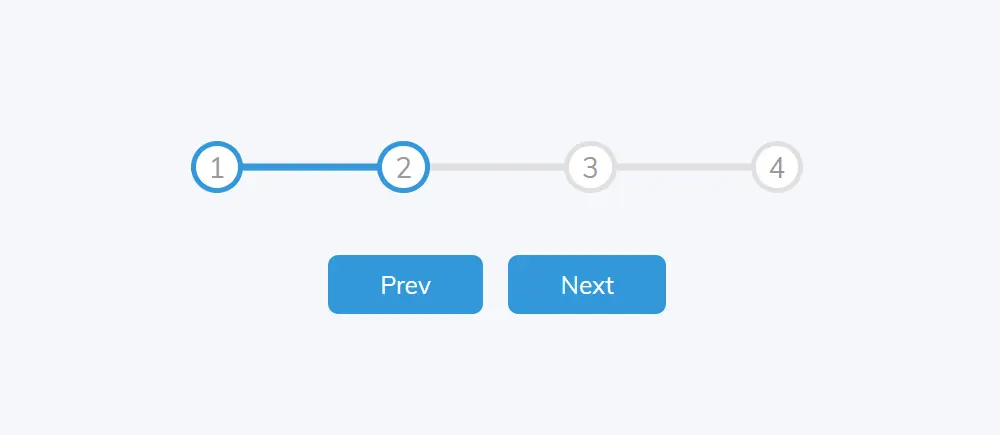
This animated step progress bar css is made very simply. Where there are two buttons that will control the steps and they will progress step by step. I have used 4 steps in this multi step progress bar css. You can use more if you want.
I used some javascript to create this step progress bar. Horizontal step progress bar is mainly used in registration forms.
Step Progress Bar HTML CSS JavaScript
A step progress bar is a graphical element used to visualize the progression of a multi-step process. In web development, it is often used in forms, quizzes, or other types of applications that require the user to complete a series of steps in order to reach a final goal. In this article, we will learn how to create a step progress bar using JavaScript.
See the Pen Progress Bar by Ground Tutorial (@groundtutorial) on CodePen.
As you can see above this is a simple responsive step progress bar css with four steps. There are also two buttons to control the step.
When you click on the Next button, the progress will move forward. First, the multi step progress bar will be at number one. When you click the Next button it will go to step number two, then step number three and then step number 4.
Within this HTML step bar you can easily increase or decrease the amount of steps as per your need. I’ve shown you how in the tutorial below.
How to Create Multi Step Progress Bar in HTML CSS
Now if you want to create this design(Create Step Progress Bar Using HTML And CSS) then follow the tutorial below. Here I have given necessary step by step tutorial and necessary source code. If you want only the source code of this Step progress bar Tutorial then you can use the download button below the article.
If you are a beginner then follow the tutorial below to create this responsive step progress bar. Here I have given the necessary explanation how you can edit it and implement it in your project.
Step 1: Basic Structure of Step Progress Bar
I created a basic structure for this project using my below html and css. I will add all the information of html Step Progress Bar in this basic structure. Then the web page is designed using some css and background color is added.
Step 2: Add Multi Step to Progress Bar
Now we will create the steps. Here I used four steps. You can increase or decrease the step as per your need. Then using some css I added color and design to those tapes.
.progress-container < display: flex; justify-content: space-between; position: relative; margin-bottom: 30px; max-width: 100%; width: 350px; >.progress-container::before < content: ""; /* Mandatory with ::before */ background-color: var(--line-border-empty); position: absolute; top: 50%; left: 0; transform: translateY(-50%); height: 4px; width: 100%; z-index: -1; >.progress Now the steps of this html track progress bar are turned into circles. Height: 30px, width: 30px and background color of this circle is white.

Step 3: Responsive Step Progress control button
Now we need to create two buttons to control the Simple Step Progress Bar. The first button will act as the previous button and the second button will act as the next button.
.btn:active < transform: scale(0.98); >.btn:focus < outline: 0; >.btn:disabled 
Step 4: Activate the Step Progress Bar with JavaScript
Now implement this multi step progress bar css using javascript. Above we have designed this horizontal step progress bar using html and css. Now we need to use some javascript to activate this step progress bar.
const progress = document.getElementById("progress"); const prev = document.getElementById("prev"); const next = document.getElementById("next"); const circles = document.querySelectorAll(".circle"); let currentActive = 1; This code is written in JavaScript and is using the Document Object Model (DOM) to access elements on an HTML page. The code is accessing elements on the page using their id or class name and storing them in variables.
The progress variable refers to an element with an id of “progress”. The prev and next variables refer to elements with ids of “prev” and “next” respectively. The circles variable refers to all elements with a class name of “circle”.
The currentActive the variable is storing a number, which represents the current active circle element in the series of steps.
next.addEventListener("click", () => < currentActive++; if (currentActive >circles.length) currentActive = circles.length; update(); >); The above code activates the next button of the JavaScript Step Progress Bar. This code is adding a click event listener to the next button, which is referenced by the next variable. When the next button is clicked, the function inside the event listener will be executed.
The function increments the value of the currentActive variable by 1. If the value of currentActive is greater than the number of elements in the circles list, it sets the value of currentActive to the number of elements in the circles list, so it never goes out of bounds.
Finally, the function calls update() , which is likely a separate function that updates the appearance of the progress bar and the circle elements to reflect the new currentActive value.
prev.addEventListener("click", () => < currentActive--; if (currentActive < 1) currentActive = 1; update(); >); The above code activates the Previous button of the Multi Step Progress Bar. This code is similar to the previous code but instead adds a click event listener to the previous button, which is referenced by the prev variable. When the previous button is clicked, the function inside the event listener will be executed.
The function decrements the value of the currentActive variable by 1. If the value of currentActive is less than 1, it sets the value of currentActive to 1, so it never goes out of bounds.
Finally, the function calls update() , which is likely a separate function that updates the appearance of the progress bar and the circle elements to reflect the new currentActive value.
const update = () => < circles.forEach((circle, index) =>< if (index < currentActive) circle.classList.add("active"); else circle.classList.remove("active"); >); const actives = document.querySelectorAll(".active"); progress.style.width = ((actives.length - 1) / (circles.length - 1)) * 100 + "%"; if (currentActive === 1) prev.disabled = true; else if (currentActive === circles.length) next.disabled = true; else < prev.disabled = false; next.disabled = false; >>; This is the implementation of the update function that was called in the previous two event listeners. The function updates the appearance of the progress bar and the circle elements to reflect the current currentActive value.
The function uses a forEach loop to iterate over the elements in the circles list. For each circle, if the index is less than the currentActive value, the active class is added to it. Otherwise, the active class is removed from it. This changes the appearance of the circles to indicate which step is currently active.
Next, the function selects all elements with the active class and stores them in the actives variable. The width of the progress bar is then set to be a percentage equal to the number of active circles divided by the total number of circles, minus 1. This makes the width of the Multi Step progress bar proportional to the number of active circles.
Finally, the function checks the value of currentActive and updates the disabled property of the prev and next buttons accordingly. If currentActive is equal to 1, the prev button is disabled. If currentActive is equal to the number of circles, the next button is disabled. If currentActive is neither 1 nor equal to the number of circles, both buttons are enabled.