- Реализация робототехнических задач на платформе KUKA youBot, часть 1
- The KUKA Robot Programming Guide for Beginners
- A Common Misconception About KUKA Programming
- Online vs Offline Programming Methods
- 6 Proven Ways to Program a KUKA Robot
- What’s the Best Way to Program Your KUKA Robot?
- How to Program a KUKA Robot Quickly and Easily
- Related Posts
- 15 Tips for Robot Offline Programming
- 5 Ways Robotic Offline Programming Can Benefit Your Business
- Robot Singularities: What Are They and How to Beat Them
- About Alex Owen-Hill
Реализация робототехнических задач на платформе KUKA youBot, часть 1
Уважаемые читатели Geektimes, вас приветствует Студенческое конструкторское бюро (Robotics engineering department или RED) кафедры СУиИ Университета ИТМО. О нас уже писали в блоге нашего университета.
В рамках программы развития университета RED преследует несколько целей, и одна из них – участие в студенческой соревновательной робототехнике на международном уровне. В качестве стартовой платформы были выбраны популярные международные соревнования RoboCup. На RoboCup присутствуют несколько видов состязаний, от робофутбола до соревнований социально-ориентированных роботов, которые проводятся в разных странах с 1997 года. Российские команды тоже участвовали в соревнованиях и занимали призовые места.
Исходя из технической оснащенности RED и анализа конкурентной среды одной из возможных категорий соревнований стал RoboCup@Work, где множество промышленных манипуляторов соревнуются в выполнении типичных для них задач. Во многом этот выбор обусловлен тем, что кафедра располагает парой промышленных роботов youBot, созданных компанией KUKA. youBot – это всенаправленная мобильная платформа, на которой установлен манипулятор с пятью степенями свободы, с двухпальцевым захватом. В комплект входят: лазерный дальномер URG-04LX-UG01 от Hokuyo Automatic Co. с дальностью измерения 5600 мм на 240°, с помощью которого можно реализовать локализацию и мапинг; устройство распознавания движения ASUS Xtion, аналогичный Microsoft Kinect. Создатели представляют робота прекрасно подходящим для сферы образования.
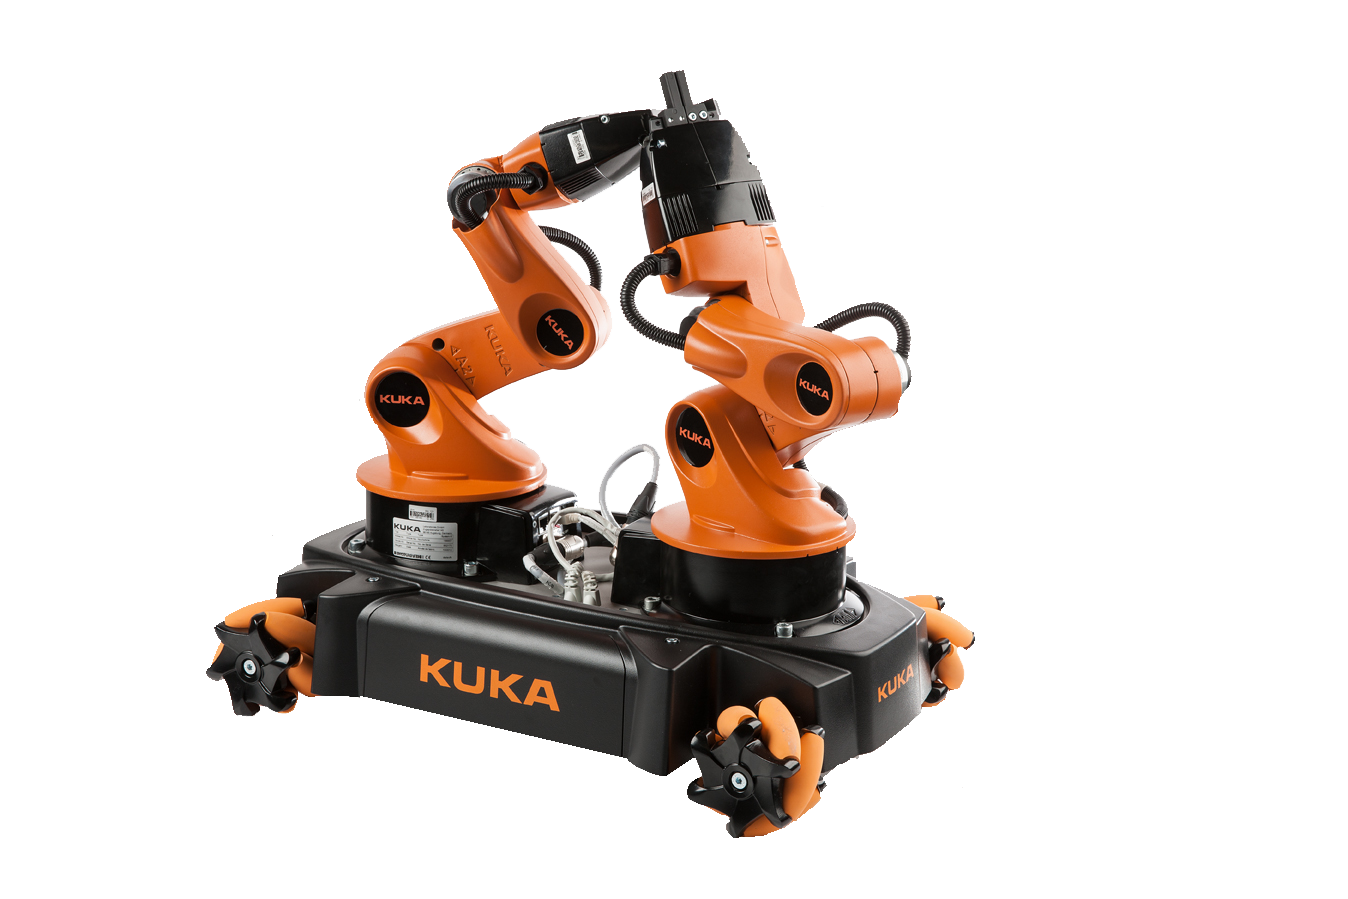
На борт контроллера youBot можно установить ОС (в нашем случае Ubuntu 12.04), что позволяет запускать управление сразу на компьютере, встроенном в робота. Связь с роботом осуществляется через Wi-Fi-модуль.
Работа на youBot – действительно прекрасная возможность познакомиться с промышленными манипуляторами. Но для начала нам нужно испытать себя и youBot в деле.
- Локализация и мапинг: определение местонахождения целевой площадки, на которой стоит объект, среди препятствий (в качестве препятствий выступают невысокие доски – «стены») с последующим приближением к площадке.
- Распознавание объекта: поиск объекта, который покоится на площадке, и получение его координат.
- Захват объекта с помощью полученных координат и его перенос в нужное местоположение.
Управление youBot, обработка данных и «общение» между датчиками и роботом мы решили осуществить с помощью Robot Operating System. На Хабре уже были статьи про ROS и про роботов, работающих с ее помощью. Например, здесь рассказано про замечательную реализацию робота-гексапода, начиная от разбора железа и проектирования модели до объединения всех узлов под контролем ROS.
На всякий случай напомним, что ROS – фреймворк для работы с роботами, облегчающий разработку и объединение разных программных компонентов. ROS используется как в любительских и образовательных проектах, так и для разработки программ промышленных роботов. Стоит отметить, что в данный момент разрабатывается вторая версия ROS, которая обещает включить в себя еще больше возможностей для разработки роботов.
ROS обеспечивает многие службы стандартной ОС: аппаратная абстракция, низкоуровневый контроль устройств, передача сообщений между процессами и управление пакетами. ROS состоит из двух частей: непосредственно ядра программного обеспечения ros, и ros-pkg, набора пакетов (package), внутри которых содержится какие-либо данные, библиотеки, исполняемые и конфигурационные, логически объединенные в полезный модуль.
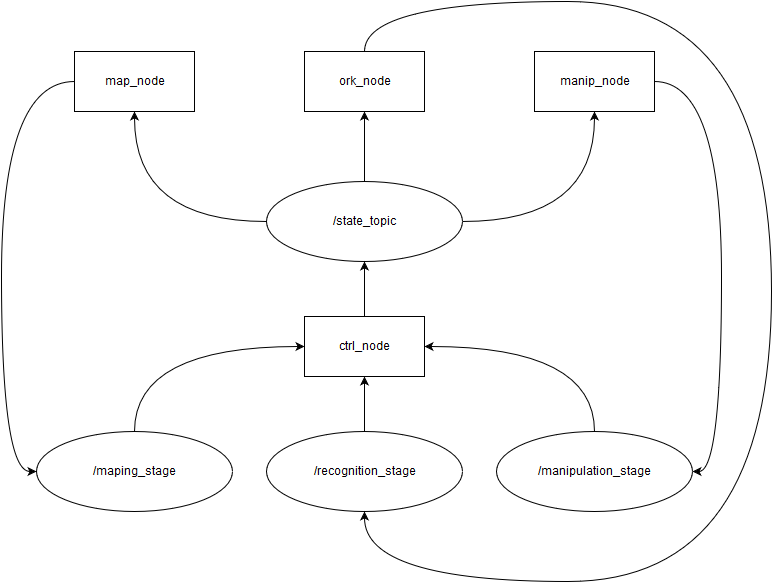
Основными концепциями общения компонентов в ROS являются ноды (node), сообщения (message) и топики (topic). Нода – это запущенный процесс, который умеет общаться с другими процессами. Топик – именованный канал, соединяющий различные ноды. ROS основан на архитектуре графов, где обработка данных происходит в нодах, которые могут получать и передавать сообщения между собой. Эти сообщения публикуются в топиках, которые разделяют сообщения на группы интересов. Когда некоторой ноде необходимо получать сообщения с определенными данными, эта нода подписывается на определенный топик. Благодаря этому между нодами возникает отношения «подписчик-издатель» (publisher-subscriber).
В нашем случае ядро ROS запускается на самом контроллере youBot, и там организуется граф обработки данных между тремя нодами-программами (локализацией, распознаванием объекта и его захватом). Эти ноды публикуют в соответствующие топики данные о своей работе, будь то информация о достижении роботом целевой платформы или координаты объекта. На три топика подписана главная управляющая нода, которая следит за работой трех остальных, а команды публикует в специальный топик, на который подписаны управляемые ноды. Поэтому граф управления выглядит так:
Для ускорения работы мы разделились на три команды, каждая из которых должна была реализовать одну из трех нод.
В следующей статье мы расскажем, как нам удалось реализовать локализацию, и что мы для этого использовали.
Оставайтесь с нами.
The KUKA Robot Programming Guide for Beginners

KUKA robots are some of the most popular robots in the world. KUKA is often listed as one of the “Big 4” robotic companies (ABB, KUKA, Yaskawa, and Fanuc).
Whether you are a complete beginner to robot programming or you have just not used KUKAs before, this guide will give you the essential knowledge you need to get up and running.
A Common Misconception About KUKA Programming
New robot users often mistakenly assume that they must program their KUKA using the default options provided by the manufacturer.
Usually, this means using the teach pendant or KUKA’s text-based programming language. As we will explain in a moment, there are often better methods for beginners to KUKA programming.
Two major problems that arise by sticking with the default programming methods are:
- It ties you into using only one brand of robot. Even if you only use KUKA robots right now, you will likely want to explore other brands in the future. Ideally, you want a programming method that works for many brands, not just KUKA.
- There is a steep learning curve. KUKA’s teach pendant programming has certainly improved over the years. But, it still relies on a lot of button pressing or arduous touchscreen navigation, jogging (manually moving the robot with buttons), and text-based programming. This requires extensive training and experience.
There are more intuitive ways to program a KUKA robot that are easily accessible to beginners…
Online vs Offline Programming Methods
Two terms you might not be very familiar with are “online programming” and “offline programming.”
Online programming requires that the robot is physically present when you are programming it. This reduces the productivity of the robot as it has to come out of production whenever you want to improve the program or develop another application.
Offline programming means that you create the program first then upload it to the robot only when it is ready. If you are using text-based programming, such as with KRL, you still have to do extensive debugging with the robot online. But, with graphical offline programming, you debug the program first in a simulated environment, which improves the robot’s productivity.
You can learn more about the difference between the two methods in our previous article.
6 Proven Ways to Program a KUKA Robot
As with any programming task, there are various options for programming a KUKA robot. Some of these are only suited to experienced robot programmers. Others are ideal for both beginners and robotics experts.
5 proven methods of programming a KUKA are:
- KUKA teach pendant — The standard option for KUKA programming is the teach pendant that comes shipped with the robot. There have been various versions of this over the years including the KRC2, KRC4, and smartPAD. This online programming method requires significant training and programming can be a laborious process.
- KUKA Robot Language (KRL) — Every robot manufacturer has its own proprietary programming language. For KUKA, this means the KRL programming language. Based on Pascal, this offline programming language requires a high level of expertise.
- Hand guiding — Hand guiding involves adding extra controllers and/or sensors to the end of the robot that allow you to move it by hand. KUKA’s version of this is ready2_pilot, which uses a type of 6D joystick. Although more intuitive than the teach pendant, it has a downside of being an online programming method so reduces the robot’s productivity.
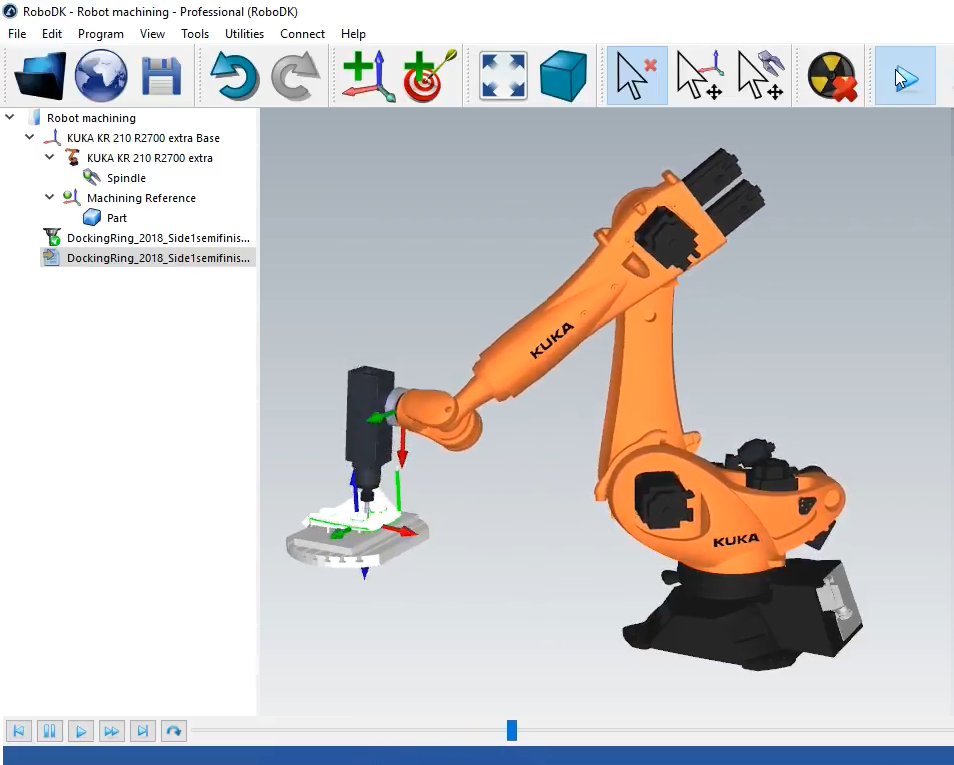
- Graphical offline programming — A graphical offline programming software combines the productivity advantages of an offline programming system with the intuitiveness of a graphical system. RoboDK is simple enough to use that beginners can simulate robots from any manufacturer by following 5 simple steps. It’s also compatible with over 50 robot brands.
- Your favorite programming language — If you are already an experienced programmer, you might wonder if you can use your preferred programming language to program your KUKA robot as well. This is possible with the RoboDK API which takes your code and converts it into instructions that the KUKA controller can understand.
- An intuitive handheld probe — A final option is to use a handheld probe, such as the RoboDK TwinTrack, which allows you to program the robot using your own hand and arm. This is even more intuitive than hand guiding and has the added benefit that it can be used as either an offline or an online programming method.
What’s the Best Way to Program Your KUKA Robot?
With so many options for programming KUKA robots, you might be wondering which one you should choose!
Each programming method has its pros and cons. But, as a beginner, you should be looking for options that make life easier for you both in the short term and the long term.
Your programming methods should allow you to get up and running with your KUKA robot as soon as possible. You also want to learn methods that will be applicable for different robot brands.
For these reasons, it’s best to go with the programming method that will be most intuitive for you right from the start.
If you’re an experienced programmer, this might mean using your favorite programming language. However, in most cases, a method like graphical offline programming or a handheld probe will be the best option for beginners looking to get started quickly.
How to Program a KUKA Robot Quickly and Easily
With the right programming tool, you can start programming your KUKA robot within a matter of minutes.
You don’t even need to have the physical robot in front of you!
When you download the free RoboDK trial, you can load your chosen KUKA model from the integrated robot library and get started programming immediately.
What questions do you have about KUKA programming that this guide didn’t cover? Tell us in the comments below or join the discussion on LinkedIn, Twitter, Facebook, Instagram, or in the RoboDK Forum.
Related Posts

15 Tips for Robot Offline Programming
February 20, 2023 February 20, 2023

5 Ways Robotic Offline Programming Can Benefit Your Business
December 15, 2022 December 15, 2022

Robot Singularities: What Are They and How to Beat Them
November 30, 2022 November 30, 2022
About Alex Owen-Hill
Alex Owen-Hill is a freelance writer and public speaker who blogs about a large range of topics, including science, presentation skills at CreateClarifyArticulate.com, storytelling and (of course) robotics. He completed a PhD in Telerobotics from Universidad Politecnica de Madrid as part of the PURESAFE project, in collaboration with CERN. As a recovering academic, he maintains a firm foot in the robotics world by blogging about industrial robotics.