- HTML CSS Javascript PHP MySQL To Build A Website (Simple Example)
- TABLE OF CONTENTS
- EXAMPLE DEVELOPMENT CYCLE
- STEP 1) THE PLAN – DIVIDE AND CONQUER
- STEP 2) CREATING MYSQL DATABASE TABLES
- 2A) THE SQL
- 2B) TABLE STRUCTURE
- 2C) MYSQL DATABASE NOTES & EXPLANATION
- STEP 3) SERVER-SIDE PHP SCRIPTS
- 3A) THE SCRIPT
- 3B) PHP NOTES & EXPLANATION
- STEP 4) HTML PAGE
- 4A) THE SCRIPT
- 4B) HTML NOTES & EXPLANATION
- STEP 5) THE CSS
- 5A) THE SCRIPT
- 5B) CSS NOTES & EXPLANATION
- STEP 6) THE JAVASCRIPT
- 6A) THE SCRIPT
- 6B) JAVASCRIPT NOTES & EXPLANATION
- DOWNLOAD & NOTES
- SUPPORT
- EXAMPLE CODE DOWNLOAD
- EXTRA BITS & LINKS
- SOFTWARE DEVELOPMENT LIFE CYCLE (SDLC)
- FRONT-END, BACK-END, FULL-STACK
- LINKS & REFERENCES
- INFOGRAPHIC CHEAT SHEET
- THE END
- How to Use HTML5 Tables for SQL Output
- About This Article
- This article is from the book:
- About the book author:
- Build HTML Tables From MySQL Tables with PHP
- The CSS
- The PHP / MySQL
- ',$table,'
HTML CSS Javascript PHP MySQL To Build A Website (Simple Example)
Welcome to a beginner’s tutorial and simple example of how to use HTML, CSS, Javascript, PHP, and MySQL together to build a website. Just started with web development, and wondering how we can “put” all the different technologies together?
Various technologies and languages work together to create a website, each of them handling a different aspect.
- HTML deals with the structure and layout of web pages.
- CSS to handle the visuals and cosmetics.
- Javascript to add dynamic elements to the webpage.
- MySQL database to store data permanently.
- PHP to do server-side processing and transactions.
Yep, some of you guys may already know that. So let us walk through the development of a simple product page in this guide – Read on!
TABLE OF CONTENTS
EXAMPLE DEVELOPMENT CYCLE
All right, let us now get started with the development of the products page itself.

STEP 1) THE PLAN – DIVIDE AND CONQUER
It is common for beginners to get paralyzed by “too many things to deal with” and “don’t know where to start”. So the first step in every project is to break things down and lay out a step-by-step plan. In this example of creating a simple product page:
- Goal & Overview: As Captain Obvious as this may be, we need to create a page to display products from the database.
- Server-Side Database (MySQL): To keep things simple, the database will only capture the product name and description.
- Server-Side PHP: Create a script that gets product information from the database.
- Client-Side HTML & CSS: Use the PHP script to create an HTML page to show the products, CSS for the styling.
- Client-Side Javascript: Finally, use Javascript to add dynamic elements to the HTML page. For example, what happens when the user clicks on a product.
STEP 2) CREATING MYSQL DATABASE TABLES
2A) THE SQL
-- (A) PRODUCTS TABLE CREATE TABLE `products` ( `product_id` bigint(20) NOT NULL, `product_name` varchar(128) NOT NULL, `product_description` text ) ENGINE=InnoDB DEFAULT CHARSET=utf8mb4; ALTER TABLE `products` ADD PRIMARY KEY (`product_id`), ADD KEY `product_name` (`product_name`); ALTER TABLE `products` MODIFY `product_id` bigint(20) NOT NULL AUTO_INCREMENT; -- (B) DUMMY PRODUCTS INSERT INTO `products` (`product_id`, `product_name`, `product_description`) VALUES (1, 'Vulture Of Fortune', 'A sweated bump consents across the here separator.'), (2, 'Guardian Without Duty', 'Does a table migrate inside an excessive paranoid?'), (3, 'Enemies Without Hope', 'A cured parameter fears behind the phenomenon.'), (4, 'Lords Of The Void', 'The diary scores around the generalized lie.'), (5, 'Doctors And Aliens', 'The diary scores around the generalized lie.'), (6, 'Blacksmiths And Criminals', 'A considerable snail works into a purchase.');2B) TABLE STRUCTURE
2C) MYSQL DATABASE NOTES & EXPLANATION
Personally, I will always start with the database, simply because it serves as the foundation of almost every project. It is also important to get the required fields correct right from the start, or changing the database structure later can be a very painful process.
STEP 3) SERVER-SIDE PHP SCRIPTS
3A) THE SCRIPT
PDO::ERRMODE_EXCEPTION, PDO::ATTR_DEFAULT_FETCH_MODE => PDO::FETCH_NAMED ]); // (C) GET PRODUCTS $stmt = $pdo->prepare("SELECT * FROM `products`"); $stmt->execute(); $products = $stmt->fetchAll();3B) PHP NOTES & EXPLANATION
PHP is the next piece of the foundation, and the above is an oversimplified example of how we can use PHP to fetch data from the database… But this is actually kind of bad. In actual projects, we would have created a proper class library, object-oriented style. For example:
class Products < function get ($id) < // SELECT * FROM `products` WHERE `id`= $ID >function add ($name, $desc) < // INSERT INTO `products` (. FIELDS . ) >function delete ($id) < // DELETE FROM `products` WHERE `id` = $ID >>STEP 4) HTML PAGE
4A) THE SCRIPT
 ?>
?> 4B) HTML NOTES & EXPLANATION
So what is happening here!? Why is the file extension PHP instead of HTML? That’s right – We are using PHP alongside HTML here. No need to be confused. Remember the script we wrote earlier to fetch product data from the database? We are simply using it on this page to generate the product’s HTML, that’s all.
STEP 5) THE CSS
5A) THE SCRIPT
/* (A) WHOLE PAGE */ * < font-family: Arial, Helvetica, sans-serif; box-sizing: border-box; >body < max-width: 600px; padding: 10px; margin: 0 auto; background: #f2f2f2; >/* (B) BOOKS */ #books < display: grid; grid-template-columns: repeat(3, minmax(0, 1fr)); grid-gap: 10px; >.bookWrap < border: 1px solid #dbdbdb; background: #fff; >.bookImg < display: block; width: 100%; >.bookTitle < font-weight: 700; font-size: 16px; color: #333; >.bookDesc
5B) CSS NOTES & EXPLANATION
Nothing much here actually. CSS is the part that deals with cosmetics and styles in HTML.
STEP 6) THE JAVASCRIPT
6A) THE SCRIPT
window.addEventListener("load", () => < // (A) GET ALL BOOKS var books = document.querySelectorAll(".bookWrap"); // (B) ATTACH ONCLICK TO ALL BOOKS for (let book of books) < book.onclick = () =>< // (B1) GET SELECTED BOOK ID, NAME, DESCRIPTION var name = book.querySelector(".bookTitle").innerHTML, desc = book.querySelector(".bookDesc").innerHTML; // (B2) SHOW IN DIALOG BOX alert(`You have selected - ID: $, TITLE: $ DESC: $`); >; > >);
6B) JAVASCRIPT NOTES & EXPLANATION
This is yet another overly simplified example. On a “normal” products page, Javascript would have been used to send an “add to cart” process to the server when a product is selected. Also, you can pretty much already guess what Javascript can do – Remove from the cart, checkout, submit forms, form checks, load more content from the server, change themes, etc… Pretty much all kinds of processing that are dynamic.
DOWNLOAD & NOTES
Here is the download link to the example code, so you don’t have to copy-paste everything.
SUPPORT
600+ free tutorials & projects on Code Boxx and still growing. I insist on not turning Code Boxx into a «paid scripts and courses» business, so every little bit of support helps.
EXAMPLE CODE DOWNLOAD
Click here for the source code on GitHub gist, just click on “download zip” or do a git clone. I have released it under the MIT license, so feel free to build on top of it or use it in your own project.
EXTRA BITS & LINKS
That’s it for all the code, and here are a few small extras that may be useful.
SOFTWARE DEVELOPMENT LIFE CYCLE (SDLC)
- Requirement Analysis – What is required? What does the client need?
- Planning – Divide-and-conquer. What needs to be done?
- Design – The database structure, software architecture, and page design.
- Development – Actual coding.
- Testing & Deployment – Test the code, and put it live on the Internet.
Some people may have different steps for the SDLC, but that is the general process. Also, take note that SDLC does not stop after just one cycle – We may review our projects later, and decide that things need to change. The whole SDLC cycle starts again, and it never really ends.
FRONT-END, BACK-END, FULL-STACK
- Project Manager (Full-Stack) – The boss. He/she/it deals with the wide overview, processes, structure of the entire system, and even support for other platforms such as mobile apps.
- Lead/Senior Web Developers (Full-Stack) – Does everything. HTML, CSS, Javascript, PHP, MySQL, and whatever else. AKA Superman.
- Junior Web Developers (Front End) – Creates the webpages. HTML, CSS, Javascript.
- Junior Web Developers (Back End) – Does PHP, MySQL. More on the administration panel and server-side libraries instead.
So yeah, it is only further up the ladder that we need to really deal with “everything and beyond”.
LINKS & REFERENCES
INFOGRAPHIC CHEAT SHEET
THE END
Thank you for reading, and we have come to the end of this guide. I hope that it has helped you to better understand – HTML, CSS, Javascript, PHP, MySQL, they are all different components, but they all work together to create a single website or system.
It may be overwhelming at first to deal with many things at once, so take it step-by-step, and the rest will be just like learning how to cycle. Once you catch the gist and flow, it will be much easier. If you want to share anything with this guide, please feel free to comment below. Good luck and happy coding!
How to Use HTML5 Tables for SQL Output
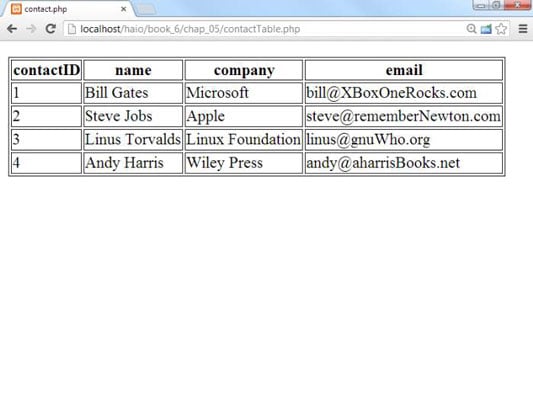
The basic unit of structure in SQL is called a table because it’s usually displayed in a tabular format. HTML5 also has a table structure, which is ideal for outputting SQL data. ContactTable.php, displays the contact information inside an HTML table.
Tables are a very common way to output SQL results. There’s one big difference between table output and the basic version of a table. In a table, you have a separate row containing field names. Here’s the code:

setAttribute(PDO::ATTR_ERRMODE, PDO::ERRMODE_EXCEPTION); $query = "SELECT * FROM contact"; //first pass just gets the column names print "
n"; $result = $con->query($query); //return only the first row (we only need field names) $row = $result->fetch(PDO::FETCH_ASSOC); print " n"; foreach ($row as $field => $value)< print " $field n"; > // end foreach print " n"; //second query gets the data $data = $con->query($query); $data->setFetchMode(PDO::FETCH_ASSOC); foreach($data as $row) < print " n"; foreach ($row as $name=>$value)< print " $value n"; > // end field loop print " n"; > // end record loop print "
n"; > catch(PDOException $e) < echo 'ERROR: ' . $e->getMessage(); > // end try ?> You might be confused that a table is being used here. Tables aren’t evil: They just aren’t designed to be a page layout mechanism. Tables, however, are designed to display tabular data, and the result of a data query is pretty much the definition of tabular data. You can (and should) still use CSS for specific layout details of the table. Tables are fine when used to present data.
This code is still very similar to the basic contact.php program. It extracts data from the database exactly the same way. The main difference is how field names are treated. The field names will go in table headings, and only the values are printed from each row. To make this work, follow these steps:
Build a normal MySQL connection. Begin with the standard connection. Don’t worry about formatting until you’re reasonably certain that you can read data from the database.
$con = new PDO('mysql:host=localhost;dbname=dbName', "user", "pwd"); $con->setAttribute(PDO::ATTR_ERRMODE, PDO::ERRMODE_EXCEPTION); $query = "SELECT * FROM contact";
$result = $con->query($query); //return only the first row (we only need field names) $row = $result->fetch(PDO::FETCH_ASSOC);
print " n"; foreach ($row as $field => $value)< print " $field n"; > // end foreach print " n";
//second query gets the data $data = $con->query($query); $data->setFetchMode(PDO::FETCH_ASSOC);
foreach($data as $row) < print " n"; foreach ($row as $name=>$value)< print " $value n"; > // end field loop print " n"; > // end record loop
About This Article
This article is from the book:
About the book author:
Andy Harris taught himself programming because it was fun. Today he teaches computer science, game development, and web programming at the university level; is a technology consultant for the state of Indiana; has helped people with disabilities to form their own web development companies; and works with families who wish to teach computing at home.
Build HTML Tables From MySQL Tables with PHP
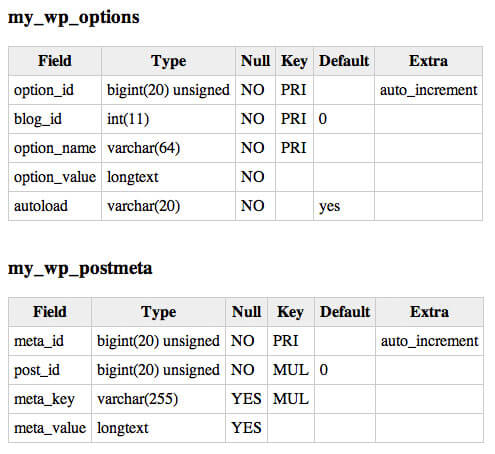
I was recently completing a project which required that I build a series of HTML tables which would represent all of the tables within a MySQL database. I didn’t have anything created but after a few minutes I had exactly what I needed. Hopefully this helps you out!
The CSS
table.db-table < border-right:1px solid #ccc; border-bottom:1px solid #ccc; >table.db-table th < background:#eee; padding:5px; border-left:1px solid #ccc; border-top:1px solid #ccc; >table.db-table td
The CSS I’m styling the table with is as basic as it gets — style as you wish!
The PHP / MySQL
/* connect to the db */ $connection = mysql_connect('localhost','username','password'); mysql_select_db('my_db',$connection); /* show tables */ $result = mysql_query('SHOW TABLES',$connection) or die('cannot show tables'); while($tableName = mysql_fetch_row($result)) < $table = $tableName[0]; echo '',$table,'
'; $result2 = mysql_query('SHOW COLUMNS FROM '.$table) or die('cannot show columns from '.$table); if(mysql_num_rows($result2)) < echo ''; echo 'Field Type Null Key Default Extra '; foreach($row2 as $key=>$value) < echo '',$value,' '; > echo ' '; > echo '
'; > > The first step in the process is accessing all of the tables within the database. Once all tables have been fetched, the next step is to loops through the array of tables we receive and, for each table, build a new HTML table with column information.
Nothing groundbreaking but surely has use. I’ve also written a blog post about backing up your MySQL database with PHP titled Backup Your MySQL Database Using PHP; check that out if you’d prefer to backup your databse information in SQL format!