- Изменив расстояние между строчками css кода, вы сможете оформить ваш текст красиво и читабельно
- Поднимем руки над клавиатурой и да раздвинем строки!
- А теперь пришло время таблиц!
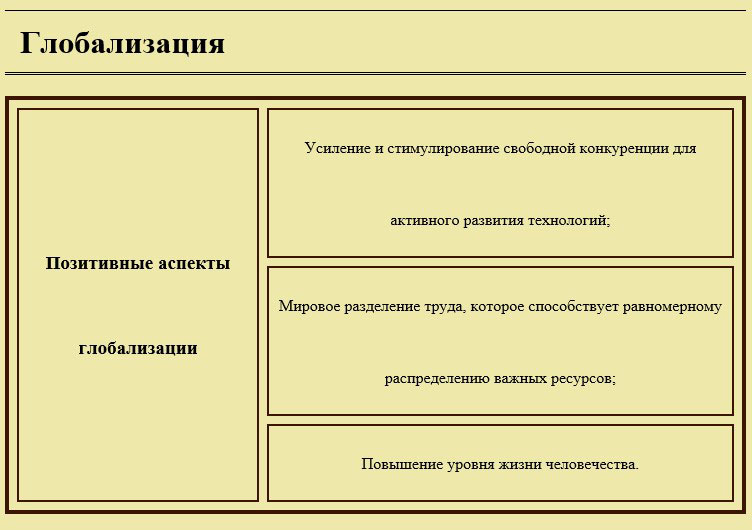
- Глобализация
- Глобализация
- CSS Table Row Height
- Example # 1:
- Example # 2:
- Example # 3:
- Conclusion:
- About the author
- Aqsa Yasin
- line-height
- Синтаксис
- Значения
- Объектная модель
- Браузеры
Изменив расстояние между строчками css кода, вы сможете оформить ваш текст красиво и читабельно
Доброго времени суток, мои дорогие любители веб-тематики. Сегодня я хочу поделиться с вами полезными и достаточно простыми знаниями, которые в будущем помогут с оформлением текстового контента вашего сайта. Я расскажу, как задавать расстояние между строчками css-средствами.
При чем мы разберем с вами свойства, которые помогут форматировать не только интервалы между строками текста, а еще и расстояние между ячейками таблиц. А теперь давайте приступим к самому интересному!
Поднимем руки над клавиатурой и да раздвинем строки!
На всякий случай начну главу с пояснения «что такое межстрочный интервал».
Расстояние между строками в параграфе называется межстрочным интервалом. Также иногда используют и современный термин – интерлиньяж.
Для форматирования данного параметра каскадными стилевыми таблицами нужно знать всего лишь одно свойство – line-height.
В обычных ситуациях значение line-height устанавливается в браузере автоматически в зависимости от выбранного шрифта, типа начертания и размера символов. Однако если появилась необходимость увеличить или уменьшить интервалы в тексте, то это можно сделать исключительно через описываемый инструмент.
line-height предусматривает два встроенных ключевых слова:
- normal – вычисление расстояния между строками абзацев происходит автоматически;
- inherit – наследуется форматирование объекта-родителя.
Помимо этого, можно самим устанавливать размер отступов. В свойстве поддерживаются любые существующие в css единицы измерений. Таким образом, вы можете указать интервал в процентах, пунктах, пикселах, em-ах и других.

Однако обычно указывается просто тип отступа в виде цифры. Например, line-height: 1.5; оповещает браузер, что в контенте выбран полуторный межстрочный интервал.
Думаю, особо любопытные задались вопросом: «Как же работает такой механизм?». Ответ очень прост: при помощи умножения. Интерлиньяж устанавливается, начиная от базовой линии. Если значение свойства указывается цифрой, то она распознается как множитель, на который и идет умножение базового значения.
А теперь хочу привести небольшой пример. При помощи html я создал заголовок и обычный нумерованный список.
1 2 3 4 5 6 7 8 9 10 11 12 13 14 15 16 17 18 19 20 21 22 23 24 25 26 27 28 29 30 31
- Усиление и стимулирование свободной конкуренции для активного развития технологий;
- Мировое разделение труда, которое способствует равномерному распределению важных ресурсов;
- Повышение уровня жизни человечества.
А теперь пришло время таблиц!
Для таблиц также можно использовать свойство css line- height. Оно задаст интервал в ячейках между строками текста. Однако в некоторых случаях нужно двигать именно ячейки, а не контент.
Для реализации такого приема существует свойство border-spacing. Этот элемент работает только в том случае, если в другом табличном свойстве border-collapse указано раздельное отображение ячеек таблицы (border-collapse: separate), т.е. двойная линия не убирается.
Почему так происходит? border-spacing устанавливает расстояние от контента до границ элемента таблицы. По умолчанию рамка задается для каждого элемента своя. Если же используется свойство border-collapse: collapse, то происходит следующее: браузер анализирует табличное представление и удаляет двойные линии.
При этом между строками и столбцами остается одна линия, которая преобразовывается в общую границу сразу для нескольких элементов таблицы.
У свойства border-spacing нет ключевых слов, поэтому значения указываются в виде единиц измерения. Можно установить как одно значение, так и два. Во втором случае первый параметр определит интервал по горизонтали, второй – по вертикали.
Перейдем к практике. Информацию из предыдущего примера занесем в таблицу.
1 2 3 4 5 6 7 8 9 10 11 12 13 14 15 16 17 18 19 20 21 22 23 24 25 26 27 28 29 30 31 32 33 34 35 36 37 38 39 40 41 42 43 44 45 46 47
h1 < line-height: 95%; border-bottom: 3px double #000; border-top: 1px solid #000; padding: 15px; >body < background: #EEE8AA; >table < width: 100%; border: 4px solid #3B1500; border-spacing: 8px; line-height: 5; >#left < font-weight: 900; font-size: 19px; >td
| Усиление и стимулирование свободной конкуренции для активного развития технологий; | |
| Мировое разделение труда, которое способствует равномерному распределению важных ресурсов; | |
| Повышение уровня жизни человечества. |
На этой ноте я закончу. Не забывайте подписываться на мои обновления и обязательно приглашайте знакомых и коллег в наш дружный коллектив блога. Пока-пока!
CSS Table Row Height
![]()
Height is the measurement of something from the bottom to the top, or from the head to the foot. The height of the table row is defined as the distance between the top and the base of the row. In CSS, we have the “line-height” property which allows us to customize the height of the table row. The CSS “line-height” attribute can be used to alter the table’s row height. When we change the value of this “line-height” property, our table row is resized to that height. We’ll use this “line-height” property to set the height of the table row in this tutorial, and we’ll show you how it sets the height of the table row and how to adjust the table row height using several examples.
Example # 1:
To set the table’s row height, we must design the table in the HTML file. This HTML file is created here in Visual Studio Code. But you may use any software to create these codes. This software is being used to run the examples. We must select the language when creating a new file in Visual Studio Code. Otherwise, it will recognize it by default. When HTML is selected as the language, the file extension is created automatically when the file is saved under any name. We merely put “!” into this file after selecting HTML as a language and pressing “Enter”. The “HTML” code’s core tags are produced automatically.
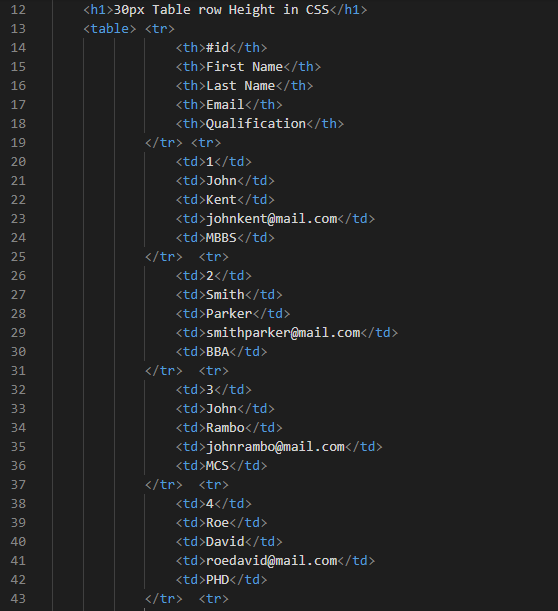
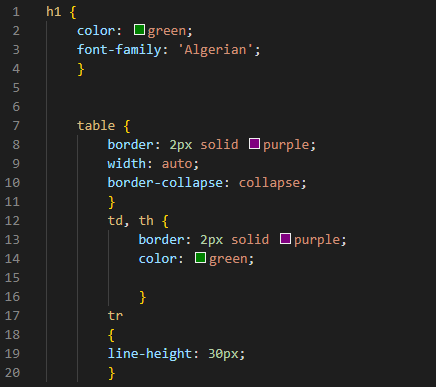
Style the heading by naming “h1” and applying CSS properties. We chose “green” for the “color” parameter which is used to change the color of the text. This heading’s “font-family” is “Algerian” Then, apply a “border” of “2px” to the entire table, with the type set to “solid” and the border color set to “purple”. The table’s “width” is then specified with “auto” being the width. Then, we are utilizing the “border-collapse” property and set this to “collapse” for collapsing the border of the entire table.
After this, we must create the “border” for all cells. We set the same border for the cell that we use for the table here. The text in the cells will render in “green” as we set this “color” in the CSS property. Now, we are setting row height of the table. So, here we put “tr” which is used for the rows and set the height of the row by utilizing the CSS “line-height” property. We are setting “30px” for the height of the table’s row. This height will apply to all rows of the table.
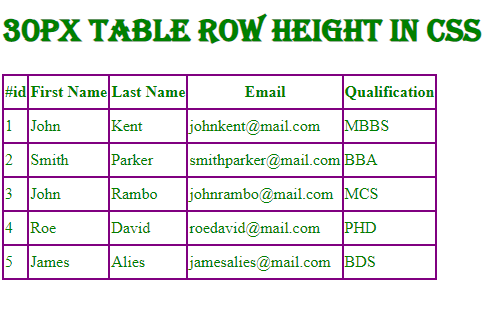
The output shows the table. In this table, the height of the rows of the table is 30px each. We can set the height of the row according to our choice. We set it to 30px in this code and you can check this in the given output.
Example # 2:
The table we’re using here is the same as the one we used in the previous example. But we’re going to change the line-height property value to adjust the table’s row height. We are going to change the font’s “font-family” to “times New Roman”. Then, we are applying some attributes to the entire table and establish the border. First with a “border” of “2px” and in “solid” form, as well as in the color “green”. We use the “auto” keyword for the “width” property and the “collapse” keyword for the “border-collapse” property.
We also need to establish the border for the cells. So, we use the “border” property now for “th” and “tr”. The values are set to “2px solid green” and the cell’s text is color “blue”. Then, for all rows except the heading row, we are setting the “20px” height by utilizing the “line-height” property. But we also want to set the height of the heading row. For this, we use the “th” and utilize “line-height” here and set it to “80px”. When this table will render on the output screen, the heading row height will be “80px” and the height of the remaining rows will be “20px”.

Here, you can see that the height of the first row is greater than the remaining rows as we have set its height to “80px” and the other row’s height is “20px”. That’s why there is a difference between the height of the first row which is the header row and the height of the other rows.
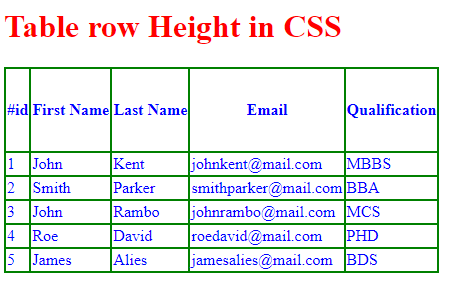
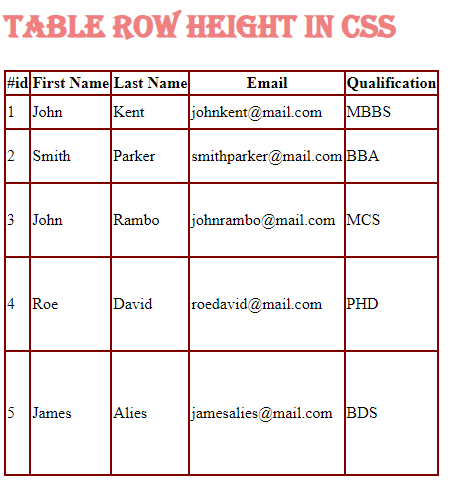
Example # 3:
In this table, we give the name to each row as “t1”, “t2”, “t3”, and so on. Then, we set different heights for each row in CSS. We will apply the “line-height” property separately on each row by using the names of the rows which we have given here in this HTML file.
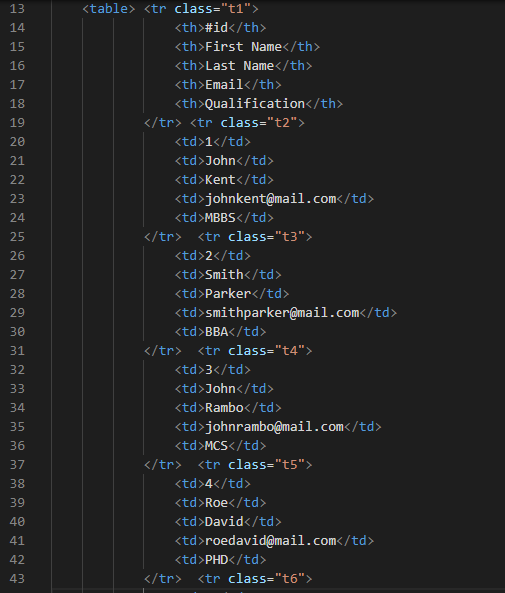
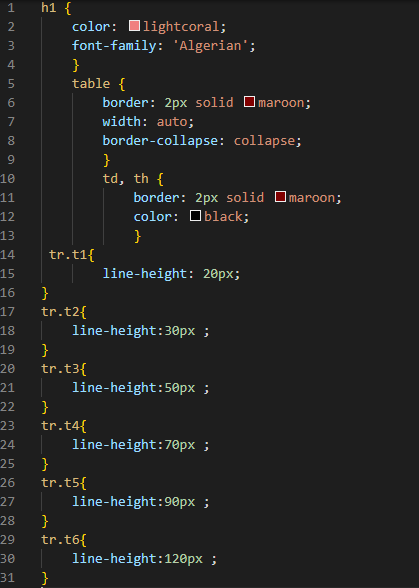
First, we are styling the heading which appears on the top to make it attractive by utilizing some properties. We are using the “color” which is the CSS property and set the “light coral” color for this heading. The heading’s “font-family” is “Algerian”. The table border is set as “maroon”. We set it to “solid” so it appears as a solid line border and it is “2px” in width. Then “collapse” the border so it will display as a single border.
Now, we are creating a “border” around all cells of the table. We apply the same border as the table border. The same “maroon” color and solid type of “2px”. The text “color” is “black”. Now, we are going to set the height of each row separately by using the name of the rows. We use “t1” with “tr” which represents the first row of the table and set its height by using the “line-height” property and putting “20px” as its value. Then, use “t2” with “tr” by placing “.” between them which is the second row. The height of this row is set to “30px”.
After this, we have “t3” which is the third row. We write it with “td” as we write the “t1” or “t2” but here its height is “50px”. We are setting “70px” for the fourth row using “t4” and “90px” for the fifth row. Also, set “120px” for the sixth rows and the name of the sixth row is “t6”. Now, we set different row heights for all six rows.
The height difference between all rows is seen in this given output. Here, the height of the first row is smaller than the second row and so on. All the rows are of different heights, so in this way, we can set the height of the rows in CSS.
Conclusion:
This tutorial demonstrated what the table’s row height is, how to set the table’s row height in CSS, and which CSS property is used to determine the table’s row height. As we have stated, the height of a table’s row is measured from top to bottom of the row and explained that the “line-height” property of CSS is used for setting the height of the rows. We have used this property on all rows combined, and on each table’s row separately. We have gone over various codes in this tutorial, as well as the results of these codes. After reading this tutorial thoroughly, you will set the height of the table’s row in projects.
About the author
Aqsa Yasin
I am a self-motivated information technology professional with a passion for writing. I am a technical writer and love to write for all Linux flavors and Windows.
line-height
Устанавливает интерлиньяж (межстрочный интервал) текста, отсчет ведется от базовой линии шрифта. При обычных обстоятельствах расстояние между строками зависит от вида и размера шрифта и определяется браузером автоматически. Отрицательное значение межстрочного расстояния не допускается.
Синтаксис
line-height: множитель | значение | проценты | normal | inherit
Значения
Любое число больше нуля воспринимается как множитель от размера шрифта текущего текста. Например, значение 1.5 устанавливает полуторный межстрочный интервал. В качестве значений принимаются также любые единицы длины, принятые в CSS — пикселы (px), дюймы (in), пункты (pt) и др. Разрешается использовать процентную запись, в этом случае за 100% берется высота шрифта.
normal Расстояние между строк вычисляется автоматически. inherit Наследует значение родителя.
HTML5 CSS2.1 IE Cr Op Sa Fx
h1 < line-height: 60%; >p Duis te feugifacilisi
Lorem ipsum dolor sit amet, consectetuer adipiscing elit, sed diem nonummy nibh euismod tincidunt ut lacreet dolore magna aliguam erat volutpat. Ut wisis enim ad minim veniam, quis nostrud exerci tution ullamcorper suscipit lobortis nisl ut aliquip ex ea commodo consequat.
Результат данного примера показан на рис. 1.

Рис. 1. Применение свойства line-height
Объектная модель
[window.]document.getElementById(» elementID «).style.lineHeightБраузеры
Internet Explorer до версии 7.0 неправильно вычисляет высоту строк для изображений и элементов форм. Также в этом браузере не поддерживается значение inherit .