- Плагин wordpress php mysql
- Installation
- Composer
- FAQ
- Should I back up my site before using this?
- I don’t see any changes to my database speed. Why not?
- I use a nonstandard database table prefix. Will this work ?
- My WordPress host offers MariaDB, not MySQL. Can I use this plugin?
- Which versions of MySQL and MariaDB does this support?
- What database Storage Engine does this support?
- What tables and keys does the plugin change?
- Is this safe? Can I add high-performance keys and revert back to WordPress standard keys safely?
- I got a fatal error trying to add keys. How can I fix that?
- What happens to my tables and keys during a WordPress version update?
- My site has thousands of registered users. My Users, Posts, and Pages panels in my dashboard are still load slowly even with this plugin.
- How can I enable persistent object caching on my site?
- Why did the size of my tables grow when I added high-performance keys?
- Will the new keys be valid for new data in the tables?
- How do I get an answer to another question?
- Simple WordPress shortcode plugin running MySQL queries
- Docker-compose
- Setup WordPress on first use
- Plugin files location
- Activate plugin
- Using plugin
Плагин wordpress php mysql


Installation
You may install this plugin by visiting Plugins > Add New on your site’s Dashboard, then searching for Index WP MySQL For Speed and following the usual installation workflow.
When you activate it, it will copy a php source file into the must-use plugins directory, wp-content/mu-plugins . Some sites’ configurations prevent the web server from writing files into that directory. In that case the plugin will still work correctly. But, after WordPress core version upgrades you may have to revisit the Tools > Index MySQL page and correct the keying on some tables. Why? The mu-plugin prevents core version updates from trying to change keys.
Composer
If you configure your WordPress installation using composer, you may install this plugin into your WordPress top level configuration with the command
composer require "wpackagist-plugin/index-wp-mysql-for-speed":"^1.4" During composer installation the plugin can automatically copy the necessary source file (see the previous section) into the must-use plugins directory. If you want that to happen, you should include these scripts in your top-level composer.json file.
FAQ
Should I back up my site before using this?
Yes. You already knew that.
I don’t see any changes to my database speed. Why not?
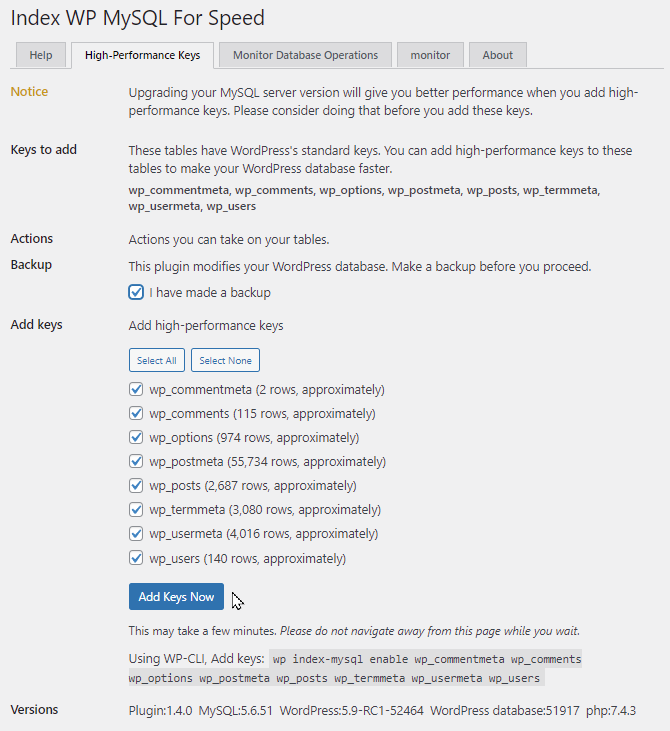
- Just installing and activating the plugin is not enough to make it work. Don’t forget to visit the Index MySQL Tool under the Tools menu. From there you can press the Add Keys Now button.
- On a modestly sized site (with a few users and a few hundred posts) your database may be fast enough without these keys. The speed improvements are most noticeable on larger sites with many posts and products.
I use a nonstandard database table prefix. Will this work ?
Yes. Some WordPress databases have nonstandard prefixes. That is, their tables are named something_posts, something_postmeta, and so forth instead of wp_posts and wp_postmeta. This works with those databases.
My WordPress host offers MariaDB, not MySQL. Can I use this plugin?
Which versions of MySQL and MariaDB does this support?
MySQL versions 5.5.62 and above, 5.6.4 and above, 8 and above. MariaDB versions 5.5 and above.
What database Storage Engine does this support?
InnoDB only. If your tables use MyISAM (the older storage engine) or the older COMPACT row format, this plugin offers to upgrade them for you.
What tables and keys does the plugin change?
Is this safe? Can I add high-performance keys and revert back to WordPress standard keys safely?
Yes. it is safe to add keys and revert them. Changing keys is a routine database-maintenance operation.
As you know you should still keep backups of your site: other things can cause data loss.
I got a fatal error trying to add keys. How can I fix that?
Sometimes the Index WP MySQL For Speed plugin for WordPress generates errors when you use it to add keys. These can look like this or similar:
Fatal error: Uncaught ImfsException: [0]: Index for table 'wp_postmeta' is corrupt; try to repair it First, don’t panic. This (usually) does not mean your site has been corrupted. It simply means your MariaDB or MySQL server was not able to add the keys to that particular table. Your site will still function, but you won’t get the benefit of high-performance keys on the particular table. Very large tables are usually the ones causing this kind of error. Very likely you ran out of temporary disk space on your MariaDB or MySQL database server machine. The database server makes a temporary copy of a table when you add keys to it; that allows it to add the keys without blocking your users.
It’s possible to correct this problem by changing your MariaDB or MySQL configuration. Instructions are here.
What happens to my tables and keys during a WordPress version update?
If the plugin is activated during a WordPress version update, it prevents the update workflow from removing your high-performance keys (Version 1.4.7).
My site has thousands of registered users. My Users, Posts, and Pages panels in my dashboard are still load slowly even with this plugin.
We have another plugin to handle lots of users, Index WP Users For Speed. Due to the way WordPress handles users, just changing database keys is not enough to solve those performance problems.
How can I enable persistent object caching on my site?
Persistent object caching can help your site’s database performance by reducing its workload. You can read about it here. If your hosting provider doesn’t offer redis or memcached cache-server technology you can try using our SQLite Object Cache plugin for the purpose.
Why did the size of my tables grow when I added high-performance keys?
Database keying works by making copies of your table’s data organized in ways that are easy to randomly access. Your MariaDB or MySQL server automatically maintains the copies of your data as you insert or update rows to each table. And, the keying task adjusts the amount of free space in each block of your table’s data in preparation for the insertion of new rows. When free space is available, inserting new rows doesn’t require relatively slow block splits. Tables that have been in use for a long time often need new free space in many blocks. When adding keys, it is normal for table sizes to increase. It’s the oldest tradeoff in computer science: time vs. space.
Will the new keys be valid for new data in the tables?
Yes. Once the high-performance keys are in place MariaDB and MySQL automatically maintain them as you update, delete, or insert rows of data to your tables. There is no need to do anything to apply the keys to new data: the DBMS software does that for you.
How do I get an answer to another question?
Please see more questions and answers here.
Simple WordPress shortcode plugin running MySQL queries
I’ve recently been asked for advice regarding developing a simple WordPress plugin that can perform explicit interactions with the database.
Having no prior experience of WordPress and very short experience of PHP (and this is dating 20 years back) I had no idea how one would tackle it. I was tempted to just say no, especially that PHP is one of the technologies I just can’t produce a spark of love towards. However, I said I will have a look, as curiosity got the best of me. I decided to time-box it to a day of research and prototyping. I got a working solution but I’m sure somebody knowing PHP and/or WordPress well, would point out a number of problems with it. Please do!!
I named the plugin «Pain Inducer» with apprehension of bad things that will happen if I start coding in PHP.
Complete code is available on GitHub.
Docker-compose
If you have WordPress installed on your machine already you can skip to next section.
I was not keen to install the platform directly onto my machine so used Docker instead.
Note: This WordPress activity is probably just a one-off for me as I am happy with Jekyll. I don’t use PHP either so why cluttering my system with it? For experimentation like this Docker is brilliant, as I can easily discard the impact of this installation. I also get the environment setup scripted so it is repeatable. If you don’t have Docker but are tempted to try it, install it from here. For Docker-compose pop-in here. I’m on Linux machine where it runs natively, but if you are on Mac or Windows I believe you will need to use docker-machine, which (I think) ships with Docker.
The platform consists of two services:
- wordpress — as a PHP application bundled with PHP interpreter and webserver
- db — providing persistence via means of MySQL
1version: '3.3' 2 3 services: 4 db: 5 image: mysql:5.7 6 volumes: 7 - db_data:/var/lib/mysql 8 restart: always 9 ports: 10 - "3306:3306" 11 environment: 12 MYSQL_ROOT_PASSWORD: somewordpress 13 MYSQL_DATABASE: wordpress 14 MYSQL_USER: wordpress 15 MYSQL_PASSWORD: wordpress 16 17 wordpress: 18 depends_on: 19 - db 20 image: wordpress:latest 21 ports: 22 - "8000:80" 23 restart: always 24 volumes: 25 - ./my-plugins/pain_inducer:/var/www/html/wp-content/plugins/pain_inducer 26 environment: 27 WORDPRESS_DB_HOST: db:3306 28 WORDPRESS_DB_USER: wordpress 29 WORDPRESS_DB_PASSWORD: wordpress 30 volumes: 31 db_data: I’ve modified the quickstart docker-compose.yml file as following:
- @lines 9-10 — map MySQL port so that I can connect to it from the host
- @lines 24-25 — map a directory from host onto container, so that it appears within WordPress’ plugins area
To start them all, navigate to top directory (cloned from Git) and run:
1~/src/wordpress-play$ docker-compose up Docker has to download all images required to spin up the containers, so the first run will take some time. Subsequent invocations are instant. The command prompt will not appear again (foreground mode) so you have to look for a line similar to the following in your standard output:
1wordpress_1 | Complete! WordPress has been successfully copied to /var/www/html The above command will run in the foreground, which is easier to stop for novice Docker users (Ctrl-C once to finish gracefully, again to kill it). For background execution you can use . up -d (to start) and . down -v (to stop and cleanup). There is more but it isn’t an article about Docker.
Setup WordPress on first use
If you have WordPress installed and setup already you can skip to next section.
This step isn’t tying into the original advice request, but is included for completeness.
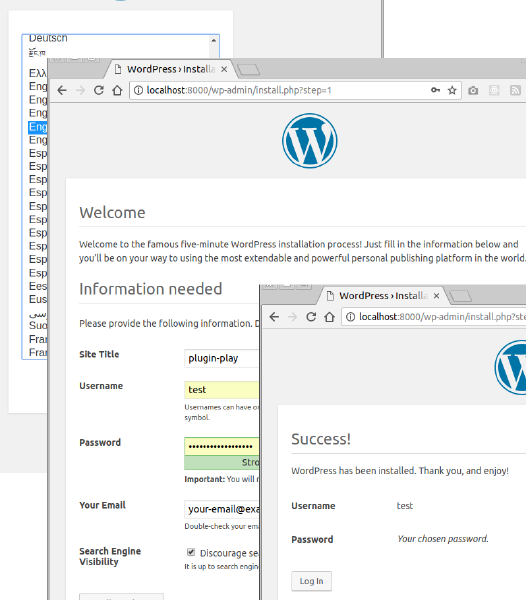
After you start WordPress for the first time you need to set it up. It applies to either option; direct local installation and containerised run.
Plugin files location
Notice that the repo you’ve cloned from GitHub already contains the PHP files defining the plugin ( my-plugins/pain_inducer directory).
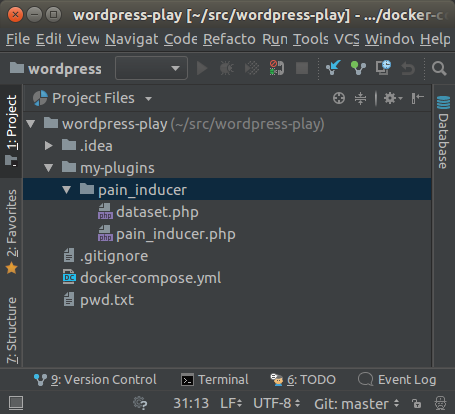
It will be automatically found by WordPress because the volumes field of docker-compose.yml maps the host directory /my-plugins/pain_inducer onto /var/www/html/wp-content/plugins/pain_inducer in the container.
Note: if you don’t use Docker for this, copy the directory pain-inducer and its contents immediately under your WordPress’ plugins directory.
File pain_inducer.php controls the logic of the plugin
File dataset.php is providing means to interact with WordPress’ MySQL database.
Activate plugin
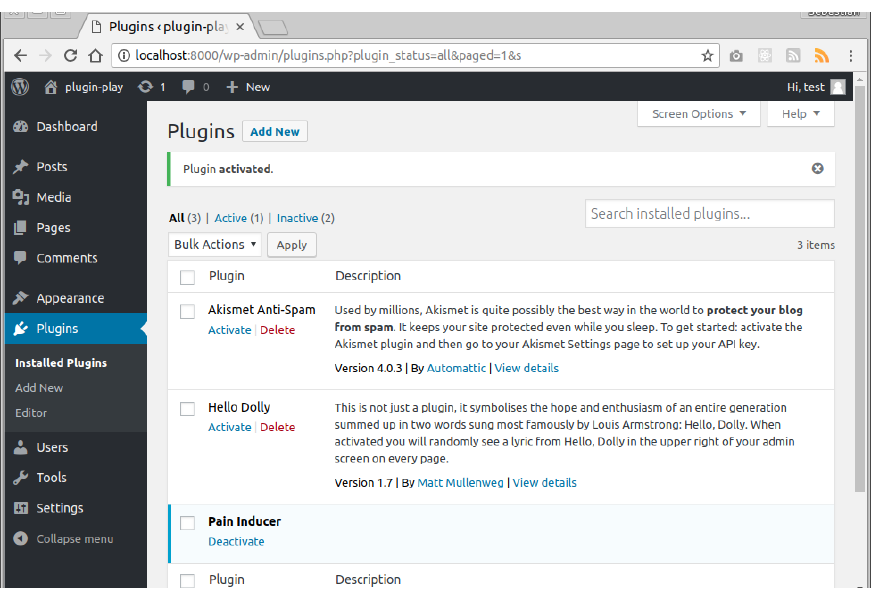
Now you can just click on «Plugins» in the left nav you should see something like that:
You need to choose «Activate» under «Pain Inducer», notice I’ve already done this here.
You are now ready to use the new shortcode!
Using plugin
Create new post and place the following inside it:
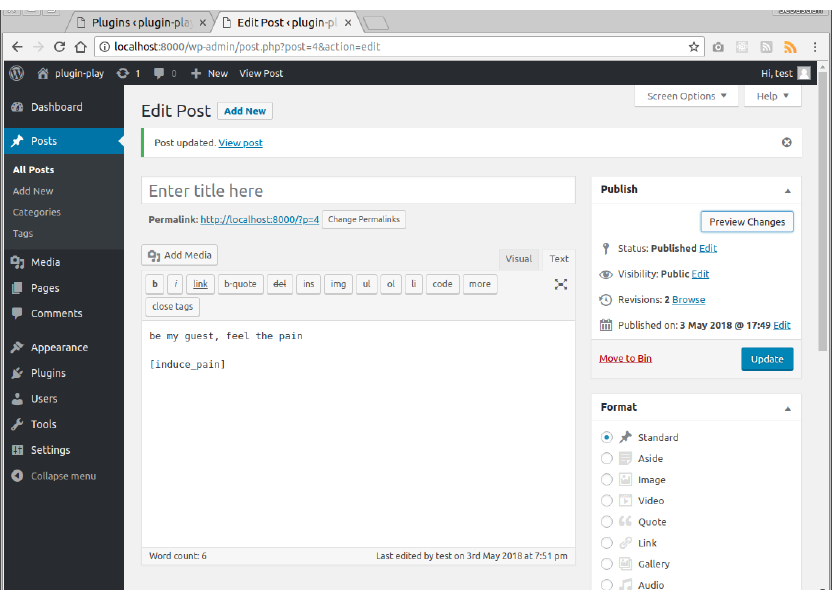
You have now made it possible to induce pain, well done!

When you save and preview you’ll get view similar to this:
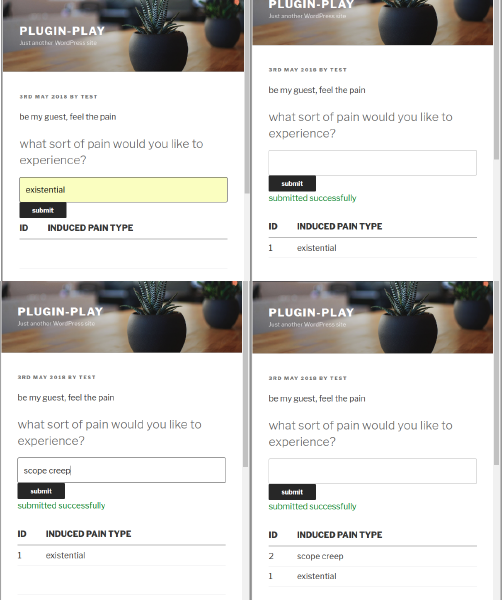
Subsequent screens show adding two items:
After each submission the database is queried and brings back the newly added item.
The shortcode provides some customisation options (for demonstration).
You can provide a different prompt to the default one (as per the above print-screens):
1[induce_pain]what kind of pain can I serve you today?[/induce_pain] You can control the length of the listing fetched from the database:
1[induce_pain pain_limiter="3"] And, finally, you can control the table to store the pain in:
1[induce_pain table_name="some_other_table"] This table (with applied prefix) will be created on plugin initialisation, if it does not exist.