- CLI Interpreters
- Left-hand pane
- Right-hand pane
- Remote interpreter accessible through SSH
- Remote interpreter on a Vagrant instance
- Remote interpreter in a Docker container
- Remote interpreter running in a multi-container Docker Compose application
- Remote interpreter running through Windows Subsystem for Linux (WSL)
- General area
- Advanced area
- Configuration options dialog
- Phpstorm путь к php
- Установка Xdebug
- Подключение интерпретатора PHP к PhpStorm
- Работа с отладчиком Xdebug в PhpStorm
CLI Interpreters
The dialog opens when you click next to the CLI Interpreter list in the Development environment section of the PHP page.
Use this dialog to configure PHP engines as interpreters , see Configure local PHP interpreters and Configure remote PHP interpreters. In this dialog, you can add new interpreters and edit or remove the existing ones.
The dialog consists of two panes. The left-hand pane lists all the configured PHP interpreters, both local and remote ones, and contains a toolbar for adding, removing, and copying PHP interpreter configurations. The contents of the right-hand pane depend on the type of the interpreter currently selected in the left-hand pane. Use the controls in this pane to edit the settings of the selected interpreter and even choose its type, if necessary.
Left-hand pane
The left-hand pane lists all the configured PHP interpreters, both local and remote ones, and contains a toolbar for adding, removing, and copying PHP interpreter configurations.
Click this button to add a new PHP interpreter to the list. From the popup list, choose the interpreter type ( Local or Remote ), and configure a local interpreter in the right-hand pane or a remote interpreter in the Configure PHP Remote Interpreter Dialog dialog that opens.
Click this button to remove the selected interpreter from the list.
Click this button to create a new interpreter with the settings copied from the selected one.
Right-hand pane
The contents of the right-hand pane depend on the type of the interpreter currently selected in the left-hand pane. Use the controls in this pane to edit the settings of the selected interpreter and even choose its type, if necessary.
Remote interpreter accessible through SSH
From this list, choose one of the created SSH configurations, or click and create a new configuration as described in Create SSH configurations.
Remote interpreter on a Vagrant instance
In this field, choose the folder that points at the environment you are going to use. Technically, it is the folder where the VagrantFile configuration file for the desired environment is located. Based on this setting, PhpStorm detects the Vagrant host and shows it as a link in the Vagrant Host URL read-only field.
Remote interpreter in a Docker container
In this field, specify the Docker configuration to use, see Configure the Docker daemon connection settings for details. Select a configuration from the list or click New. and create a new configuration on the Docker page that opens.
In this field, specify the base Docker image to use. Choose one of the previously downloaded or your custom images from the list or type the image name manually, for example, php:latest or php:7.0-cli . When you later launch the run configuration, Docker will search for the specified image on your machine. If the search fails, the image will be downloaded from the Docker Official Images repository on the Docker Registry page.
Remote interpreter running in a multi-container Docker Compose application
in this field, specify the Docker configuration to use, see Configure the Docker daemon connection settings for details. Select a configuration from the list or click New. and create a new configuration on the Docker page that opens.
In this field, specify the docker-compose.yml file defining the application’s services.
In this field, choose the desired application’s service.
In this field, define the environment variables. See Docker Compose run configuration settings for details.
In this area, choose how the Docker container for the selected service should be managed by PhpStorm.
- Always start a new container (‘docker-compose run’) : choose this option to have the container started via the run command. The container will be restarted upon each run.
- Connect to existing container (‘docker-compose exec’) : choose this option to have the container started once, and then connect to it via the exec command.
Remote interpreter running through Windows Subsystem for Linux (WSL)
From this list, choose one of the installed Linux distributions to use.
General area
In this field, type the identifier to distinguish the interpreter from others, for example, php_installation_ .
In this field, specify the path to the PHP engine. Type the path manually or click and choose the executable file in the dialog that opens. PhpStorm detects the version of PHP and displays it in the PHP version read-only field.
PhpStorm also detects the debugging engine and the php.ini configuration file. The type of the debugging engine associated with the PHP interpreter and its version are displayed in the Debugger read-only field. If no debugger is detected or you have disabled it in php.ini file (see Configuring Xdebug for Using in the On-Demand Mode), the field shows Debugger: Not installed .
The location of php.ini is displayed in the Configuration file read-only field. To edit the php.ini in PhpStorm, click Open in Editor .
Click this button to check that the specified PHP home directory actually contains a PHP executable file. If no PHP executable is detected at the specified location, PhpStorm displays the corresponding error message.
Click this button to have PhpStorm display a separate information window with the installation details and the list of loaded extensions and configured options. Note that the additional options specified in the Configuration Options field of the PHP Interpreters dialog are not listed.
Advanced area
In this field, specify the location of the Xdebug extension to enable PhpStorm to activate it when necessary.
PhpStorm supports the On-Demand mode, where you can disable debugger for your global PHP installation and have it enabled automatically on demand only when you are debugging your command-line scripts or when you need code coverage reports. This lets your command line scripts (including Composer and unit tests) run much faster.
Use this field to customize the configuration settings of the installation by composing a string of configuration directives to be passed through the -d command line option and thus add new entries to the php.ini file. Click to open the Configuration Options dialog and create a list of new php.ini entries there.
Configuration options dialog
In this field, type the name of the new entry.
In this field, type the value of the new entry.
Click this button to have a new line added to the list and specify the name and value of a new entry there.
Click this button to remove the selected entry from the list.
Use these buttons to move the selected entry up or down in the list. The order of entries in the list determine the order in which they are passed through the -d command line option.
You can add as many entries as you need, just keep in mind that they will be transformed into a command line with its length limited to 256 characters.
Phpstorm путь к php

На данный момент, PhpStorm – одна из лучших IDE для разработки на языке PHP, которая предоставляет множество возможностей для разработчика, такие как запуск PHP-скриптов, благодаря возможности подключения внешнего интерпретатора PHP и отладку через расширение Xdebug.
В этой статье мы рассмотрим возможность подключения интерпретатора PHP, отладчика Xdebug к PhpStorm и использование встроенного в IDE web-сервера.
Начнем с установки отладчика Xdebug в PHP.
Установка Xdebug
Первым делом скачаем и установим сам интерпретатор PHP по ссылке: http://php.net/downloads.php
Далее нужно произвести начальную настройку PHP и прописать в переменную окружения PATH путь к интерпретатору. Чтобы не повторяться, весь необходимый порядок действий мной описан в этой статье: Установка Composer и снятие ограничения количества обращений к GitHub
Теперь можно перейти к установке отладчика Xdebug, для которого существует специальный помощник, значительно упрощающий процедуру установки. Для его использования перейдем по ссылке: https://xdebug.org/wizard.php
На этой странице, необходимо ввести в поле ввода информацию об установленном PHP-интерпретаторе, которая генерируется с помощью PHP-функции phpinfo(). Вводить нужно весь скопированный текст со страницы.
Или, введя в консоль команду php -i, которая генерирует информацию о PHP.
Копируем полученную информацию, нажимаем кнопку Analyse my phpinfo() output и получаем инструкцию по установке Xdebug.
В зависимости от вашей версии PHP и пути установки инструкция может отличаться от моей:
- Скачиваем библиотеку Xdebug для PHP версии 5.6.19 по ссылке: php_xdebug-2.4.0-5.6-vc11-nts.dll
- Перемещаем её в папку C:\php\ext
- В файл C:\php\php.ini находим секцию Dynamic Extensions и добавляем следующую строку:
zend_extension = C:\php\ext\php_xdebug-2.4.0-5.6-vc11-nts.dllПодключение интерпретатора PHP к PhpStorm
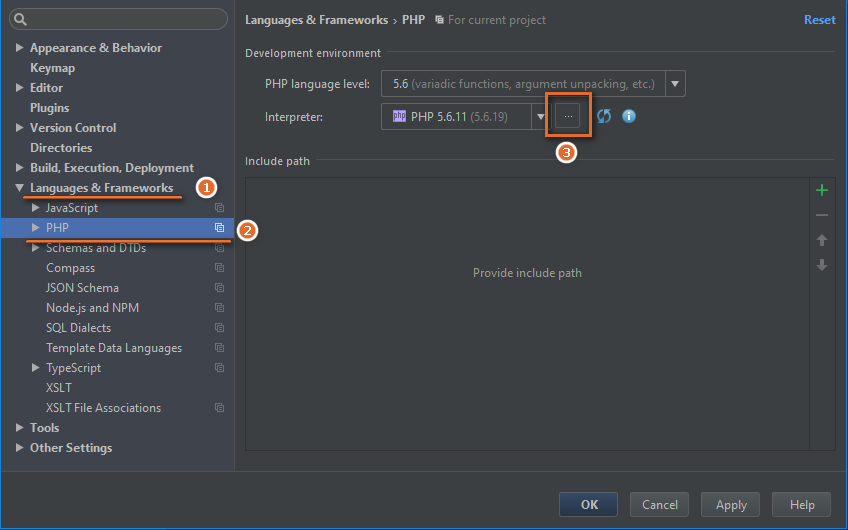
Теперь перейдем в PhpStorm и откроем настройки комбинацией клавиш Ctrl+Alt+S.
Далее, в секции Languages & Frameworks выберем пункт PHP. В этой секции необходимо назначить интерпретатор для IDE в пункте Interpreter нажав на кнопку …
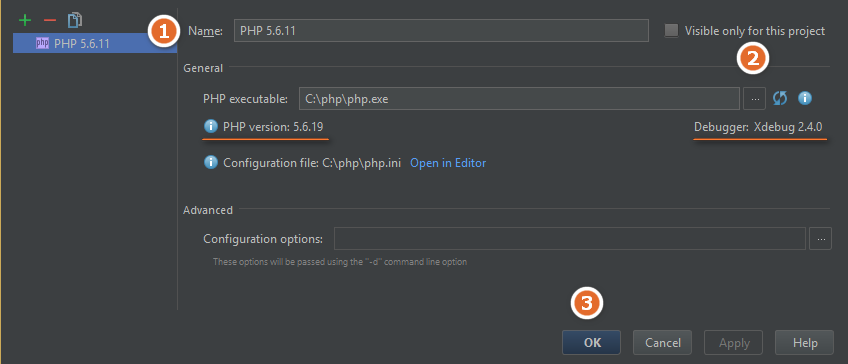
В открывшемся окне, в поле Name вводим любое имя для удобства дальнейшей идентификации, например: PHP 5.6.11.
В поле PHP executable указываем путь до интерпретатора, например: C:\php\php.exe. Обратите внимание на появившуюся версию PHP и дебагера, что свидетельствует о правильности установки.
Чтобы убедиться в том, что правильно отрабатывает подключенный интерпретатор PHP, создадим в PhpStorm новый проект, добавим к нему файл index.php и запишем в этот файл, например, функцию var_dump([ 1, 2, 3 ]) с переданным в неё массивом.
Нажав правой кнопкой мыши на этом файле, выберем Open in Browser -> Default.
На странице мы видим характерный вывод var_dump(), который генерируется с помощью Xdebug. И, если посмотреть на заголовки ответа через консоль разработчика, то мы увидим, что всё работает верно:
server:PhpStorm 2016.1 X-Powered-By:PHP/5.6.19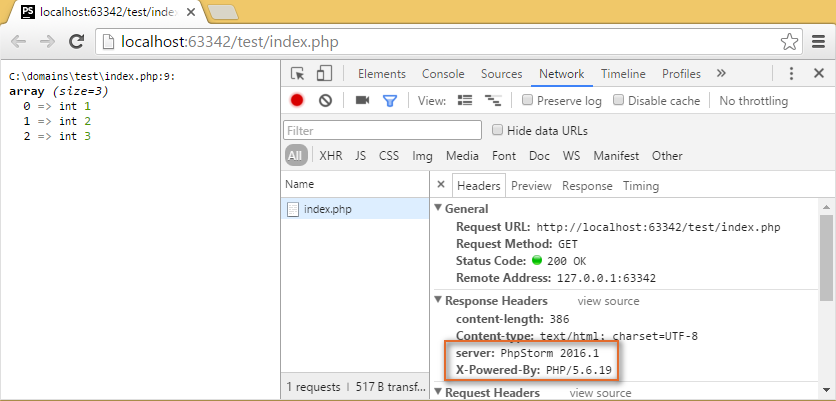
Начальная настройка Xdebug и установка его под линукс описана в статье Установка модуля Xdebug для PHP под Ubuntu Linux
Работа с отладчиком Xdebug в PhpStorm
Прежде чем приступит к отладке PHP-скриптов с помощью Xdebug произведем необходимую настройку в файле php.ini. В секции Dynamic Extensions после подключения расширения Xdebug добавим следующие настройки:
xdebug.remote_enable=1 xdebug.remote_port=9000 xdebug.profiler_enable=1 xdebug.profiler_output_dir="c:\php\tmp"Теперь зайдем в PhpStorm и откроем настройки. Перейдем в Languages & Frameworks -> PHP -> Debug. В секции Xdebug убедимся, что установлены следующие настройки:
Debug port: 9000 Установлен флажок Can accept external connections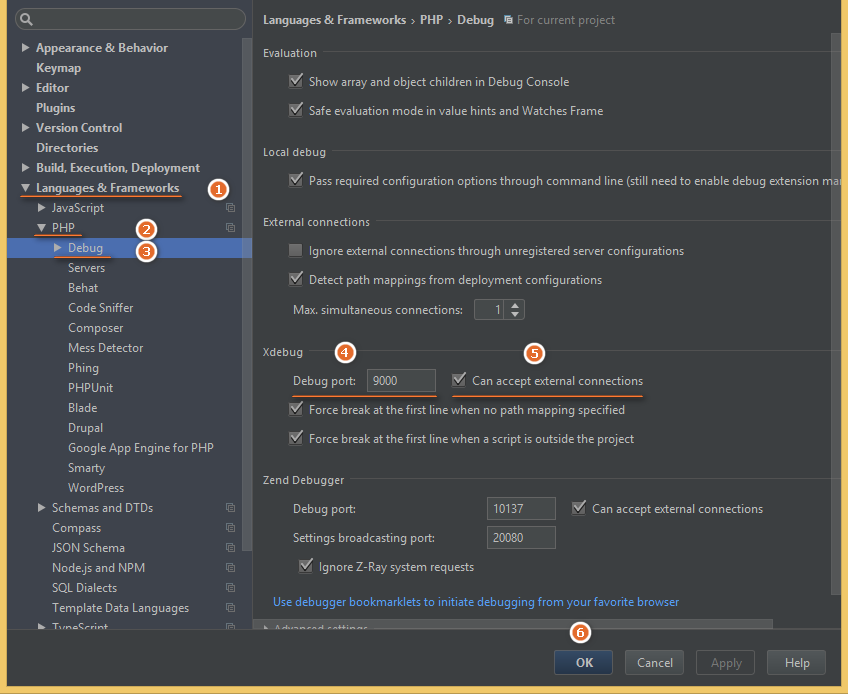
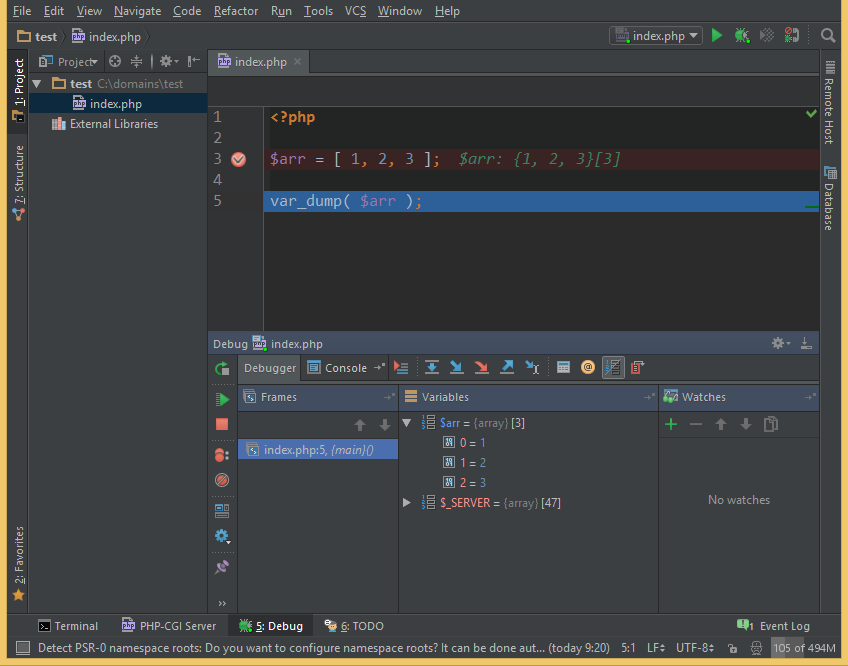
Чтобы проверить, что все действия были проведены верно, добавим в уже имеющийся в проекте файл index.php следующий код:
И поставим точку остановки на переменной $arr.
Теперь запустим отладку этого скрипта, нажав правую кнопку мыши и выбрав пункт Debug ‘index.php’. Если все было сделано правильно, то в PhpStorm появится вывод дебага, как показано на скриншоте.
В итоге, мы получили мощный и удобный инструмент для отладки PHP-скриптов с подключенным интерпретатором PHP, а также возможность запускать скрипты через встроенный в PhpStorm локальный web-сервер.