- PHP File Upload
- Configure The «php.ini» File
- Create The HTML Form
- Create The Upload File PHP Script
- Check if File Already Exists
- Limit File Size
- Limit File Type
- Complete Upload File PHP Script
- Complete PHP Filesystem Reference
- Php image upload path
- How to Upload an Image in PHP and Store it in the Folder
- Step 1: Create a Basic HTML Form to Upload Images in PHP
- Step 2: PHP Code to Upload and Store Image in Folder
- About The Author
- Muhammad Zeeshan
PHP File Upload
However, with ease comes danger, so always be careful when allowing file uploads!
Configure The «php.ini» File
First, ensure that PHP is configured to allow file uploads.
In your «php.ini» file, search for the file_uploads directive, and set it to On:
Create The HTML Form
Next, create an HTML form that allow users to choose the image file they want to upload:
Some rules to follow for the HTML form above:
- Make sure that the form uses method=»post»
- The form also needs the following attribute: enctype=»multipart/form-data». It specifies which content-type to use when submitting the form
Without the requirements above, the file upload will not work.
- The type=»file» attribute of the tag shows the input field as a file-select control, with a «Browse» button next to the input control
The form above sends data to a file called «upload.php», which we will create next.
Create The Upload File PHP Script
The «upload.php» file contains the code for uploading a file:
$target_dir = «uploads/»;
$target_file = $target_dir . basename($_FILES[«fileToUpload»][«name»]);
$uploadOk = 1;
$imageFileType = strtolower(pathinfo($target_file,PATHINFO_EXTENSION));
// Check if image file is a actual image or fake image
if(isset($_POST[«submit»])) $check = getimagesize($_FILES[«fileToUpload»][«tmp_name»]);
if($check !== false) echo «File is an image — » . $check[«mime»] . «.»;
$uploadOk = 1;
> else echo «File is not an image.»;
$uploadOk = 0;
>
>
?>
- $target_dir = «uploads/» — specifies the directory where the file is going to be placed
- $target_file specifies the path of the file to be uploaded
- $uploadOk=1 is not used yet (will be used later)
- $imageFileType holds the file extension of the file (in lower case)
- Next, check if the image file is an actual image or a fake image
Note: You will need to create a new directory called «uploads» in the directory where «upload.php» file resides. The uploaded files will be saved there.
Check if File Already Exists
Now we can add some restrictions.
First, we will check if the file already exists in the «uploads» folder. If it does, an error message is displayed, and $uploadOk is set to 0:
// Check if file already exists
if (file_exists($target_file)) echo «Sorry, file already exists.»;
$uploadOk = 0;
>
Limit File Size
The file input field in our HTML form above is named «fileToUpload».
Now, we want to check the size of the file. If the file is larger than 500KB, an error message is displayed, and $uploadOk is set to 0:
// Check file size
if ($_FILES[«fileToUpload»][«size»] > 500000) echo «Sorry, your file is too large.»;
$uploadOk = 0;
>
Limit File Type
The code below only allows users to upload JPG, JPEG, PNG, and GIF files. All other file types gives an error message before setting $uploadOk to 0:
Complete Upload File PHP Script
The complete «upload.php» file now looks like this:
$target_dir = «uploads/»;
$target_file = $target_dir . basename($_FILES[«fileToUpload»][«name»]);
$uploadOk = 1;
$imageFileType = strtolower(pathinfo($target_file,PATHINFO_EXTENSION));
// Check if image file is a actual image or fake image
if(isset($_POST[«submit»])) $check = getimagesize($_FILES[«fileToUpload»][«tmp_name»]);
if($check !== false) echo «File is an image — » . $check[«mime»] . «.»;
$uploadOk = 1;
> else echo «File is not an image.»;
$uploadOk = 0;
>
>
// Check if file already exists
if (file_exists($target_file)) echo «Sorry, file already exists.»;
$uploadOk = 0;
>
// Check file size
if ($_FILES[«fileToUpload»][«size»] > 500000) echo «Sorry, your file is too large.»;
$uploadOk = 0;
>
// Check if $uploadOk is set to 0 by an error
if ($uploadOk == 0) echo «Sorry, your file was not uploaded.»;
// if everything is ok, try to upload file
> else if (move_uploaded_file($_FILES[«fileToUpload»][«tmp_name»], $target_file)) echo «The file «. htmlspecialchars( basename( $_FILES[«fileToUpload»][«name»])). » has been uploaded.»;
> else echo «Sorry, there was an error uploading your file.»;
>
>
?>
Complete PHP Filesystem Reference
For a complete reference of filesystem functions, go to our complete PHP Filesystem Reference.
Php image upload path
I think the way an array of attachments works is kind of cumbersome. Usually the PHP guys are right on the money, but this is just counter-intuitive. It should have been more like:
Array
(
[0] => Array
(
[name] => facepalm.jpg
[type] => image/jpeg
[tmp_name] => /tmp/phpn3FmFr
[error] => 0
[size] => 15476
)
Anyways, here is a fuller example than the sparce one in the documentation above:
foreach ( $_FILES [ «attachment» ][ «error» ] as $key => $error )
$tmp_name = $_FILES [ «attachment» ][ «tmp_name» ][ $key ];
if (! $tmp_name ) continue;
$name = basename ( $_FILES [ «attachment» ][ «name» ][ $key ]);
if ( $error == UPLOAD_ERR_OK )
if ( move_uploaded_file ( $tmp_name , «/tmp/» . $name ) )
$uploaded_array [] .= «Uploaded file ‘» . $name . «‘.
\n» ;
else
$errormsg .= «Could not move uploaded file ‘» . $tmp_name . «‘ to ‘» . $name . «‘
\n» ;
>
else $errormsg .= «Upload error. [» . $error . «] on file ‘» . $name . «‘
\n» ;
>
?>
Do not use Coreywelch or Daevid’s way, because their methods can handle only within two-dimensional structure. $_FILES can consist of any hierarchy, such as 3d or 4d structure.
The following example form breaks their codes:
As the solution, you should use PSR-7 based zendframework/zend-diactoros.
use Psr \ Http \ Message \ UploadedFileInterface ;
use Zend \ Diactoros \ ServerRequestFactory ;
$request = ServerRequestFactory :: fromGlobals ();
if ( $request -> getMethod () !== ‘POST’ ) http_response_code ( 405 );
exit( ‘Use POST method.’ );
>
$uploaded_files = $request -> getUploadedFiles ();
if (
!isset( $uploaded_files [ ‘files’ ][ ‘x’ ][ ‘y’ ][ ‘z’ ]) ||
! $uploaded_files [ ‘files’ ][ ‘x’ ][ ‘y’ ][ ‘z’ ] instanceof UploadedFileInterface
) http_response_code ( 400 );
exit( ‘Invalid request body.’ );
>
$file = $uploaded_files [ ‘files’ ][ ‘x’ ][ ‘y’ ][ ‘z’ ];
if ( $file -> getError () !== UPLOAD_ERR_OK ) http_response_code ( 400 );
exit( ‘File uploading failed.’ );
>
$file -> moveTo ( ‘/path/to/new/file’ );
The documentation doesn’t have any details about how the HTML array feature formats the $_FILES array.
Array
(
[document] => Array
(
[name] => sample-file.doc
[type] => application/msword
[tmp_name] => /tmp/path/phpVGCDAJ
[error] => 0
[size] => 0
)
)
Multi-files with HTML array feature —
Array
(
[documents] => Array
(
[name] => Array
(
[0] => sample-file.doc
[1] => sample-file.doc
)
(
[0] => application/msword
[1] => application/msword
) [tmp_name] => Array
(
[0] => /tmp/path/phpVGCDAJ
[1] => /tmp/path/phpVGCDAJ
)
The problem occurs when you have a form that uses both single file and HTML array feature. The array isn’t normalized and tends to make coding for it really sloppy. I have included a nice method to normalize the $_FILES array.
function normalize_files_array ( $files = [])
foreach( $files as $index => $file )
if (! is_array ( $file [ ‘name’ ])) $normalized_array [ $index ][] = $file ;
continue;
>
foreach( $file [ ‘name’ ] as $idx => $name ) $normalized_array [ $index ][ $idx ] = [
‘name’ => $name ,
‘type’ => $file [ ‘type’ ][ $idx ],
‘tmp_name’ => $file [ ‘tmp_name’ ][ $idx ],
‘error’ => $file [ ‘error’ ][ $idx ],
‘size’ => $file [ ‘size’ ][ $idx ]
];
>
?>
The following is the output from the above method.
Array
(
[document] => Array
(
[0] => Array
(
[name] => sample-file.doc
[type] => application/msword
[tmp_name] => /tmp/path/phpVGCDAJ
[error] => 0
[size] => 0
)
(
[0] => Array
(
[name] => sample-file.doc
[type] => application/msword
[tmp_name] => /tmp/path/phpVGCDAJ
[error] => 0
[size] => 0
) [1] => Array
(
[name] => sample-file.doc
[type] => application/msword
[tmp_name] => /tmp/path/phpVGCDAJ
[error] => 0
[size] => 0
)
How to Upload an Image in PHP and Store it in the Folder
In this tutorial, I will show you the exact steps on how to upload an image in PHP and store it in the folder.
Let’s see how we’ll do it:
First of all, we’ll create a basic HTML form that will allow users to choose an image file from their pc and submit it to the form handler. A form handler is a file with a name upload.php that contains a PHP script.
This PHP script will upload the image to a folder that is located on a server. So, this is a straightforward process that we’re going to do now.
Our file structure will look like this.
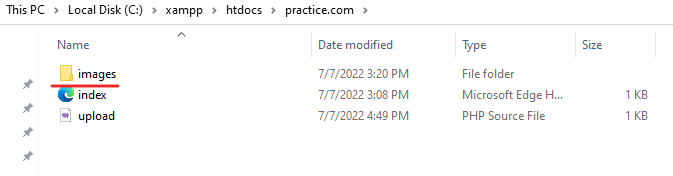
In this above file structure image, first I created my project folder inside ‘ htdocs ‘ folder and named it practice.com . Then, I created 2 files and a folder inside it.
The images folder is where I will upload the image using PHP and store it in this folder. And the index.html file will have HTML form code while upload.php file consists of a PHP script that will process images.
Now, just paste the practice.com folder into your text editor, and let’s code.
Tip: If you don’t know to run PHP code on your pc then check this guide first on how to run PHP code on your pc.
Let’s begin with our first step:
Step 1: Create a Basic HTML Form to Upload Images in PHP
The form is very simple and it will look like this in your browser.
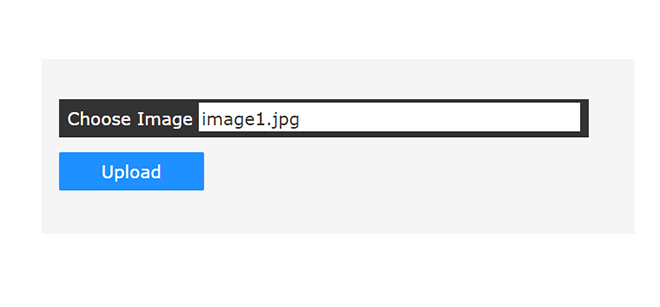
The form contains only one input to choose an image and an upload button. This form will allow users to choose an image to upload.
The HTML code of our image upload form will look like this below:
form action="upload.php" method="POST" enctype="multipart/form-data"> input type="file" name="imageToUpload"> input type="submit" name="submit" value="Submit"> /form>
Code Explanation:
- In the above code, the form element contains three attributes, the first action attribute is used for specifying the form handler file which is upload.php . And the method we will use to send input to the upload.php file is POST .
- And the third attribute I used is enctype the attribute and set its value to “ multipart/form-data “. It’s crucial if you want to upload an image file in PHP.
- Inside the form element, I used two inputs, one is a file upload button and the second is a submit button which will upload images in a folder upon click.
And CSS code to style the form is below.
* box-sizing: border-box; margin: 0; font-family: Verdana, Geneva, Tahoma, sans-serif; font-size: 20px; > body padding-top: 100px; > form width: 50%; margin: auto; background-color: #f5f5f5; padding: 50px 20px; > input padding: 4px; > input[type=text] width: 100%; > input[type=file] background-color: #ffffff; color: #333; padding: 6px 3px 3px 3px; > input[type=file]::-webkit-file-upload-button display: none; background-color: #333; > .file-upload background-color: #333333; color: #ffffff; padding: 10px; cursor: pointer; > input[type=submit] background-color: dodgerblue; color: #ffffff; padding: 10px; cursor: pointer; width: 26%; border-radius: 2px; border: none; > input[type=submit]:hover background-color: rgb(15, 116, 218); > @media screen and (max-width: 700px) * font-size: 18px; > form width: 90%; > >
You can copy the above CSS code and paste it in a separate style sheet or inside style tags of HTML.
Now, our form is ready. Let’s see the second step.
Step 2: PHP Code to Upload and Store Image in Folder
After choosing the image, when the user will click on the submit button. The HTML form will send data to the upload.php file which we’re going to create now.
Inside the upload.php file, we’ll write some code to upload an image file and store it in a folder.
So, let’s edit upload.php file in a text editor. Just see the code below.
if(isset($_FILES['imageToUpload'])) move_uploaded_file($_FILES['imageToUpload']['tmp_name'], "images/". $_FILES['imageToUpload']['name']); > else echo "image not found!"; > ?> Code Explanation:
1- First of all, on line number 2 in the above code, I checked whether the name attribute of the is set or not using the if() statement with isset() function.
Inside the function, I used the $_FILES[ ] superglobal variable and pass the value of the name attribute which is ‘imageToUpload’.
If the variable is set and the statement will be true then the code inside it will execute otherwise it will not run.
2- Inside the curly brackets of if() statement, I used move_uploaded_file() function. This function is used to upload an image in PHP and store it in a folder.
The move_uploaded_file() function uses two parameters inside it.
move_uploaded_file(tmp_name, filepath.withName); ?> The first parameter is tmp_name which is the temporary name of the file.
And the second parameter is a filename with the path where the image file will store.
These few lines of code will do the job and you can upload multiple images in PHP and store them in a folder.
This is how you can upload images in PHP and store them in a folder.
If you have questions related to this guide then feel free to leave a comment below.
About The Author
Muhammad Zeeshan
Hi everyone, I’m a Full Stack Web Developer and Technical Writer. I just love to share my knowledge to help others in this community. I mostly write about HTML, CSS, JS, MySQL, and PHP.