- How to use custom php.ini files on shared hosting
- Step 1:- Create a php.ini file
- Step 2:- Create a .htaccess file
- Step 3:- Test your php.ini file
- Create Config Files in PHP
- Store the Configurations in an Array in a PHP File
- Typecast the Array Configuration to an Object in a PHP File
- Use an INI File to Create a Config File in PHP
- Saved searches
- Use saved searches to filter your results more quickly
- License
- Magicalex/WriteiniFile
- Name already in use
- Sign In Required
- Launching GitHub Desktop
- Launching GitHub Desktop
- Launching Xcode
- Launching Visual Studio Code
- Latest commit
- Git stats
- Files
- README.md
- What Is a php.ini File and Its Use
- Use of PHP INI File
- Example of PHP.INI File
How to use custom php.ini files on shared hosting
The advantages of using php with apache web server are many. The wonderful file named .htaccess makes things easier by allowing the webmaster (thats you!) to play around with many settings which would otherwise need the php.ini to be edited. This is a boon for people having their websites hosted on a shared server. Such people can’t even dream of editing the php.ini file located on their web hosting provider’s server. Thus the concept of custom php.ini was born. Webmasters who have their website hosted on a server with support for custom php.ini can create a php.ini within their directory and provide all the necessary settings they require. But custom php.ini doesn’t work out-of-the-box. This article explains how to use custom php.ini on a shared hosting server.
Note:- First ask your web hosting provider whether they support custom php.ini. If they don’t there is no point in trying anything further.
Step 1:- Create a php.ini file
Create a file named php.ini inside your root directory. By root directory I mean the directory outside your document root. If you are confused here is the clear explanation, if you upload files inside /home/username/public_html then it is your document root, you should create the php.ini inside /home/username for your safety and security.
Step 2:- Create a .htaccess file
Even for custom php.ini feature to work the infamous .htaccess is required. Create a .htaccess file inside your root directory i.e. the directory outside your document root if you upload your website file at /home/username/htdocs then the htaccess file should be in /home/username
Add the following line to the .htaccess file
SetEnv PHPRC /home/username/php.ini
Wait its not over the php.ini file needs to be secured so along with the above line add the following
order allow,deny deny from all
This will return a 403 error whenever someone tries to view your php.ini files or any file with a .ini extension. You could argue that no one can access it via the url as it is located outside the document root, but even if you accidentally copy the file into the document root you’ll be in trouble. So better safe than sorry.
Step 3:- Test your php.ini file
Create a file named info.php into your document root and add the following code
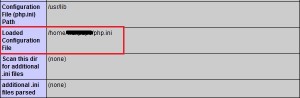
Save the file and access it by typing in the url (http://example.com/info.php) check the value next to “Loaded Configuration File” it should point to the location of the new php.ini file.
Now you can edit the php.ini file as you wish. Here are some sample configurations
display_errors = On date.timezone = Europe/London upload_max_filesize = 30M
IMPORTANT Remove the file containing phpinfo immediately because it exposes many sensitive information about your web server
Create Config Files in PHP

- Store the Configurations in an Array in a PHP File
- Typecast the Array Configuration to an Object in a PHP File
- Use an INI File to Create a Config File in PHP
This article will introduce some methods to create config files in PHP.
Store the Configurations in an Array in a PHP File
We can create an array of the configuration items to form a config file in PHP.
An associative array will be best for storing the configuration data. The file can be included in another PHP file, and the configuration can be used.
We can use the include() function to have the configuration file. We will demonstrate the creation of config files for the database connection in PHP.
For example, create a PHP file config.php and create an array. Write the keys hostname , username , and password in the array.
Set the hostname to localhost , username , and password to your database username and password. Then return the array.
Next, create another file, DB.php , and use the include() function to include the config.php file and store it in the $conf variable. Create the variables $hostname , $username , $password , and $db to assign the configurations.
Store the configurations in the variables accessing each array items of the $conf variable. Set your database name in the $db variable. Use the mysqli_connect() function to connect the server and the database.
Provide the variables we created above as the parameters to the mysqli_connect() function. If the correct configuration is provided in the config.php file, the example below will connect the server and the database.
In this way, we can use an array to create a configuration file in PHP.
return array( 'hostname' => 'localhost', 'username' => 'root', 'password' => 'pass123' ); $conf = include('config.php'); $hostname = $conf['hostname']; $username = $conf['username']; $password = $conf['password']; $db = "my_db"; $con = mysqli_connect($hostname, $username, $password,$db); if (!$con) die("Failed to establish connection"); > echo "Connection established successfully"; Connection established successfully Typecast the Array Configuration to an Object in a PHP File
This method will typecast the array in the config.php file into an object. In this way, the configurations can be accessed as an object in the PHP file.
Furthermore, we can take the benefits from objects for data handling purposes. For example, the objects could easily be passed JSON to the client-side if we use JavaScript.
For example, typecast the array placing (object) before the array function after the return keyword. Then, in index.php , access the configurations as $conf->hostname as shown in the example below.
return (object) array ( 'hostname' => 'localhost', 'username' => 'root', 'password' => 'subodh', 'db' => 'oop' ); $conf = include('config.php'); $hostname = $conf->hostname; $username = $conf->username; $password = $conf->password; $db = $conf->db; $con = mysqli_connect($hostname, $username, $password,$db); if (!$con) die("Failed to establish connection"); > echo "Connection established successfully"; Use an INI File to Create a Config File in PHP
We can also create a config file using the INI file in PHP. We can store all the configurations in the INI file and use the parse_ini_file() function to access those configurations in the PHP file.
The INI file is broadly used as a configuration file. The structure of the file contains key-value pairs.
The parse_ini_file loads the content of the INI file as an associative array. We will demonstrate the creation of the INI config file to establish a connection to the server and the database.
For example, create a file config.ini and write the keys hostname , username , password , and db . Then, write the correct configurations. An example is shown below.
hostname = 'localhost' username = 'root' password = 'pass1234' db = 'my_db' Next, create an index.php file and create an $ini variable in it.
Use the parse_ini_file() function to parse the config.ini file. The $ini variable contains an associative array of the configurations.
Now use the mysqli_connect() function with the correct parameters to establish the connection as we did above.
$ini = parse_ini_file('config.ini'); $hostname = $ini['hostname']; $username = $ini['username']; $password = $ini['password']; $db = $ini['db']; $con = mysqli_connect($hostname, $username, $password,$db); if (!$con) die("Failed to establish connection"); > echo "Connection established successfully"; Connection established successfully It should be noted that the INI file should be kept in a non-public folder so that we do not encounter any security problems. In this way, we can create a configuration file with an INI file.
Subodh is a proactive software engineer, specialized in fintech industry and a writer who loves to express his software development learnings and set of skills through blogs and articles.
Saved searches
Use saved searches to filter your results more quickly
You signed in with another tab or window. Reload to refresh your session. You signed out in another tab or window. Reload to refresh your session. You switched accounts on another tab or window. Reload to refresh your session.
Write-ini-file php library for create, remove, erase, add, and update ini file
License
Magicalex/WriteiniFile
This commit does not belong to any branch on this repository, and may belong to a fork outside of the repository.
Name already in use
A tag already exists with the provided branch name. Many Git commands accept both tag and branch names, so creating this branch may cause unexpected behavior. Are you sure you want to create this branch?
Sign In Required
Please sign in to use Codespaces.
Launching GitHub Desktop
If nothing happens, download GitHub Desktop and try again.
Launching GitHub Desktop
If nothing happens, download GitHub Desktop and try again.
Launching Xcode
If nothing happens, download Xcode and try again.
Launching Visual Studio Code
Your codespace will open once ready.
There was a problem preparing your codespace, please try again.
Latest commit
Git stats
Files
Failed to load latest commit information.
README.md
Write-ini-file php library for create, remove, erase, add, and update ini file.
Use composer for install magicalex/write-ini-file.
composer require magicalex/write-ini-file
require_once 'vendor/autoload.php'; use \WriteiniFile\WriteiniFile; use \WriteiniFile\ReadiniFile; $data = [ 'fruit' => ['orange' => '100g', 'fraise' => '10g'], 'legume' => ['haricot' => '20g', 'oignon' => '100g'], 'jus' => ['orange' => '1L', 'pomme' => '1,5L', 'pamplemousse' => '0,5L'], ]; // demo create ini file $file = new WriteiniFile('file.ini'); $file ->create($data) ->add(['music' => ['rap' => true, 'rock' => false]]) ->rm(['jus' => ['pomme' => '1,5L']]) ->update(['fruit' => ['orange' => '200g']]) ->write(); echo ''
.file_get_contents('file.ini').' '; /* output file.ini [fruit] orange=200g fraise=10g [legume] haricot=20g oignon=100g [jus] orange=1L pamplemousse=0,5L [music] rap=true rock=false */ // Just read a file ini var_dump(ReadiniFile::get('file.ini')); /* output array(4) 'fruit' => array(2) 'orange' => string(4) "200g" 'fraise' => string(3) "10g" > 'legume' => array(2) 'haricot' => string(3) "20g" 'oignon' => string(4) "100g" > 'jus' => array(2) 'orange' => string(2) "1L" 'pamplemousse' => string(4) "0,5L" > 'music' => array(2) 'rap' => string(4) "true" 'rock' => string(5) "false" > > */ $erase = (new WriteiniFile('file.ini'))->erase()->write(); // file.ini -> empty
composer install php vendor/bin/phpunit # or use: composer run-script test WriteiniFile is released under the GNU General Public License v3.0
What Is a php.ini File and Its Use
What Is a php.ini File? As all, we know PHP is an open-source scripting language which means we can modify PHP configuration.

What Is a php.ini File? As all, we know PHP is an open-source scripting language which means we can modify PHP configuration according to our use. So, the php.ini is the main configuration file of PHP that we used to modify the execution time, upload file size, and much more.
PHP INI file is created at the time of PHP installation. If you install XAMPP there is also an auto-generated PHP INI configuration that we use to set up the maximum upload size for our PHPMYADMIN database.
Use of PHP INI File
Here is a list of major use of the PHP INI configuration file.
- By using the INI configuration file we can increase PHPMyAdmin DB Import Size.
- We can maximize the execution time of PHP files or prevent timeout issues (max_execution_time).
- It is used to disable error reporting like PHP error notices and warnings (error_reporting).
- Also, we can enable and disable file upload functionality by using PHP INI configuration (file_uploads).
- Set memory limit for PHP scripts which allows the script to take defined memory (memory_limit).
Example of PHP.INI File
In this example, I will show you how you can increase your upload size limit,