- Saved searches
- Use saved searches to filter your results more quickly
- alexmingoia/virtual-dom-stringify
- Name already in use
- Sign In Required
- Launching GitHub Desktop
- Launching GitHub Desktop
- Launching Xcode
- Launching Visual Studio Code
- Latest commit
- Git stats
- Files
- README.md
- Saved searches
- Use saved searches to filter your results more quickly
- License
- ntharim/vdom-to-html
- Name already in use
- Sign In Required
- Launching GitHub Desktop
- Launching GitHub Desktop
- Launching Xcode
- Launching Visual Studio Code
- Latest commit
- Git stats
- Files
- README.md
- About
- How the virtual DOM works in Vue.js
- The DOM itself
- This is a Heading
- Why the traditional DOM is not enough
- The Vue.js virtual DOM
- Over 200k developers use LogRocket to create better digital experiences
- How it works
- How to mount a virtual DOM to an HTML element
- Some lessons
- Conclusion
- Experience your Vue apps exactly how a user does
- Virtual dom to html
Saved searches
Use saved searches to filter your results more quickly
You signed in with another tab or window. Reload to refresh your session. You signed out in another tab or window. Reload to refresh your session. You switched accounts on another tab or window. Reload to refresh your session.
alexmingoia/virtual-dom-stringify
This commit does not belong to any branch on this repository, and may belong to a fork outside of the repository.
Name already in use
A tag already exists with the provided branch name. Many Git commands accept both tag and branch names, so creating this branch may cause unexpected behavior. Are you sure you want to create this branch?
Sign In Required
Please sign in to use Codespaces.
Launching GitHub Desktop
If nothing happens, download GitHub Desktop and try again.
Launching GitHub Desktop
If nothing happens, download GitHub Desktop and try again.
Launching Xcode
If nothing happens, download Xcode and try again.
Launching Visual Studio Code
Your codespace will open once ready.
There was a problem preparing your codespace, please try again.
Latest commit
Git stats
Files
Failed to load latest commit information.
README.md
Stringify virtual-dom trees into HTML. For parsing DOM nodes into a virtual-dom tree use vnode-virtualize.
This module is deprecated. Use vdom-to-html.
npm install --save virtual-dom-stringify
bower install --save virtual-dom-stringify
module.exports(node, parent, [options]) ⇒ String ⏏
Stringify given virtual dom tree and return html.
Kind: Exported function
| Param | Type | Description |
|---|---|---|
| node | VirtualNode | |
| parent | VirtualNode | |
| [options] | Object | |
| [options.selfClosingTags] | Array. | tags that are self-closing |
| [options.attributes] | Object. | map of attribute names where keys are camelCased name and values are the HTML attribute name. |
| [options.asciiSafe] | Boolean | encode non-ASCII symbols (default: false) |
var VirtualNode = require('vtree/vnode'); var stringify = require('virtual-dom-stringify'); stringify(new VirtualNode('div')); // => " "
Please submit all issues and pull requests to the alexmingoia/virtual-dom-stringify repository!
If you have any problem or suggestion please open an issue here.
Saved searches
Use saved searches to filter your results more quickly
You signed in with another tab or window. Reload to refresh your session. You signed out in another tab or window. Reload to refresh your session. You switched accounts on another tab or window. Reload to refresh your session.
Turn Virtual DOM nodes into HTML
License
ntharim/vdom-to-html
This commit does not belong to any branch on this repository, and may belong to a fork outside of the repository.
Name already in use
A tag already exists with the provided branch name. Many Git commands accept both tag and branch names, so creating this branch may cause unexpected behavior. Are you sure you want to create this branch?
Sign In Required
Please sign in to use Codespaces.
Launching GitHub Desktop
If nothing happens, download GitHub Desktop and try again.
Launching GitHub Desktop
If nothing happens, download GitHub Desktop and try again.
Launching Xcode
If nothing happens, download Xcode and try again.
Launching Visual Studio Code
Your codespace will open once ready.
There was a problem preparing your codespace, please try again.
Latest commit
Git stats
Files
Failed to load latest commit information.
README.md
npm install --save vdom-to-html
var VNode = require('virtual-dom/vnode/vnode'); var toHTML = require('vdom-to-html'); toHTML(new VNode('input', className: 'name', type: 'text' >)); // => ''
Widgets are used to take control of the patching process, allowing the user to create stateful components, control sub-tree rendering, and hook into element removal. Documentation is available here.
Widgets are given an opportunity to provide a vdom representation through an optional render method. If the render method is not found an empty string will be used instead.
var Widget = function(text) this.text = text; > Widget.prototype.type = 'Widget'; // provide a vdom representation of the widget Widget.prototype.render = function() return new VNode('span', null, [new VText(this.text)]); >; // other widget prototype methods would be implemented toHTML(new Widget('hello')); // => 'hello'
About
Turn Virtual DOM nodes into HTML
How the virtual DOM works in Vue.js

Vue.js is a JavaScript framework known for its fast loading speed and easy scalability. Some of its features can be linked directly its use of a virtual DOM to update the actual DOM as necessary.
Understanding the virtual DOM is not a requirement for learning Vue.js, but it can certainly help budding Vue developers begin to understand some of the things happening behind the scenes.
The DOM itself
This is a Heading
This is a paragraph.
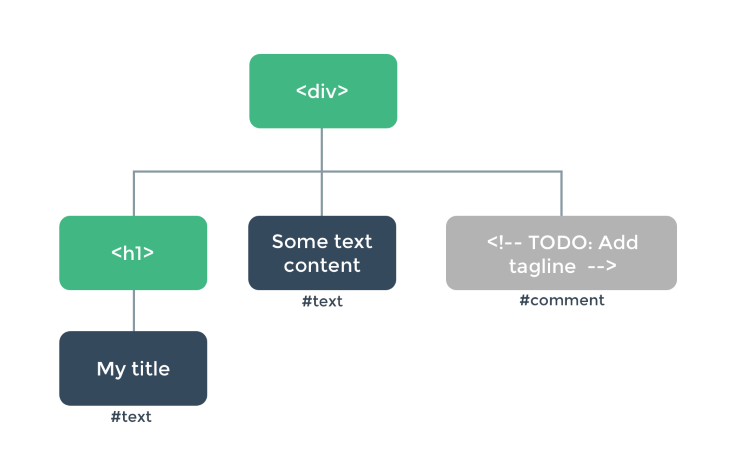
Before we talk about the Vue.js virtual DOM, it is important to understand what the DOM itself is. The Document Object Model, or DOM, is a kind of interface that treats all the markup language (your HTML) as connected nodes. It can be seen as an interface of objects for markup elements stored in a tree-like structure.
The DOM is what allows us to write and change styles on elements, and even change elements themselves. This is done by adding, modifying, or deleting element tags or CSS styles in the head and body of a document because they are represented as nodes and objects. This is how the HTML DOM works — so why would Vue have another DOM?
Why the traditional DOM is not enough
So all is fine and good with the DOM. As applications grow, however — meaning more nodes to traverse, more elements, and more scripts to communicate with those elements — the DOM grows slower and costs a lot of processing power.
Trying to perform a search or even update a DOM becomes a hard task, ultimately affecting the performance of the application. This is why the virtual DOM was created.
The Vue.js virtual DOM
The Vue.js team built the virtual DOM to be a kind of abstraction of the traditional DOM; it is a “lite” version of the HTML DOM, but with superpowers. The virtual DOM is smarter, and so it finds a way to be more efficient than the traditional DOM.
The primary way it accomplishes this is through various diff algorithms to avoid re-rendering the entire DOM after any new change or update to the document. That alone improves efficiency and resource management to a great degree because the DOM API is called less often.
The virtual DOM by that explanation is located between the actual DOM and the Vue instance.
new Vue(< el: '#app', data: < text: 'hi LogRocket' >, render(createElement) < return createElement( 'h1', < attrs: < id: 'headers' >>, this.text ); > >);
This returns the elements below on render:
You see that Vue virtual DOM is made of Vue components, which are JavaScript objects that extend the Vue instance. Vue uses a virtual DOM because of the sheer difference in speed and efficiency compared to the actual DOM. The virtual DOM is also smaller in size than the actual DOM and so is very efficient.

Over 200k developers use LogRocket to create better digital experiences
![]()
Learn more →
How it works
Let’s use a form with a conditional statement in it to show how the virtual DOM works:
Notice how the code block above has a span with a v-if statement showing an error class when the name is not entered. In this code, a small span line appears if you do not type a name in the box indicating “Field is required.” The change in the virtual DOM will be to conditionally add this span element if the v-if condition returns true .
Before this line is read, the actual DOM and the virtual DOM will read the same; after this condition is met, a diff is now made between the two states (in the actual DOM and the virtual DOM), and this diff will output a patch of changes that will now be applied to the actual DOM without re-rendering it. In this way, both DOMs go back to being the same immediately.
How to mount a virtual DOM to an HTML element
You might not have noticed, but any time you run a Vue.js command for a new project, like hello world:
You see that by default you are already using the Vue’s virtual DOM; you can confirm that when you go to your main.js file. It should look somewhat similar to this code block below:
import Vue from 'vue' import App from './App' new Vue( < el: '#app', components: < App >>);
You can see that the element here is any element with the ID of App , which is usually the App component in the App.vue file. Inside any component, you can specifically target an element of your choice by using the el option, and it becomes mounted to the HTML DOM.
Some lessons
It is refreshing to catch a glimpse of what happens behind the scenes with the virtual DOM in Vue.js. It is also important to recognize that whatever code we write is parsed by the virtual DOM, and things like directives and even events inside our template sections do not end up that way on the actual DOM.
Vue makes use of them, processes them, and the patch created is what gets to the actual DOM. You can easily inspect your app in your browser to confirm that you would not see any directives.
Conclusion
This post has been an overview of how the virtual DOM works in Vue.js, with a few illustrations to follow and how to mount one. It is my hope that after reading this post, you appreciate the concepts behind the things you use every day whenever you create a Vue project. Happy hacking!
Experience your Vue apps exactly how a user does
Debugging Vue.js applications can be difficult, especially when there are dozens, if not hundreds of mutations during a user session. If you’re interested in monitoring and tracking Vue mutations for all of your users in production, try LogRocket. https://logrocket.com/signup/
LogRocket is like a DVR for web and mobile apps, recording literally everything that happens in your Vue apps including network requests, JavaScript errors, performance problems, and much more. Instead of guessing why problems happen, you can aggregate and report on what state your application was in when an issue occurred.
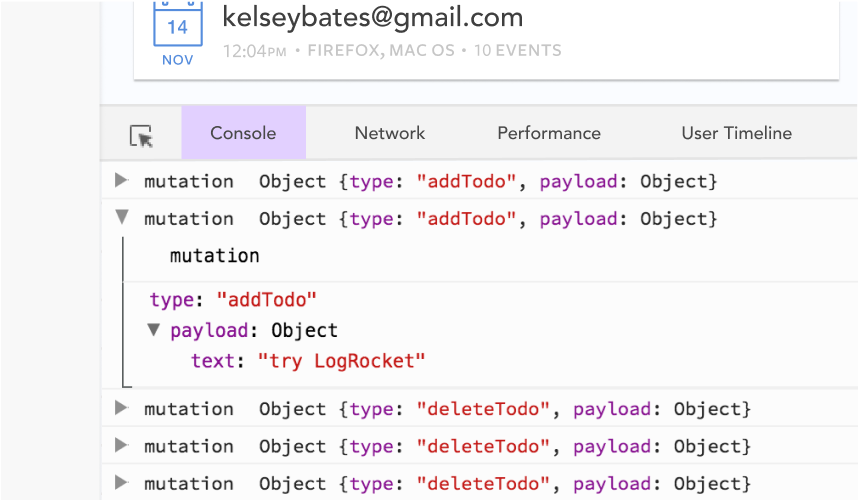
The LogRocket Vuex plugin logs Vuex mutations to the LogRocket console, giving you context around what led to an error, and what state the application was in when an issue occurred.
Modernize how you debug your Vue apps — Start monitoring for free.
Virtual dom to html
npm install --save vdom-to-html
var VNode = require('virtual-dom/vnode/vnode');var toHTML = require('vdom-to-html');toHTML(new VNode('input', className: 'name', type: 'text' >));// => ''
Widgets are used to take control of the patching process, allowing the user to create stateful components, control sub-tree rendering, and hook into element removal. Documentation is available here.
Widgets are given an opportunity to provide a vdom representation through an optional render method. If the render method is not found an empty string will be used instead.
var Widget = function(text)this.text = text;>Widget.prototype.type = 'Widget';// provide a vdom representation of the widgetWidget.prototype.render = function()return new VNode('span', null, [new VText(this.text)]);>;// other widget prototype methods would be implementedtoHTML(new Widget('hello'));// => 'hello'