Как отразить изображение?
Для отражения изображения или другого элемента, в том числе текста, применяется свойство transform и функция scale() . Хотя исходно эта функция предназначена для изменения масштаба элемента, отрицательное значение -1 позволяет сделать отражение.
- transform: scale(-1, 1) — отражение по горизонтали;
- transform: scale(1, -1) — отражение по вертикали;
- transform: scale(-1, -1) (или просто scale(-1) ) — одновременное отражение по горизонтали и вертикали.
Вместо scale() можно использовать отдельные функции scaleX() и scaleY() , они отвечают за масштабирование по соответствующим координатам:
- transform: scaleX(-1) — отражение по горизонтали;
- transform: scaleY(-1) — отражение по вертикали;
- transform: scaleX(-1) scaleY(-1) — одновременное отражение по горизонтали и вертикали.
В примере 1 добавляется обычное изображение, а затем оно же, но отражённое по вертикали. Для этого к добавляется класс с именем mirrorY , а в нём используется свойство transform с функцией scaleY(-1) .
Пример 1. Отражение фотографии

.mirrorY
Результат данного примера показан на рис. 1.

Рис. 1. Обычная фотография и фотография, отражённая по вертикали
Как отразить изображение?
Для отражения изображения или другого элемента, в том числе текстового, применяется свойство transform и функция scale() с отрицательным значением. Варианты такие:
- transform: scale(-1, 1) — отражение по горизонтали;
- transform: scale(1, -1) — отражение по вертикали;
- transform: scale(-1, -1) — одновременное отражение по горизонтали и вертикали.
Есть также отдельные функции scaleX() и scaleY() , они отвечают за масштабирование по соответствующим координатам.
Хотя функция scale() предназначена для изменения масштаба элемента, отрицательное значение также позволяет сделать отражение. В примере 1 добавляется обычное изображение, а затем оно же, но отражённое по вертикали. Для этого к добавляется класс с именем mirrorY .
Пример 1. Отражение фотографии
.mirrorY 

Результат данного примера показан на рис. 1.
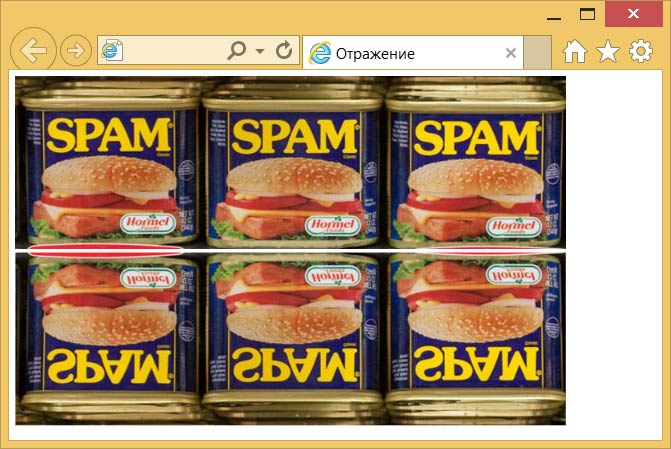
Рис. 1. Обычная фотография и фотография, отражённая по вертикали
CSS по теме
Не выкладывайте свой код напрямую в комментариях, он отображается некорректно. Воспользуйтесь сервисом cssdeck.com или jsfiddle.net, сохраните код и в комментариях дайте на него ссылку. Так и результат сразу увидят.
Популярные рецепты
- Как добавить картинку на веб-страницу?
- Как добавить иконку сайта в адресную строку браузера?
- Как добавить фоновый рисунок на веб-страницу?
- Как сделать обтекание картинки текстом?
- Как растянуть фон на всю ширину окна?
- Как выровнять фотографию по центру веб-страницы?
- Как разместить элементы списка горизонтально?
- Как убрать подчеркивание у ссылок?
- Как убрать маркеры в маркированном списке?
- Как изменить расстояние между строками текста?
- Как сделать, чтобы картинка менялась при наведении на нее курсора мыши?
- Как открыть ссылку в новом окне?
 Как добавить картинку на веб-страницу?
 Как добавить иконку сайта в адресную строку браузера?
 Как добавить фоновый рисунок на веб-страницу?
 Как сделать обтекание картинки текстом?
 Как разместить элементы списка горизонтально?
 Как убрать подчеркивание у ссылок?
 Как убрать маркеры в маркированном списке?
 Как изменить расстояние между строками текста?
 Как сделать, чтобы картинка менялась при наведении на нее курсора мыши?
Как отразить изображение?
Для отражения изображения или другого элемента, в том числе текстового, применяется свойство transform и функция scale() с отрицательным значением. Варианты такие:
- transform: scale(-1, 1) — отражение по горизонтали;
- transform: scale(1, -1) — отражение по вертикали;
- transform: scale(-1, -1) — одновременное отражение по горизонтали и вертикали.
Есть также отдельные функции scaleX() и scaleY() , они отвечают за масштабирование по соответствующим координатам.
Хотя функция scale() предназначена для изменения масштаба элемента, отрицательное значение также позволяет сделать отражение. В примере 1 добавляется обычное изображение, а затем оно же, но отражённое по вертикали. Для этого к добавляется класс с именем mirrorY .
Пример 1. Отражение фотографии
.mirrorY 
Результат данного примера показан на рис. 1.
Рис. 1. Обычная фотография и фотография, отражённая по вертикали
CSS по теме
Не выкладывайте свой код напрямую в комментариях, он отображается некорректно. Воспользуйтесь сервисом cssdeck.com или jsfiddle.net, сохраните код и в комментариях дайте на него ссылку. Так и результат сразу увидят.
Популярные рецепты
- Как добавить картинку на веб-страницу?
- Как добавить иконку сайта в адресную строку браузера?
- Как добавить фоновый рисунок на веб-страницу?
- Как сделать обтекание картинки текстом?
- Как растянуть фон на всю ширину окна?
- Как выровнять фотографию по центру веб-страницы?
- Как разместить элементы списка горизонтально?
- Как убрать подчеркивание у ссылок?
- Как убрать маркеры в маркированном списке?
- Как изменить расстояние между строками текста?
- Как сделать, чтобы картинка менялась при наведении на нее курсора мыши?
- Как открыть ссылку в новом окне?
Flipping Images Horizontally Or Vertically With CSS And JavaScript
In this 3 minute article we’ll look at flipping images horizontally and vertically using CSS and JavaScript. We’ll explore how to flip an img element, a background-image , or flip the actual ImageData using a canvas element.
Flipping an Image Element
We can flip the img element using the CSS transform property. We can do so using the scaleX and scaleY transforms.
img src="/media/tulips.jpg" alt="" />img /* flip horizontally */ transform: scaleX(-1); > img /* flip vertically */ transform: scaleY(-1); > img /* flip both */ transform: scale(-1, -1); >
original
scaleX(-1)
scaleY(-1)
scale(-1, -1)
Alternatively you can use rotateX and rotateY
img /* flip horizontally */ transform: rotateY(180deg); > img /* flip vertically */ transform: rotateX(180deg); > img /* flip both */ transform: rotateX(180deg) rotateY(180deg); >
original
rotateY(180deg)
rotateX(180deg)
rotateX(180deg)
rotateY(180deg)
The rotation transform is also a nice choice for when you want to animate the flip.
scaleX
rotateY
Note that I’ve added a slight perspective to the transform chain. Without the perspective transform the rotateY animation would be just as flat as the scaleX animation. I’ve added it to the scaleX animation as well to show that it doesn’t make a difference.
@keyframes flip-with-scale 0% transform: perspective(400px) scaleX(1); > 100% transform: perspective(400px) scaleX(-1); > > @keyframes flip-with-rotate 0% transform: perspective(400px) rotateY(0); > 100% transform: perspective(400px) rotateY(180deg); > >Flipping a Background Image
The only way (at this point in time) (and as far as I can tell) to flip a background-image is to flip the element containing the background image. But that would flip its contents as well.
p class="tulips"> Tulips form a genus of spring-blooming perennial herbaceous bulbiferous geophytes. p>.tulips background-image: url(/media/tulips.jpg); background-repeat: no-repeat; background-size: contain; padding-left: 5em; > .tulips-flipped transform: scaleX(-1); >Tulips form a genus of spring-blooming perennial herbaceous bulbiferous geophytes.
Tulips form a genus of spring-blooming perennial herbaceous bulbiferous geophytes.
To work around this we can either move the background to a separate element or create a pseudo-element.
Let’s go with the pseudo-element.
.tulips display: flex; width: 15em; > /* create our pseudo element */ .tulips-flipped::before content: ''; background-image: url(/media/tulips.jpg); background-repeat: no-repeat; background-size: cover; min-width: 5em; > /* flip our pseudo element */ .tulips-flipped::before transform: scaleX(-1); >Tulips form a genus of spring-blooming perennial herbaceous bulbiferous geophytes.
Tulips form a genus of spring-blooming perennial herbaceous bulbiferous geophytes.
Flipping an Image with JavaScript
The CSS flipping techniques only alter the presentation of an image, not the actual pixel data. We can flip the pixel data using the canvas element. This might be useful if for example we want to flip an image before it’s uploaded to a server.
We’ll use the image data in the image element below the code snippet, it’s simply an img tag with a class name set to image-tulips .
img src="/media/tulips.jpg" class="image-tulips" alt="" />Lets get a reference to the image. That allows us to load it to a canvas element for manipulation.
const inputImage = document.querySelector('.image-tulips'); // need to check if the image has already loaded if (inputImage.complete) flipImage(); > // if not, we wait for the onload callback to fire else inputImage.onload = flipImage; > // this function will flip the imagedata function flipImage() // create a canvas that will present the output image const outputImage = document.createElement('canvas'); // set it to the same size as the image outputImage.width = inputImage.naturalWidth; outputImage.height = inputImage.naturalHeight; // get the drawing context, needed to draw the new image const ctx = outputImage.getContext('2d'); // scale the drawing context negatively to the left (our image is 400 pixels wide) // resulting change to context: 0 to 400 -> -400 to 0 ctx.scale(-1, 1); // draw our image at position [-width, 0] on the canvas, we need // a negative offset because of the negative scale transform ctx.drawImage(inputImage, -outputImage.width, 0); // insert the output image after the input image inputImage.parentNode.insertBefore( outputImage, inputImage.nextElementSibling ); >The above code just ran, and you can view the result below. The first image is the inputImage and the second image is the outputImage canvas element.
Conclusion
We learned three methods to flip images for various purposes. We can flip images using the CSS transform property. The scaleX and scaleY transforms work but the rotateX and rotateY transforms allow for nicer animation (if needed). We quickly explored flipping background images using pseudo elements and ended the article with manipulating the actual image data using JavaScript and a canvas element.
I share web dev tips on Twitter, if you found this interesting and want to learn more, follow me there
At PQINA I design and build highly polished web components.
Make sure to check out FilePond a free file upload component, and Pintura an image editor that works on every device.