- How to fix exe4j_java_home, no jvm could be found on your system error?
- Method 1: Set JAVA_HOME environment variable
- Method 2: Update the PATH environment variable
- Method 3: Re-install Java
- Method 4: Check for multiple Java installations
- Step 1: Check your Java version
- Step 2: Check for multiple Java installations
- Step 3: Set the correct Java path
- Step 4: Test the Java installation
- Step 5: Run the Java application
- Как исправить ошибку «No JVM could be found» в Windows 10?
- Установка совместимой версии DbVisualiser
- Исправление переменной окружения
- Переустановка текущей среды
- Fix No JVM Could Be Found on Your System Define EXE4J_JAVA_HOME Error in Java
- EXE4J_JAVA_HOME Error Description, Possible Causes and Solutions in Java
- Related Article — Java Error
How to fix exe4j_java_home, no jvm could be found on your system error?
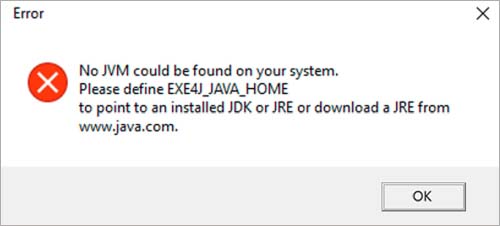
The «EXE4J_JAVA_HOME, No JVM could be found on your system» error occurs when an executable JAR file attempts to run on a computer that does not have the required version of Java installed. The error is generated by the exe4j tool, which is used to create executable JAR files that can be run as standalone applications on Windows and MacOS. The error message indicates that the exe4j tool was unable to locate the Java Virtual Machine (JVM) required to run the executable JAR file, and as a result, the application will not start.
Method 1: Set JAVA_HOME environment variable
- Open the System Properties window by pressing Windows key + Pause/Break or right-clicking on This PC and selecting Properties .
- Click on Advanced system settings on the left-hand side of the window.
- Click on the Environment Variables button at the bottom of the window.
- Under System Variables , click on New .
- Enter JAVA_HOME in the Variable name field.
- Enter the path to your Java installation in the Variable value field. For example, C:\Program Files\Java\jdk1.8.0_251 .
- Click OK to close the New System Variable window.
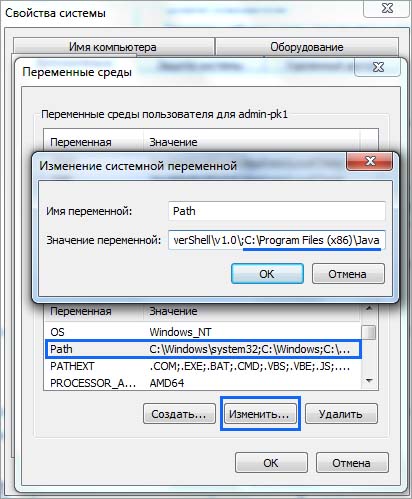
- Under System Variables , find the Path variable and click on Edit .
- Click on New and enter %JAVA_HOME%\bin .
- Click OK to close all windows.
// Java code example public class HelloWorld public static void main(String[] args) System.out.println("Hello, World!"); > > dependency> groupId>com.examplegroupId> artifactId>example-libraryartifactId> version>1.0.0version> dependency>// JavaScript code example console.log("Hello, World!"); DOCTYPE html> html> head> title>Hello, World!title> head> body> h1>Hello, World!h1> body> html>/* CSS code example */ body background-color: #fff; color: #000; >Method 2: Update the PATH environment variable
To fix the «EXE4J_JAVA_HOME, No JVM could be found on your system error» by updating the PATH environment variable, follow these steps:
- Open the Control Panel and navigate to System and Security > System > Advanced system settings.
- Click on the Environment Variables button.
- Under System Variables, scroll down and find the Path variable. Click on the Edit button.
- In the Edit Environment Variable window, click on the New button and add the path to your Java installation directory. For example, C:\Program Files\Java\jdk1.8.0_221\bin.
- Click OK to close all windows.
- Open a new command prompt window and type java -version to verify that Java is now recognized by the system.
Here is an example of how to update the PATH environment variable in Java:
String javaHome = System.getProperty("java.home"); String path = System.getenv("PATH"); String newPath = javaHome + "\\bin;" + path; System.setProperty("PATH", newPath);In this example, we get the current Java home directory using the System.getProperty() method. Then, we get the current PATH environment variable using the System.getenv() method. We concatenate the Java home directory with the bin subdirectory and the current PATH variable, separated by a semicolon. Finally, we set the new PATH variable using the System.setProperty() method.
This should fix the «EXE4J_JAVA_HOME, No JVM could be found on your system error» by adding the Java installation directory to the PATH environment variable.
Method 3: Re-install Java
If you encounter the «EXE4J_JAVA_HOME, No JVM could be found on your system error» when running a Java application, it means that the Java Virtual Machine (JVM) is missing or cannot be found on your system. One way to fix this is to re-install Java. Here are the steps to do it:
- Download the latest version of Java from the official website: https://www.java.com/en/download/
- Run the installer and follow the on-screen instructions to install Java on your system.
- Once the installation is complete, open a command prompt or terminal window and type the following command to check the version of Java installed:
- Open the Control Panel and go to System and Security > System > Advanced system settings.
- Click the Environment Variables button.
- Under System Variables, scroll down and find the PATH variable.
- Click Edit and add the path to the bin directory of the Java installation, for example: C:\Program Files\Java\jdk1.8.0_271\bin .
- Click OK to save the changes.
That’s it! You should now be able to run your Java application without encountering the «EXE4J_JAVA_HOME, No JVM could be found on your system error» again.
Method 4: Check for multiple Java installations
If you encounter the EXE4J_JAVA_HOME error when running a Java application, it means that the Java Virtual Machine (JVM) required by the application cannot be found on your system. This error can occur when you have multiple Java installations on your computer and the application is unable to locate the correct one.
Here’s how you can fix the EXE4J_JAVA_HOME error by checking for multiple Java installations:
Step 1: Check your Java version
Open a command prompt and type the following command:
This will display the version of Java that is currently installed on your system. Make a note of the version number.
Step 2: Check for multiple Java installations
Type the following command in the command prompt:
This will display the locations of all the Java installations on your system. If you have multiple installations, make a note of the paths.
Step 3: Set the correct Java path
Open the Control Panel and click on System. Click on Advanced system settings and then click on Environment Variables.
Under System Variables, scroll down and find the Path variable. Click on Edit and add the path to the correct Java installation at the beginning of the variable value. For example, if the correct Java installation is located at C:\Program Files\Java\jdk1.8.0_211\bin , add this path to the beginning of the Path variable value:
C:\Program Files\Java\jdk1.8.0_211\bin;%OTHER_PATHS%Make sure to replace %OTHER_PATHS% with the rest of the paths that were displayed in Step 2.
Step 4: Test the Java installation
Open a new command prompt window and type the following command:
This should display the version of the correct Java installation that you just set in the Path variable.
Step 5: Run the Java application
Try running the Java application again. The EXE4J_JAVA_HOME error should now be resolved.
Как исправить ошибку «No JVM could be found» в Windows 10?
С ошибкой «No JVM could be found on your system» можно столкнуться в ходе установки DbVisualizer, при открытии исполняемого файла exe4j, а также при запуске Minecraft (или другой игры и приложения, использующего среду Java). Во многих случаях проблема возникает из-за несовместимой версии Java, но иногда ее появление связано с неправильной переменной среды.
Установка совместимой версии DbVisualiser
Если сталкиваетесь с ошибкой, что JVM не найдена в вашей системе, то, скорее всего, она возникает из-за несовместимой установки Java. Это может произойти в случае, когда пытаетесь развернуть 32-разрядную версию DbVisualiser с 64-разрядной установкой JRE или наоборот. Чтобы это исправить, следуйте инструкции.
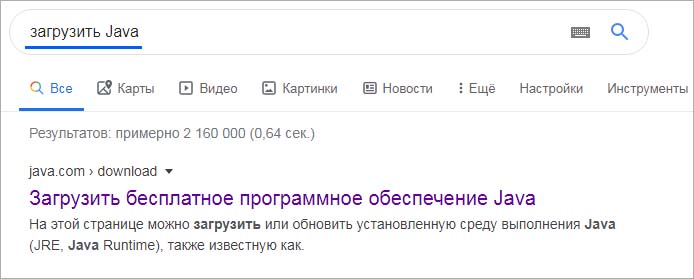
Сделайте запрос в интернете «загрузить Java»и перейдите на указанную страницу.
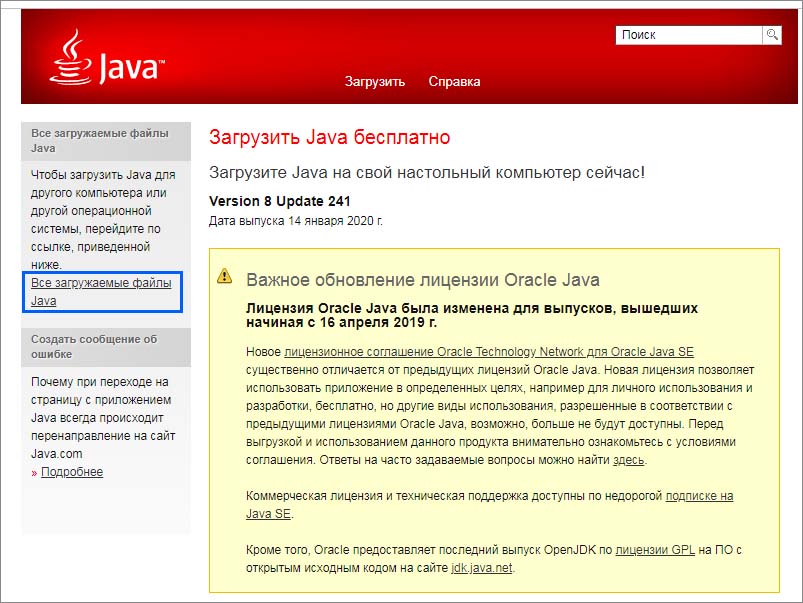
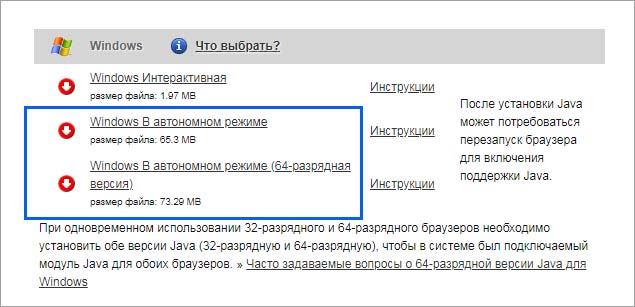
В левом меню нажмите на «Все загружаемые файлы» и прокрутите до раздела Windows.
Загрузите сборку, которая соответствует разрядности DbVisualiser.
После завершения загрузки дважды щелкните на файл установщика и следуйте инструкциям до завершения установки. Затем перезагрузите компьютер. Повторите то действие, которое вызывало ошибку «No JVM could be found on your system».
Исправление переменной окружения
Также JVM не может быть найден из-за неправильной переменной окружения Java. Чтобы избавиться от ошибки, нужно проверить, правильно ли указано расположение в переменной среде.
В проводнике перейдите к папке Java. Если при установке не изменили папку по умолчанию, то она находится по пути:
Щелкните правой кнопкой мыши на панели навигации и выберите пункт «Копировать адрес».
Откройте Свойства системы командой sysdm.cpl, запущенной из окна «выполнить» (Win + R).

На вкладке Дополнительно кликните на кнопку «Переменные среды».

В разделе «Системные переменные», выберите параметр «Path» и кликните на «Изменить».
Найдите Java и измените его значение на правильное расположение, которое скопировали в проводнике.
Переустановка текущей среды
Если столкнулись с ошибкой при использовании сервера Openfire, вполне вероятно, что она произошла из-за общего сбоя, который был решен в последних версиях. Чтобы устранить проблему, нужно удалить текущую версию Java и вспомогательные компоненты, затем загрузить и становить последнюю сборку.
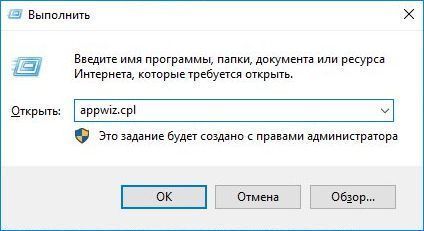
Перейдите в раздел «Программы и компоненты» командой appwiz.cpl , запущенной из окна «Выполнить» (Win + R).
Найдите в списке текущую установку Java, щелкните правой кнопкой мыши и выберите «Удалить».
После удаления основного приложения повторите те же действия для вспомогательных программ JavaUpdates, NodeJs и прочих. Чтобы не пропустить, сгруппируйте их по издателю.
После завершения удаления перезагрузите компьютер.
Затем скачайте и установите последнюю версию JRE. Проверьте, решена ли проблема.
Fix No JVM Could Be Found on Your System Define EXE4J_JAVA_HOME Error in Java
This tutorial investigates why the no JVM could be found on your system define EXE4J_JAVA_HOME error. Then, it also provides the possible solutions to fix this error.
EXE4J_JAVA_HOME Error Description, Possible Causes and Solutions in Java
Let’s understand the error and its reasons before moving toward the solution. We have installed Java 64-bit 1.7 and the EXE4J 64-bit version.
Whenever we try to generate a .exe from the EXE4J , we get the no JVM could be found on your system define EXE4J_JAVA_HOME error while running a program.
The following screenshot shows how we have set up an Environment Variable on our machine.

Why are we having this error, and how to resolve this? Let’s learn about them one by one below.
We get this error from the JDK/JRE package version. We can fix it while configuring our EXE4J .
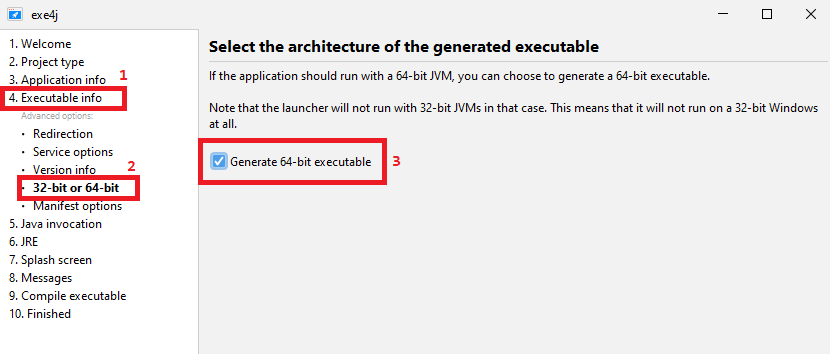
It can be found at the EXE4J wizard’s fourth step which is Executable Info > Advanced Options > 32-bit or 64-bit . If this doesn’t work for you, install JDK tool kits x32 and x64 on your computer or laptop.
See the following screenshot.
Sometimes, the old versions of the JDK/JRE package cause this error. In that case, download and install JDK ’s latest versions.
Do not forget to restart your machine once you have installed them. All the changes will take effect once you restart the machine.
Remember, if the program is 32-bit, it needs Java 8 32-bit to be installed on the machine. On the other hand, if the program is 64-bit, it will need the corresponding Java 8 64-bit version.
Make sure you have created an Environment Variable correctly. The variable name must be EXE4J_JAVA_HOME and the variable value as C:\Program Files\Java\jre7 .
Mehvish Ashiq is a former Java Programmer and a Data Science enthusiast who leverages her expertise to help others to learn and grow by creating interesting, useful, and reader-friendly content in Computer Programming, Data Science, and Technology.