- Как создать страницу ошибки 404?
- Creating an HTML 404! Error Web Page
- The 404! Error
- Why the 404! HTML Error Appears
- Create a “Page Not Found” HTML Web Page
- Step 1: Create an HTML Landing Web Page
- Step 2: Tell the Server to Use Your HTML 404! Error Page
- Step 3: Save .htaccess File to the Root Directory
- Where to Next?
Как создать страницу ошибки 404?
Прежде чем создавать страницу ошибки 404 давайте сначала разберёмся что это вообще за ошибка такая..
Ошибка 404 или Not Found — не найдено.. это стандартный код ответа HTTP о том, что страницы, к которой обращается пользователь, нет на сервере.. попросту она не существует.
Возникать данная ошибка может в ряде случаев:
Ссылка, по которой пришёл пользователь, неверна.
Пользователь неправильно указал путь в адресной строке к одной из страниц Вашего сайта.
Ранее существовавшая страница Вами уже удалена или переименована, однако всё ещё существует в индексе поисковых систем или закладках пользователей.
Что увидит пользователь в результате этой ошибки?
В лучшем случае страницу с рекламой Вашего хостера и кратким объяснением что мол Вы «не туда попали».. в худшем это будет просто надпись: 404 Not Found — The requested URL /page.html was not found on this server — собственно «Запрашиваемый URL отсутствует на этом сервере».
Теперь представьте, что сделает пользователь когда увидит эту картину? Правильно!! закроет эту страницу и пойдёт искать интересующую его информацию в другом месте!! — в результате чего Вы потеряете целевого посетителя!
Данная страница будет содержать элементы дизайна Вашего сайта — тем самым даст понять посетителю что, несмотря на то что он попал не совсем туда куда хотел он всё таки попал именно на Ваш сайт!
Пользовательская страница 404, в отличие от стандартных, не будет «тупиковой», а на ней будут располагаться ссылки на основные страницы сайта.. — Что позволит посетителю двигаться дальше и тем самым удержит его на Вашем сайте.
Ну и в конце концов на такой странице можно дать вразумительные объяснения того по каким причинам пользователь оказался на ней.. предложить ему выход из сложившейся ситуации.. помочь найти на Вашем сайте интересующую его информацию.
Как видите сплошные плюсы..
Создаётся страница ошибки 404 точно так же как и любая другая страница на Вашем сайте.. никаких нюансов в коде странице нет..
Ну например создадим файл с именем 404.html
К сожалению, запрашиваемая Вами страница не найдена..
Почему?
- Ссылка, по которой Вы пришли, неверна.
- Вы неправильно указали путь или название страницы.
- Страница была удалёна со времени Вашего последнего посещения.
Для продолжения работы с сайтом Вы можете воспользоваться формой поиска по сайту:
..или перейти на:
- Главную страницу сайта.
- Карту сайта
На самом деле это просто страничка «скелет» конечно же Вам следует создать свою собственную, полноценную страницу ошибки 404.
Создали? а вот теперь поговорим о нюансах..
Для того что бы в случае возникновения ошибки с кодом 404 посетитель переходил на только что созданную нами страницу, необходимо создать системный файл .htaccess который будет содержать в себе директиву: ErrorDocument 404 — это директива указывает серверу о том куда следует перенаправлять пользователя в случае возникновения ошибки 404.
Что это за файл такой спросите Вы?
Файл .htaccess (я не опечатался, пишется с точкой в начале имени и не использует никакого расширения) – дает возможность конфигурировать работу сервера в отдельных его директориях..
На данный файл может быть возложен ряд специфических задач.. например: устанавливать права доступа к файлам в папке, менять названия индексных файлов, глобально перенаправлять посетителей на другой сайт, запретить доступ к сайту с определённого ip адреса. и еще много всяких иногда очень полезных вещей может делать этот чудо файл.. в том числе может самостоятельно обрабатывать ошибки сервера — что нам собственно и нужно!
Однако углубляться во все подробности и тонкости мы не будем, а поговорим лишь о том, что нас интересует на данный момент.
Итак, создаём файл под названием .htaccess который содержит в себе одну единственную строчку (если таковой файл уже имеется с какими ни будь другими инструкциями серверу, то просто дописываем в него эту строчку):
И заливаем его на сервер в корневую папку сайта.
Ну только естественно сначала поменяйте в файле .htaccess ссылку http://www.site.ru/404.html на адрес Вашей собственной страницы которая должна будет открываться при возникновении ошибки 404.
Вот собственно и всё! теперь если Вы всё сделали правильно, при возникновении ошибки 404 будет загружаться Ваша «ошибочная» страница.
Сейчас огорчу тех кто располагает свой сайт на том или ином бесплатном хостинге.. Большинство бесплатных хостеров не дают доступа к файлу .htaccess так что создать страницу 404 на бесплатном хостинге вряд ли удастся.
P.S.Таким же способом с помощью файла .htaccess Вы можете обрабатывать и другие ошибки сервера:
- 401 ошибка(ErrorDocument 401 http://www.site.ru/page.html)- Требуется авторизация.
- 403 ошибка(ErrorDocument 403 http://www.site.ru/page.html)- Пользователь не прошел аутентификацию, доступ запрещен.
- 500 ошибка(ErrorDocument 500 http://www.site.ru/page.html)- Внутренняя ошибка сервера.
Если что-то непонятно или Вы в чем-то сомневаетесь, то за дополнительными разъяснениями обращайтесь на форум.
Creating an HTML 404! Error Web Page
There can be many reasons a user cannot gain access to a website. One of these is known as a 404! error. Quite simply an HTML 404! error message is a Hypertext Transfer Protocol (HTTP) status code indicating the server could not find the requested website. In other words, your web browser can connect with the server, but the specific page you are trying to access cannot be reached. In this tutorial, we will build an HTML 404 error web page to customize what the visitor sees when they land there. We will use some CSS as well to further enhance the page.
The 404! Error

Why the 404! HTML Error Appears
When an HTTP 404 appears on your screen, it means that although the server is reachable, the specific page you are looking for is not. The web page is either broken, or it no longer exists. The 404 error code can appear in any browser, regardless of the type of browser you are using.
There are several reasons why you might be getting an HTTP 404 code:
- One typical trigger for an error 404 message is when the page has been deleted from the website.
- The page was moved to another URL and the redirection was done incorrectly.
- You entered an incorrect URL address.
- Although it happens very rarely, sometimes the server malfunctions.
- The entered domain name does not exist anymore.
Unfortunately, broken links are often left for long periods of time after the page has been deleted or moved. Even when web owners maintain their web sites, sometimes the owner may delete the site, or change the name of the site. This means that when someone clicks on an “old” link, they will no longer be able to find that site. Unfortunately, due to many people putting up URLS to web sites all over the place, there will ultimately be links that actually link to nowhere.
It is common for owners of websites to not check their external links regularly which leads to users trying to access a dead link. Web maintenance is essential for this reason.
Create a “Page Not Found” HTML Web Page
If a visitor to your website reaches an old and non-existent web page, the server that hosts that website will show a “404” error that basically says the page can not be found. Instead of allowing the server to show a bland, default error page, you can create one of your own and get as creative as you want with it.
Let us jump into step one of our tutorial.
Step 1: Create an HTML Landing Web Page
Let us start by simply creating a basic HTML page. This will be the foundation for creating a more exciting and informative 404! Error web page for visitors to land on.
Open a text editor, save the file as “shorelinesurfteam.html” and put in the following HTML code. Save your file again when done.
To assist those who have landed on this “non-existent” page, you can add some helpful information to guide them on the right path. Perhaps add some information as to why the page does not exist anymore. Add something like this into the HTML. Feel free to copy the following code and resave your html file.
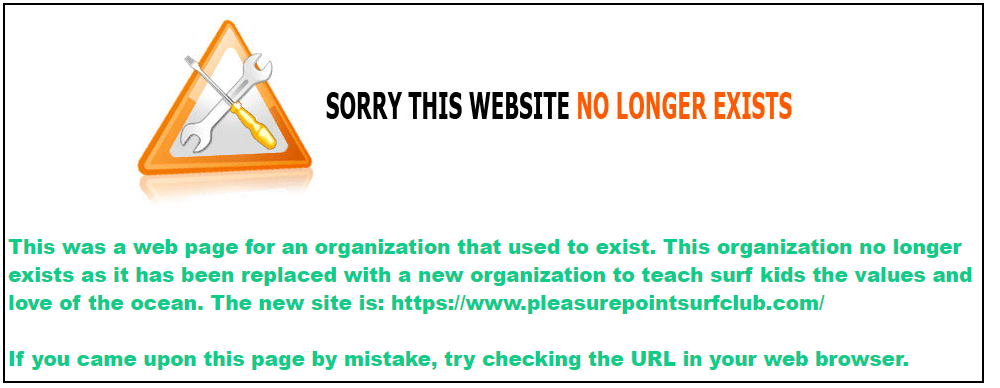
The following illustration identifies the text we added to make the page more informative.

To punch up the text font, let us add a style. Copy the following code and resave your HTML file.
Add an image and change your text color to a custom hex color if you want as well by adding the HTML to reference the image. The image can go in your root directory as well.
| !DOCTYPE html>
This was a web page for an organization that used to exist. This organization no longer exists as it has been replaced with a new organization to teach surf kids the values and love of the ocean. The new site is: https://www.pleasurepointsurfclub.com/ If you came upon this page by mistake, try checking the URL in your web browser. |
Step 2: Tell the Server to Use Your HTML 404! Error Page
Create a “.htaccess” file. This text file serves the purpose of passing on instructions to the server.
There might already be a .htaccess file in the root folder of your web hosting space. If there is, download it and amend that. It may be a hidden file. If so, you may need to adjust your server settings so that you can view this file.
In this “.htaccess” file you will need to add this line:
| ErrorDocument 404 /shorelinesurfteam.html |
This is all you need to add. You do not need to add any HTML code.
What this does is tell the server that when it encounters a 404 error, it should load the shorelinesurfteam.html file in the root folder.
Step 3: Save .htaccess File to the Root Directory
Save your “.htaccess” file and upload it to the root folder of your web site. When the server encounters a not-found error, your error page will be shown.
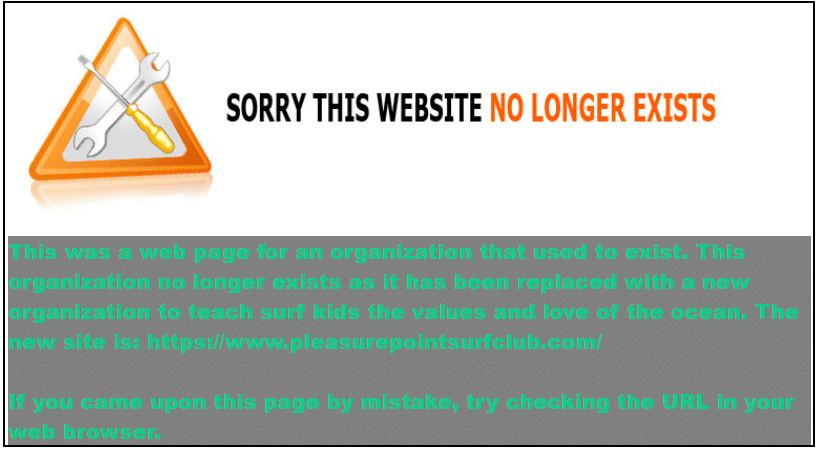
Now when a visitor finds the web page (per our code above)

They will see the following more informative and friendly error page that you have created.
To make the green text stand out more, you can add a div element with a color background as such:
p color: #0ecc8a;
font-weight: 900;
font-size: 20px;
font-family: Helvetica, Arial, sans-serif;
>
This was a web page for an organization that used to exist. This organization no longer exists as it has been replaced with a new organization to teach surf kids the values and love of the ocean. The new site is: https://www.pleasurepointsurfclub.com/
If you came upon this page by mistake, try checking the URL in your web browser.
This will yield the following:
Now, you can be as artistic as you like to create your fancy, informative 404.html page. Always keep the visitor to the page in mind to enhance their experience.
See the HTML Font Families to learn how to enhance your text, and also check out the CSS Background Tutorial to learn how to enhance the background of your web page.
Where to Next?
This introduction to the 404 page error should provide a starting point for further inquiry into web page management and the unlimited creative aspects that HTML offers. In the next blogs, you will be able to explore other areas of HTML design. Continue to be inspired, explore further and dive deeper into the world of web design.