 Quick Start Tutorial Using an Android Application
 Quick Start Tutorial Using an Android Application
Before You Begin
This 20-minute tutorial shows you how to build an Android application that simulates a virtual device and sends a message to Oracle Internet of Things (IoT) Cloud Service.
Background
Oracle IoT Cloud Service provides communication services between devices and enterprise applications. In this tutorial, you build a simulated device in an Android application, and then transmit a Hello World message to Oracle IoT Cloud Service.
The application runs in any Android device with Android KitKat 4.4 or later.
What Do You Need?
- Access to an Oracle IoT Cloud Service instance
- A computer running Windows 7, Mac OS 10.9 or later, or Linux with a web browser and a recent version of Java Development Kit (JDK)
- Installed software:
- Java Standard Edition Development Kit (Java SE JDK) 6.0 or later
- Android Studio (in this tutorial we use Windows version)
- Intel Hardware Accelerated Execution Manager (HAXM)
- Oracle Client Software Library for Android
Send Your First Message
- Download the most recent Android Client Software Library binaries from Oracle Technology Network.
- Extract the library. Note the location of the device-library.aar file. This tutorial uses iotcs\csl\android\lib\device-library.aar.
- Open Android Studio (in this tutorial we use Windows version). In the Create New Project wizard, create a new project and enter or select the following values:
- Application name: IoTAndroidHelloWorld
- Company domain: myandroid.iot
- Project location: C:\Users\ username \Documents\iotcs\csl\android\samples\IoTAndroidHelloWorld
Note: If needed, create the samples folder. - Select Phone and Tablet: Minimum SDK: API 19: Android: 4.4 (KitKat) and click Next.
- Select Empty Activity. Leave the default values for the activity and layout names and click Finish.
- In Configure Activity type mainactivity in Activity Name and click Finish.
Your IoTAndroidHelloWorld project opens in Android Studio.
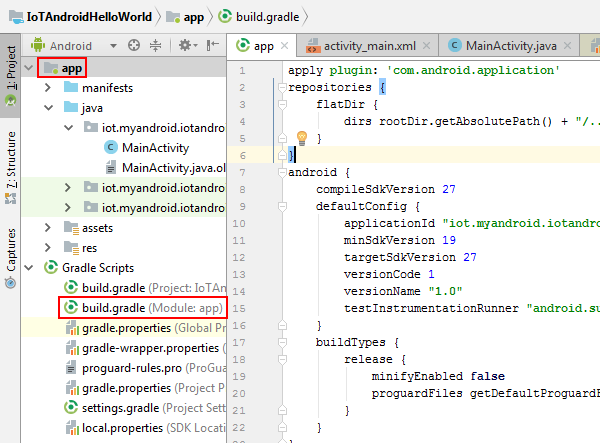
- In the project explorer window, for your project, expand Gradle Scripts and select build.gradle (Module: app).
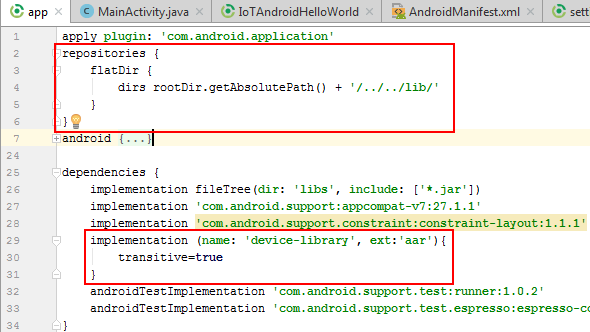
- Modify the build.gradle file:
- To provide the path of the device-library.aar file, add a flatDir closure.
- Remove the dependency for junit.
- Add a dependency for device-libray.aar.
- Copy and replace the MainActivity.java file that you can find in the pre-requisites into the app/src/main/java/iot/myandroid/iotandroidhelloworld/ directory.
- In Android Studio, go to app then manifests and then click on AndroidManifest.xml to include:
- In your file browser window, go to your IoTAndroidHelloWorld project. Under the app/src/main directory, create a folder named assets and an empty file named trustedAssets.properties.
- Copy the Provisioning file obtained from the tutorial in the pre-requisites (Configuring an Application in Oracle Internet of Things Cloud Service) into the assets folder.
- Add the following lines to the trustedAssets.properties file and save it; replace provisioning.file with the name of the file and note the File_Protection_Password is the one you used to download it:
oracle.iot.client.trustedAssetsStore=Provisioning.file oracle.iot.client.trustedAssetsStorePassword=File_Protection_Password oracle.iot.client.trustedAssetsStoreRw=Provisioning.file oracle.iot.client.trustedAssetsStoreRwPassword=File_Protection_Password
- In Android Studio, build the IoTAndroidHelloWorld project and ensure that it builds successfully. Verify that the app-debug.apk file is generated at ..\IoTAndroidHelloWorld\app\build\outputs\apk.
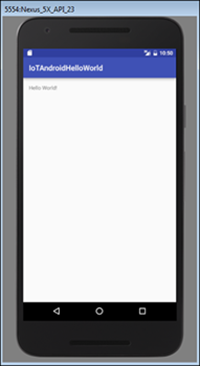
- Run the IoTAndroidHelloWorld project in an emulator.
- Sign in to your Oracle IoT Cloud Service instance.
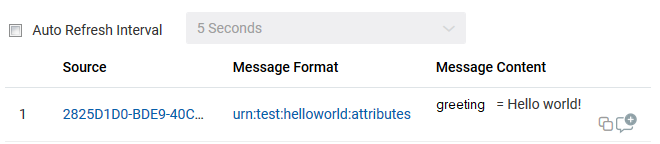
- In the Oracle IoT Cloud Service Management Console, navigate to the Oracle IoT Asset Monitoring application, select Data, and then in Filter By, select Device.
- Verify that the Messages table contains your message.
- Use Oracle Database Mobile Server. (Best, safest bet)
- Download the JDBC Drivers and connect that way. (Not recommended, unsafe — especially for over-the-air connectivity)

Verify Your Message
Want to Learn More?
What is the best way to connect between android and oracle database?
I need to access data from an external oracle database from my application android to update the local database application, but I don’t know what would be the best way to do it. Would I need to create a web service to access to the oracle database or there is another simple way? Thanks
7 Answers 7
You have (at least) two options:
To elaborate a little on Chris’ answer, Oracle Database Mobile Server is a sync solution. The advantage here is that you just develop the Android application as you normally would, using the Android OS SQLite routines. Then (after you have deployed the server of course) you simply configure and install the sync client on your device. It will keep your local SQLite data in sync with the backend Oracle Database.
You can not directly access the Oracle database from android Application. you need to create webservices in PHP, .net or in Java to make connection with Oracle Database. After creating this webservice , you need to connect your application with the webservice. This is the simplest way of connecting with Oracle Database.
This isn’t exactly true. You can certainly do it though JDBC, it’s just not the safest thing in the world.
@silent_killer see Oracle’s JDBC download page for examples. Look for demo.zip: oracle.com/technetwork/database/enterprise-edition/…
in Android you can only directly connect with SQLiteDatabase.. if you want to connect with MYSQL or Oracle it is necessory that you have to make web service whether it will be on PHP, .NET or on JSP.. but without web service you can not use oracle in android.
it also can done through JDBC connectivity but i dnt have exact example of that.
I think there is no direct way to connect android apps with oracle db. for this purpose you need to web service of php or java or .net . according to me php is best way to connect android apps with external database . for this u have to need a host a one php page.this page makes directly connection with oracle database. for connecting android apps with php page u need a json parsing which is easy to do in android apps development .
Also there is one robust 3-tier architecture using SAP-Sybase(Middle wire) with ORACLE. Connect your Sybase DB to ORACLE with JTDS driver. Then, use your generating code in Android. For reference : SQL Server and Sybase Databases
There is a simpler way than writing a WebService and still keeping the same level of security: use a Virtual JDBC Driver that uses a three-tier architecture: your JDBC code is sent through HTTP to a remote Servlet that filters the JDBC code (configuration & security) before passing it to the Oracle JDBC Driver. The result is sent you back through HTTP. There are some free software that use this technique. Just Google » Android JDBC Driver over HTTP».
ORACLE DATABASE CONNECTION WITH ANDROID THROUGH LAN
Grant Some Manifest Permissions
MainActivity Class
package example.com.myapplication; import java.sql.Connection; import java.sql.DriverManager; import android.os.StrictMode; public class MainActivity extends AppCompatActivity < private static final String DEFAULT_DRIVER = "oracle.jdbc.driver.OracleDriver"; private static final String DEFAULT_URL = "jdbc:oracle:thin:@192.168.0.1:1521:xe"; private static final String DEFAULT_USERNAME = "system"; private static final String DEFAULT_PASSWORD = "oracle"; private Connection connection; @Override protected void onCreate(Bundle savedInstanceState) < super.onCreate(savedInstanceState); setContentView(R.layout.activity_main); if (android.os.Build.VERSION.SDK_INT >9) < StrictMode.ThreadPolicy policy = new StrictMode.ThreadPolicy.Builder().permitAll().build(); StrictMode.setThreadPolicy(policy); >TextView tv = (TextView) findViewById(R.id.hello); try < this.connection = createConnection(); e.Log("Connected"); Statement stmt=connection.createStatement(); ResultSet rs=stmt.executeQuery("select * from cat"); while(rs.next()) < System.out.println("hello : " + rs.getString(1)); >connection.close(); > catch (Exception e) < e.Log(""+e); e.printStackTrace(); >> public static Connection createConnection(String driver, String url, String username, String password) throws ClassNotFoundException, SQLException < Class.forName(driver); return DriverManager.getConnection(url, username, password); >public static Connection createConnection() throws ClassNotFoundException, SQLException < return createConnection(DEFAULT_DRIVER, DEFAULT_URL, DEFAULT_USERNAME, DEFAULT_PASSWORD); >>