How to change the contrast and brightness of an image using OpenCV in Python?
We could also apply the cv2.addWeighted() function to change the contrast and brightness of an image. We have discussed it in example 2.
Steps
To change the contrast and brightness of an image, you could follow the steps given below −
- Import the required library OpenCV. Make sure you have already installed it.
- Read the input image using cv2.imread() method. Specify the full path of the image.
- Define alpha (it controls contrast) and beta (it controls brightness) and call convertScaleAbs() function to change the contrast and brightness of the image. This function returns the image with adjusted contrast and brightness. Alternatively, we can also use the cv2.addWeighted() method to change contrast and brightness
- Display the contrast and brightness adjusted image.
Let’s see the examples to change the contrast and brightness of an image.
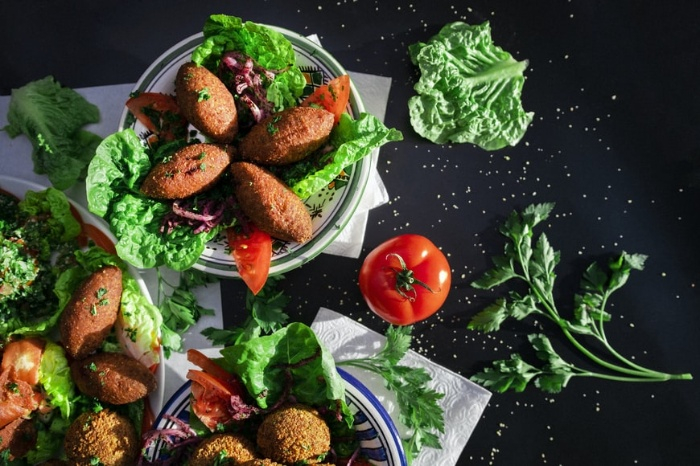
Input Image
We will use the following image as the input file in the examples below.
Example
In this Python program, we change the contrast and brightness of the input image using cv2.convertScaleAbs() method.
# import the required library import cv2 # read the input image image = cv2.imread('food1.jpg') # define the alpha and beta alpha = 1.5 # Contrast control beta = 10 # Brightness control # call convertScaleAbs function adjusted = cv2.convertScaleAbs(image, alpha=alpha, beta=beta) # display the output image cv2.imshow('adjusted', adjusted) cv2.waitKey() cv2.destroyAllWindows()
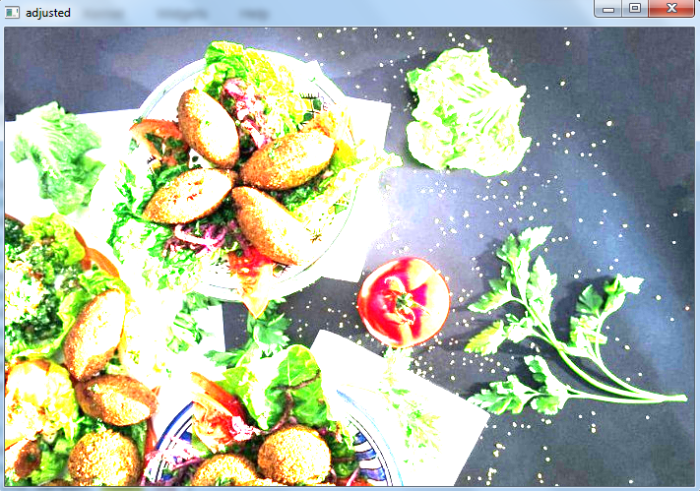
Output
When you execute the above code it will produce the following output window —
Example
In this Python program, we change the contrast and brightness of the input image using cv2.addWeighted() method.
# import required library import cv2 # read the input image img = cv2.imread('food1.jpg') # define the contrast and brightness value contrast = 5. # Contrast control ( 0 to 127) brightness = 2. # Brightness control (0-100) # call addWeighted function. use beta = 0 to effectively only operate on one image out = cv2.addWeighted( img, contrast, img, 0, brightness) # display the image with changed contrast and brightness cv2.imshow('adjusted', out) cv2.waitKey(0) cv2.destroyAllWindows()
Output
When you execute the above code, it will produce the following output window.
Русские Блоги
Python Opencv Регулировка изображения Яркость и контрастность
Python Opencv Регулировка изображения Яркость и контрастность
Регулировка яркости состоит в том, чтобы сделать интенсивность пикселя изображения и стать меньше, а регулировка контрастности относится к изображению тьма темнета, и яркость становится ярче, что расширяет точность отображения в определенной области.
Создайте две раздвижные полосы для регулировки контраста и яркости (диапазон контраста: 0 ~ 0,3, яркость от 0 до 100). Совет: Потому что скользящий бар не имеет десятичной, его можно установить на 0 ~ 300, затем умножить на 0,01
Код
import cv2 import numpy as np alpha = 0.3 beta = 80 img_path = "7MeansDenoising/1_1.bmp" img = cv2.imread(img_path) img2 = cv2.imread(img_path) def updateAlpha(x): global alpha, img, img2 alpha = cv2.getTrackbarPos('Alpha', 'image') alpha = alpha * 0.01 img = np.uint8(np.clip((alpha * img2 + beta), 0, 255)) def updateBeta(x): global beta, img, img2 beta = cv2.getTrackbarPos('Beta', 'image') img = np.uint8(np.clip((alpha * img2 + beta), 0, 255)) # Создать окно cv2.namedWindow('image') cv2.createTrackbar('Alpha', 'image', 0, 300, updateAlpha) cv2.createTrackbar('Beta', 'image', 0, 255, updateBeta) cv2.setTrackbarPos('Alpha', 'image', 100) cv2.setTrackbarPos('Beta', 'image', 10) while (True): cv2.imshow('image', img) if cv2.waitKey(1) == ord('q'): break cv2.destroyAllWindows() Как получить яркость изображения?
Всем привет ! у меня есть изображение 8192х8129 . У меня стоит задача разбить это изображение на разделы 256х256 и получить среднюю яркость каждого блока (256х256). Подскажите как это сделать ?
Средний 2 комментария
R, G, B = pixelRGB brightness = sum([R, G, B]) / 3Aleksandr Makarov, Вы совершенно правильно сомневаетесь. Почитайте, например, вот эту статью: 1.

Чтобы получить среднюю яркость цветного изображения надо пройтись по всему блоку и по каждой компоненте R G и B отдельно посчитать сумму. После этого каждую sumR, sumG и sumB разделить на количество пикселей в блоке, в данном случае это 256^2. Это и будут компоненты нового цвета

import numpy as np from skimage.util import view_as_windows # Библиотека scikit-image tsize = 256 image = np.random.randint(0, 256, (8192, 8192, 3), np.uint8) # Значения яркости - это канал L из пространства LAB lab_l_channel = cv2.cvtColor(image, cv2.COLOR_BGR2LAB)[. 0] # Плитки 256x256 tiles = view_as_windows(lab_l_channel, (tsize, tsize), (tsize, tsize)) # Примечательно, что assert np.shares_memory(lab_l_channel, tiles) == True # Средняя яркость в виде матрицы 32х32 lightness = tiles.reshape(-1, tsize ** 2).mean(axis=-1).reshape(np.array(image.shape[:2]) // tsize)P.S. Вместо skimage.util.view_as_windows можно использовать numpy.lib.stride_tricks.as_strided, но это весьма сложная в настройке правильных параметров функция; view_as_windows — её гуманный вариант)
Andrey Dugin , можете,пожалуйста, объяснить подробнее , что происходит в коде , я в общих чертах представляю , но хочется окончательно разобраться , и почему мы конвертируем
из BGR в LAB , а не из RGB .
1) Исторически сложилось так, что OpenCV работает стпредставлением каналов BGR, а не RGB. В моём примере, где я забиваю картинку случайными числами, это принципиального значения не имеет. Но если, например, будете загружать картинку из файла — каналы будут идти именно в таком порядке. А, например, Pillow загружает в порядок RGB.
2) Надо разобраться, что именно вы считаете яркостью. Можно, конечно, считать, что это grayscale-изображение. Но правильнее брать канал L из пространства LAB (или HSL). Почитайте книгу Дэна Маргулиса «Photoshop для профессионалов», там хорошо объясняется.