- Install OpenCV on your Raspberry Pi
- Table of contents
- OpenCV
- Install prerequisites
- Install OpenCV with pip
- Testing
- Errors?
- Comments
- Add a Comment
- How to Install OpenCV on a Raspberry Pi
- Let’s learn together on YouTube!
- Step 1: Set Up Your Raspberry Pi
- Step 2: Get Pip and Install OpenCV
- Option 1: Install OpenCV for the Whole System:
- Option 2: Install OpenCV in a Python Virtual Environment:
- What Can I Do With This?
- Install OpenCV 4 on Raspberry Pi
- Step 0: Select OpenCV version to install
- Step 1: Update Packages
- Step 2: Install OS Libraries
- Step 3: Install Python Libraries
Install OpenCV on your Raspberry Pi
Below I guide you through the basic steps necessary to get OpenCV working on the Raspberry Pi as well as on Ubuntu and Mac.
Table of contents
OpenCV
OpenCV is a very extensive and incredibly powerful library for (real-time) computer vision, including object detection, motion tracking, and camera calibration.
Installing OpenCV used to be a very complicated and long process, especially on older models. Luckily it is now relatively easy to install OpenCV with pip. For more background information, see the article by Adrian Rosebrock.
Install prerequisites
Pip is the main package manager for python that we will also use to install OpenCV. Pip should already be installed on your system (see here)
Next, for some versions of Raspberry Pi OS we may need to install some additional packages. First make sure apt-get is fully up-to-date by entering the following in Terminal:
Now install the prerequisites:
sudo apt-get install build-essential cmake pkg-config libjpeg-dev libtiff5-dev libjasper-dev libpng-dev libavcodec-dev libavformat-dev libswscale-dev libv4l-dev libxvidcore-dev libx264-dev libfontconfig1-dev libcairo2-dev libgdk-pixbuf2.0-dev libpango1.0-dev libgtk2.0-dev libgtk-3-dev libatlas-base-dev gfortran libhdf5-dev libhdf5-serial-dev libhdf5-103 python3-pyqt5 python3-dev -y Install OpenCV with pip
Finally, we can install OpenCV very simply using pip. Note that if you still have python2.7 on your system and you are not working with a virtual environment with python3, you will need to type in pip3 rather than pip . The standard command to install opencv is pip install opencv-contrib-python but don’t immediately run this (!) as it will try to install the latest versio of OpenCV, which is not always fully functional on the Raspberry Pi. Furthermore, the installation may take a very long time. Therefore I recommend to run the below command that installs the latest known working version. Here I use 4.5.3.56 but it could be that already a newer stable version is available:
pip install opencv-python==4.5.3.56 If you still get an error message such as Could not find a version that satisfies the requirement opencv-contrib-python (from versions: ) No matching distribution found for opencv-contrib-python, try the alternative to use apt-get instead of pip :
sudo apt-get install python-opencv Testing
Now let’s just make sure that OpenCV is working. Open a terminal window and enter python3 to start Python. Now to make sure you have installed OpenCV correctly enter:
import cv2 cv2.__version__ Your terminal window should look like:
$ python3 Python 3.7.3 (default, Dec 20 2020, 18:57:59) [GCC 8.3.0] on linux Type "help", "copyright", "credits" or "license" for more information. >>> import cv2 >>> cv2.__version__ '4.5.3' Errors?
It might be that you got an error along the way. Here are some solutions:
If you get an error message some prerequisites are not available using the command provided above try and remove them. Opencv is continuously being updated and its required prerequisites change and are sometimes removed.
If you get an error along the lines ‘could not build wheels’ it might be your wheels and setuptools are not fully up to date. To update them:
pip install --upgrade pip setuptools wheel If you have an issue with importing cv2 but the installation finished succesfully, try:
sudo apt-get install python-opencv pip install -U numpy If you have an issue running the latest version of opencv on Raspberry Pi, it can sometimes work to start python3 using the following command:
LD_PRELOAD=/usr/lib/arm-linux-gnueabihf/libatomic.so.1 python3 If you still have issues, please leave a commment!
Comments
There are currently not any comments yet.
Add a Comment
Please leave your comment below. If you’d like to be notified of my reply, please leave your comment here for others but also send your comment as an email to me. I will try to reply as soon as I can. Thanks!
How to Install OpenCV on a Raspberry Pi


Let’s learn together on YouTube!
We are covering the Pip install here because it’s fast and easy. It will work for most OpenCV projects, and it’s an easy solution. However, there will be libraries and Non-Free algorithms that are not installed with Pip. So if you want the FULL library, you’ll need to do build OpenCV from source. For most people, the Pip install should be just fine.
You may also notice we’re installing OpenCV with the contrib modules included. You can do a smaller opencv-python installation if you choose.
This is just one of many Raspberry Pi Projects you can do to learn more about development and IoT.
Step 1: Set Up Your Raspberry Pi
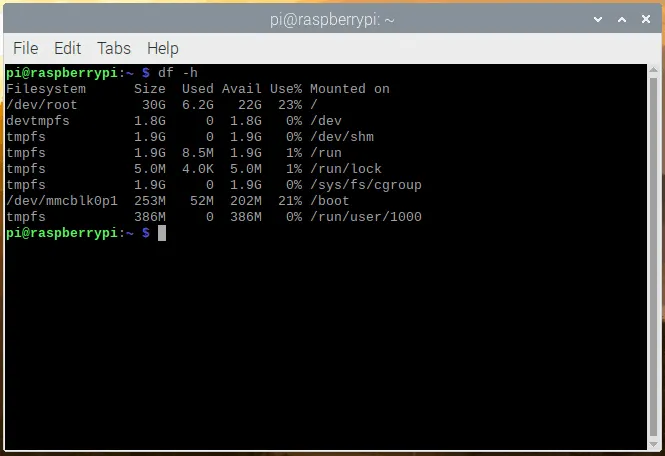
The first thing you should do is make sure your Pi is using the full SD card. It’s easy enough to do.
Now you can check to make sure you’ve got the space:
Cool, we’re ready. Let’s update the system:
sudo apt-get update && sudo apt-get upgrade This is all you’ll need to do the Pi for now to get it ready.
Step 2: Get Pip and Install OpenCV
Now, we’ll get pip and use that to install OpenCV.
mkdir ~/src && cd ~/src wget https://bootstrap.pypa.io/get-pip.py $ sudo python3 get-pip.py There are two ways to install OpenCV. You may want to install it for the whole system or use a Python Virtual Environment.
I suggest using the Python Virtual Environment method because it’s more portable, and you can use different libraries with different projects on the same machine. There isn’t a lot of overhead to using the virtual environment method, but I’ll show both ways:
Option 1: Install OpenCV for the Whole System:
sudo pip install opencv-contrib-python Option 2: Install OpenCV in a Python Virtual Environment:
sudo pip install virtualenv virtualenvwrapper 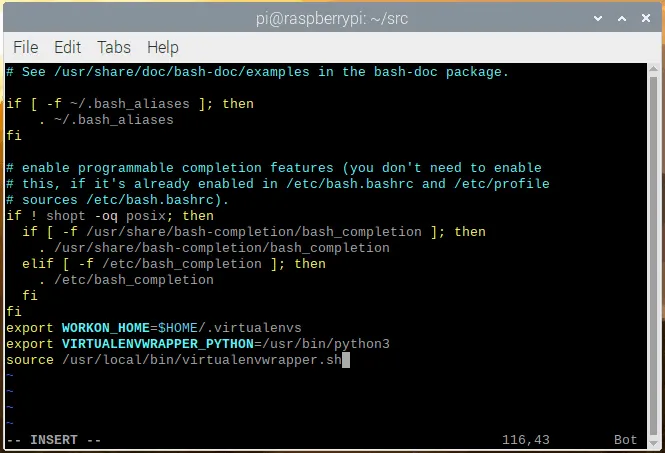
add the following lines to the bottom:
export WORKON_HOME=$HOME/.virtualenvs export VIRTUALENVWRAPPER_PYTHON=/usr/bin/python3 source /usr/local/bin/virtualenvwrapper.sh Save the file, and run source on your .bashrc to reload the changes:
Now, you can create a virtual environment named pistats (or whatever you like)
mkvirtualenv pistats -p python3 pip install opencv-contrib-python 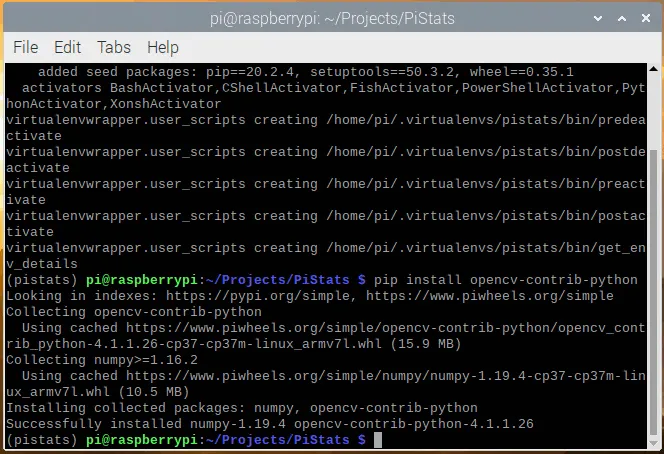
Ok, now we’re up and running.
What Can I Do With This?
OpenCV is an amazing image analysis and processing package. It’s used for some serious computer vision projects.
The Raspberry Pi is a complete Linux computer in a small package. So the possibilities are endless with this:
The list can go on forever. Here’s a good list of OpenCV projects you can check out.
Want to learn more about the Raspberry Pi? Check out the Raspberry Pi for Developers course!

Published: Nov 7, 2020 by Jeremy Morgan. Contact me before republishing this content.
Install OpenCV 4 on Raspberry Pi
Install OpenCV 4 on Raspberry Pi. In this post, we will provide a bash script for installing OpenCV-4.0 (C++, Python 2.7 and Python 3.5) on Raspbian Operating System on Raspberry Pi. We will also briefly study the script to understand what’s going on in it.
Note that this script takes around 3 times more on Raspberry Pi 2 as compared to Raspberry Pi 3.
If you are still not able to install OpenCV on your system, but want to get started with it, we suggest using our docker images with pre-installed OpenCV, Dlib, miniconda and jupyter notebooks along with other dependencies as described in this article.
Step 0: Select OpenCV version to install
First let’s prepare the system for the installation.
sudo apt-get -y purge wolfram-engine sudo apt-get -y purge libreoffice* sudo apt-get -y clean sudo apt-get -y autoremove
Download Code To easily follow along this tutorial, please download code by clicking on the button below. It’s FREE!
echo "OpenCV installation by learnOpenCV.com" cvVersion="masrer"
We are also going to clean build directories and create installation directory.
# Clean build directories rm -rf opencv/build rm -rf opencv_contrib/build
# Create directory for installation mkdir installation mkdir installation/OpenCV-"$cvVersion"
Finally, we will be storing the current working directory in cwd variable. We are also going to refer to this directory as OpenCV_Home_Dir throughout this article.
# Save current working directory cwd=$(pwd)
Step 1: Update Packages
sudo apt -y update sudo apt -y upgrade
Step 2: Install OS Libraries
sudo apt-get -y remove x264 libx264-dev ## Install dependencies sudo apt-get -y install build-essential checkinstall cmake pkg-config yasm sudo apt-get -y install git gfortran sudo apt-get -y install libjpeg8-dev libjasper-dev libpng12-dev sudo apt-get -y install libtiff5-dev sudo apt-get -y install libtiff-dev sudo apt-get -y install libavcodec-dev libavformat-dev libswscale-dev libdc1394-22-dev sudo apt-get -y install libxine2-dev libv4l-dev cd /usr/include/linux sudo ln -s -f ../libv4l1-videodev.h videodev.h cd $cwd sudo apt-get -y install libgstreamer0.10-dev libgstreamer-plugins-base0.10-dev sudo apt-get -y install libgtk2.0-dev libtbb-dev qt5-default sudo apt-get -y install libatlas-base-dev sudo apt-get -y install libmp3lame-dev libtheora-dev sudo apt-get -y install libvorbis-dev libxvidcore-dev libx264-dev sudo apt-get -y install libopencore-amrnb-dev libopencore-amrwb-dev sudo apt-get -y install libavresample-dev sudo apt-get -y install x264 v4l-utils # Optional dependencies sudo apt-get -y install libprotobuf-dev protobuf-compiler sudo apt-get -y install libgoogle-glog-dev libgflags-dev sudo apt-get -y install libgphoto2-dev libeigen3-dev libhdf5-dev doxygen
Step 3: Install Python Libraries
sudo apt-get -y install python3-dev python3-pip sudo -H pip3 install -U pip numpy sudo apt-get -y install python3-testresources
We are also going to install virtualenv and virtualenvwrapper modules to create Python virtual environments.
cd $cwd # Install virtual environment python3 -m venv OpenCV-"$cvVersion"-py3 echo "# Virtual Environment Wrapper" >> ~/.bashrc echo "alias workoncv-$cvVersion=\"source $cwd/OpenCV-$cvVersion-py3/bin/activate\"" >> ~/.bashrc source "$cwd"/OpenCV-"$cvVersion"-py3/bin/activate #############
Next, we create the Python virtual environment.
############ For Python 3 ############ # now install python libraries within this virtual environment sudo sed -i 's/CONF_SWAPSIZE=100/CONF_SWAPSIZE=1024/g' /etc/dphys-swapfile sudo /etc/init.d/dphys-swapfile stop sudo /etc/init.d/dphys-swapfile start pip install numpy dlib # quit virtual environment deactivate