- How to Write a Python Program for NVIDIA Jetson Nano
- Prerequisites
- Install Python
- Install Gedit
- Install Pip
- Create a Virtual Environment
- Write a “Hello World” Program
- Recent Posts
- Connect With Me on LinkedIn!
- Real-Time Object Detection in 10 Lines of Python on Jetson Nano
- Related resources
- How to setup Python3 and Jupyter Notebook On Jetson Nano
- Jupyter Notebooks
- Getting Started
- Step 1 : Installing the OS
- Step 2 : Bringing the machine up to date
- Step 3 : Install Anaconda (Miniforge3) for ARM
- Step 4 : Install some foundational python packages
- Step 5 : Create Anaconda Environment
- Step 6 : Install python modules
- Step 7 : Configure Jupyter Notebook
- Step 8 : Installing Torch 1.6 and TorchVision
- Torch
- Torchvision
- Step 9 : Run Jupyter Notebook
- Comments
- You May Also Enjoy
- Ahmdahl’s Law for Performance Optimization
- OCPD: When Your Need for Control Becomes a Burden
- How to automate setting up Jupyter Notebook on the Jetson Nano
- How to setup Python3 and Jupyter Notebook On Jetson Nano – Faster
How to Write a Python Program for NVIDIA Jetson Nano
In this tutorial, we will write a basic Python program for NVIDIA Jetson Nano.
Prerequisites
Install Python
To install Python, open a new terminal window and type:
sudo apt-get install python python3
To find out where the Python interpreter is located, type this command.
/usr/bin/python
Install Gedit
Install gedit, a text editor that will enable us to write code in Python.
sudo apt-get install gedit
Install Pip
Let’s begin by installing pip. Pip is a tool that will help us manage software packages for Python.
Software packages are bundles of code written by someone else that are designed to solve a specific problem. Why write code to solve a specific problem from scratch, when someone else has already written code to solve that exact same problem? That is where software packages come into play. They prevent you from having to reinvent the wheel.
Open up a fresh Linux terminal window.
Type the following command to update the list of available packages that can be installed on your system.
Upgrade all the packages. The -y flag in the following command is used to confirm to our computer that we want to upgrade all the packages.
Type the following command to check the version of Python you have installed.
My version is 3.6.9. Your version might be different. That’s fine.
sudo apt-get install -y python3-pip
If at any point in the future you want to install a Python-related package using pip, you can use the following command:
pip3 install package_name
Create a Virtual Environment
In this section, we will set up a virtual environment. You can think of a virtual environment as an independent workspace with its own set of libraries, settings, packages, and programming language versions installed.
For example, you might have a project that needs to run using an older version of Python, like Python 2.7. You might have another project that requires Python 3.8. Setting up separate virtual environments for each project will make sure that the projects stay isolated from one another.
Let’s install the virtual environment package.
sudo apt-get install -y python3-venv
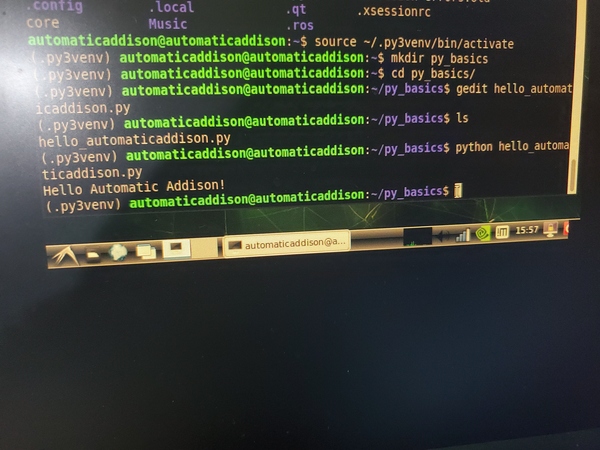
With the software installed, we can now create the virtual environment using the following command. The dot(.) in front of py3venv makes the directory a hidden directory (the dot is optional):
Type the following command to get a list of all the directories. You should see the .py3venv folder there.
List all the contents inside the .py3venv folder.
Now that the virtual environment has been created, we can activate it using the following command:
source ~/.py3venv/bin/activate
Look what happened. There is a prefix on the current line that has the name of the virtual environment we created. This prefix means that the .py3venv virtual environment is currently active.

When a virtual environment is active that means that when we create software programs here in Python, these programs will use the settings and packages of just this virtual environment.
Keep your terminal window open. We’re not ready to close it just yet. Move on to the next section so that we can write our first program in Python.
Write a “Hello World” Program
Let’s write a program that does nothing but print “Hello Automatic Addison” (i.e. my version of a “Hello World” program) to the screen.
Open a new Python program.
gedit hello_automaticaddison.py
Type the following code in there:
#!/usr/bin/env python print("Hello Automatic Addison!") Save the file, and close it.
See if your file is in there.
python hello_automaticaddison.py
Deactivate the virtual environment.
Recent Posts
Connect With Me on LinkedIn!
Welcome to AutomaticAddison.com, the largest robotics education blog online (~50,000 unique visitors per month)!
My goal is to meet everyone in the world who loves robotics. Connect with me on LinkedIn if you found my information useful to you. Also follow my LinkedIn page where I post cool robotics-related content. Don’t be shy! I’d love to hear from you!
Real-Time Object Detection in 10 Lines of Python on Jetson Nano
In the first episode Dustin Franklin, Developer Evangelist on the Jetson team at NVIDIA, shows you how to perform real-time object detection on the Jetson Nano.
In this hands-on tutorial, you’ll learn how to:
- Setup your NVIDIA Jetson Nano and coding environment by installing prerequisite libraries and downloading DNN models such as SSD-Mobilenet and SSD-Inception, pre-trained on the 90-class MS-COCO dataset
- Run several object detection examples with NVIDIA TensorRT
- Code your own real-time object detection program in Python from a live camera feed.
You can then use this 10-line Python program for object detection in different settings using other pre-trained DNN models. The code for this and other Hello AI world tutorials is available on GitHub.
Related resources
- DLI course: Getting Started with AI on Jetson Nano
- DLI course: Building Video AI Applications at the Edge on Jetson Nano
- GTC session: Jetson Edge AI Developer Days: Getting the Most Out of Your Jetson Orin Using NVIDIA Nsight Developer Tools (Spring 2023)
- GTC session: Connect with the Experts: Announcing the Jetson Orin Nano devkit for Edge AI – Deep Dive Q&A w/ Jetson Engineers (Spring 2023)
- SDK: JetPack SDK
- Webinar: ACCELERATE COMPUTER VISION AND IMAGE PROCESSING USING VPI 1.1
How to setup Python3 and Jupyter Notebook On Jetson Nano
An updated version of these instructions can be found here. The information on this page (and comments) still work perfectly. However, this page may soon go out of date and I will remove it when it does become obsolete.
Jupyter Notebooks
Jupyter Notebook is a great addition to your toolset when starting off with Python and especially Machine Learning. At the risk of oversimplifying the functionality, it allows you to execute python code on a machine from the web server. Additionally, it allows the user to embed code and description in a single file, while capturing program output as you evaluate “cells” of code.
Getting Started
But, before we can get to installing Jupyter Notebook on your brand new Jetson Nano, there’s a few things we’d need to do to bootstrap your machine.
Step 1 : Installing the OS
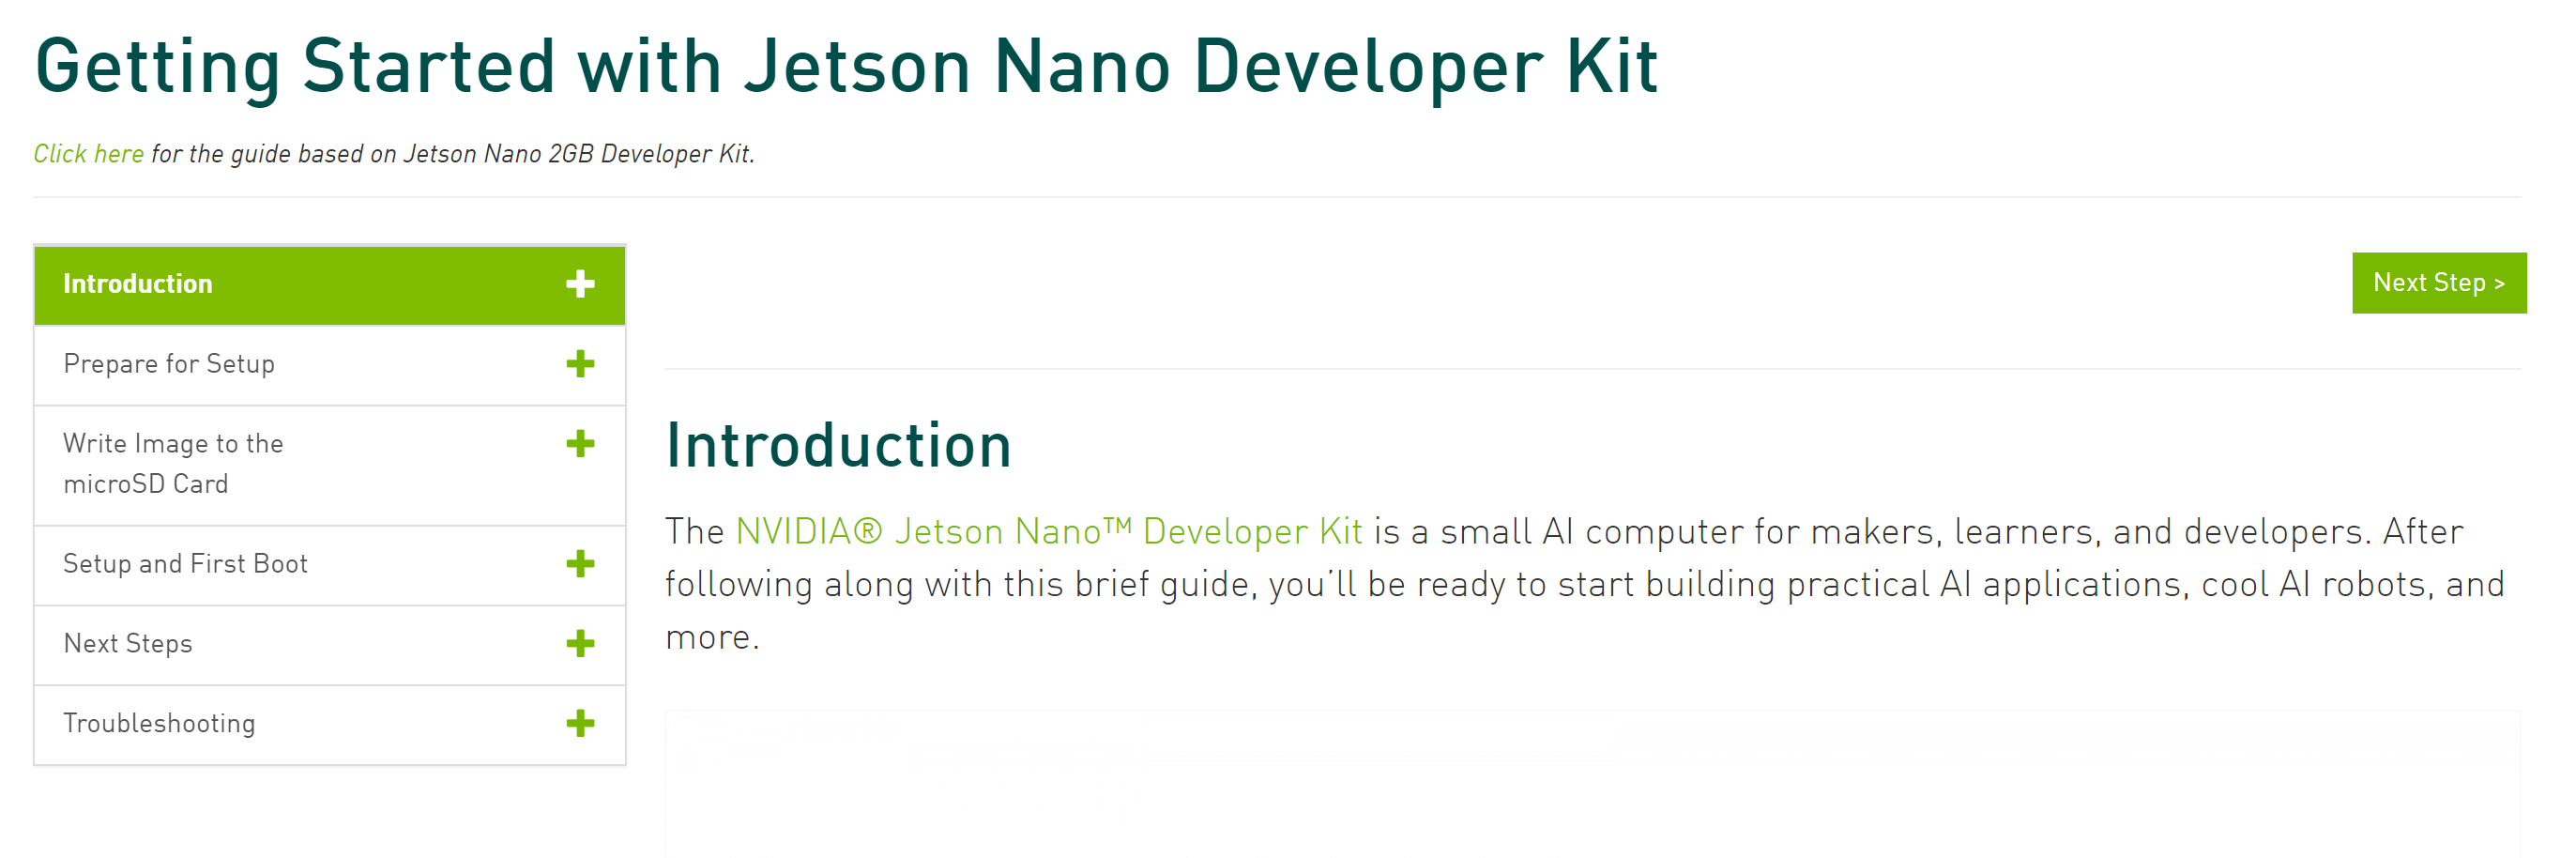
NVIDIA Jetson Nano Getting Started Guide
NVIDIA provides a good guide to help us get started with the basics on the Jetson Nano here : https://developer.nvidia.com/embedded/learn/get-started-jetson-nano-devkit
Once you’re done with installing the Ubuntu OS image and have access to the command line, let’s move on to the next step.
Step 2 : Bringing the machine up to date
NOTE: Before we proceed, make sure you’ve connected the Jetson Nano to the internet, either through an RJ45 cable or if you bought the wireless adapter, through wifi.
sudo apt-get update sudo apt-get upgrade Once you’re done with this, we’ll most likely have to reboot to apply changes, maybe more than once.
Step 3 : Install Anaconda (Miniforge3) for ARM
Installing modules for python can be nerve-wracking. Installing, updating and removing packages can affect system stability, since the packages go into your system cache, affecting all applications using python. It’s often advisable to use a virtual environment so any packages and setting changes are contained. Any changes to an python and associated packages only persist within the environment. You also gain the flexibility of creating and using multiple environments for specific needs.
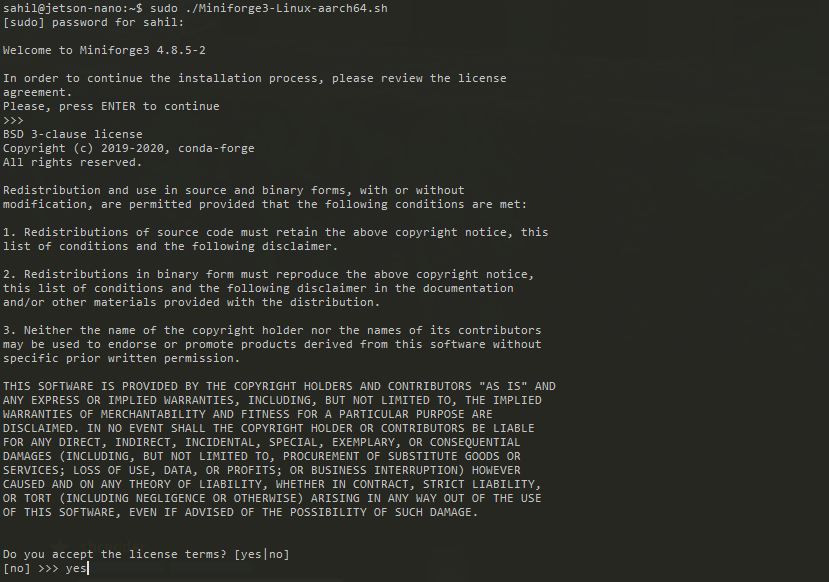
While on Windows, Mac and Linux, we have the flexibility of using Anaconda, the ARM platform has limited choices. One such choice is miniforge. In order to get miniforge running on your Jetson Nano, let’s open a terminal session and run the following commands.
cd ~ wget https://github.com/conda-forge/miniforge/releases/latest/download/Miniforge3-Linux-aarch64.sh . chmod a+x Miniforge3-Linux-aarch64.sh 
And then follow it by running the script.
Important Note : DO NOT RUN THIS SCRIPT AS ROOT
You’ll need to allow the OS to apply this installation, which would allow us to use miniforge. There’s many ways to go about this, but the easiest is just to log off and log back on.
At this point, your prompt will be prefixed with (base). This just means that miniforge has activated the “base” environment, which is the same as your system’s python environment at the moment. If you’re like me and prefer not to activate the base environment by default, there’s an option to turn off this behavior
conda config --set auto_activate_base false Step 4 : Install some foundational python packages
sudo apt install python3-h5py libhdf5-serial-dev hdf5-tools python3-matplotlib Should be self-explanatory, installs some modules for machine learning in python.
Step 5 : Create Anaconda Environment
conda create -n jupyter python=3.6 This creates a new python virutal environment with Python 3.6 as the base. Python 3.6 is important here since the Torch/TorchVision libraries for ARM are currently built for Python 3.6 only.
Once done, activate your virtual environment
Step 6 : Install python modules
If you’re not in the ‘jupyter’ virtual environment created earlier, let’s activate it now, and install the requisite packages.
conda activate jupyter pip install matplotlib pandas numpy pillow scipy tqdm scikit-image scikit-learn seaborn cython h5py jupyter ipywidgets These modules can be installed individually, but it only makes sense to do them all at once.
Step 7 : Configure Jupyter Notebook
Once Jupyter Notebook is installed, it’s advisable to configure it to your needs. Let’s start by generating a configuration file for Jupyter.
jupyter notebook --generate-config Once created, we would need to edit the config file. Some settings here may differ from those on your setup, but the idea remains the same. Let’s open the configuration file.
vim /home/sahil/.jupyter/jupyter_notebook_config.py And change some values. Specifically, I would start by uncommenting and setting these values.
c.NotebookApp.open_browser = False c.NotebookApp.ip = '*' Then we generate a password for your Jupyter Notebook instance. While this is optional, it’s highly recommended.
jupyter notebook password Give it a password of your choice, and then we set the python kernel to work with Jupyter. This step is optional, but ensures we’re using the correct python version for Jupyter Notebook.
python -m ipykernel install --user Step 8 : Installing Torch 1.6 and TorchVision
A lot of this section is borrowed from an NVIDIA Forum Post which describes the process in detail, with specific instructions for different versions of python and/or torch/torchvision.
Since we’re looking to install a specific version of Torch/TorchVision for Python3, I’ll stick to specific commands here.
Torch
wget https://nvidia.box.com/shared/static/9eptse6jyly1ggt9axbja2yrmj6pbarc.whl -O torch-1.6.0-cp36-cp36m-linux_aarch64.whl sudo apt-get install python3-pip libopenblas-base libopenmpi-dev pip install torch-1.6.0-cp36-cp36m-linux_aarch64.whl Torchvision
sudo apt-get install libjpeg-dev zlib1g-dev git clone --branch v0.7.0 https://github.com/pytorch/vision torchvision cd torchvision export BUILD_VERSION=0.7.0 python setup.py install cd ../ pip install 'pillow Step 9 : Run Jupyter Notebook
Once this is all done, let’s run Jupyter Notebook
If you aren’t in the virtual environment, activate the ‘jupyter’ virtual environment we created earlier.
Using a browser, you should now be able to browse to your Jetson Nano’s IP address on port 8888 to see the Jupyter UI. In my case, the IP was set to 10.0.0.3

Updated: October 29, 2020
Comments
You May Also Enjoy
Ahmdahl’s Law for Performance Optimization
May 16, 2023 2 minute read
OCPD: When Your Need for Control Becomes a Burden
May 14, 2023 11 minute read
In the vast landscape of mental health, one condition often overshadowed by its more recognized counterpart is Obsessive-Compulsive Personality Disorder (OCP.
How to automate setting up Jupyter Notebook on the Jetson Nano
December 23, 2021 1 minute read
This is a scripted version of the instructions posted in this article. It’s easier, but way less informative. If you need more details on what went into t.
How to setup Python3 and Jupyter Notebook On Jetson Nano – Faster
November 28, 2021 5 minute read
If you would like to set up your Jetson Nano in a more hands off manner, there’s a new installer script I’ve been working on. Here’s the details