One-line HTTP servers
If you need a quick-and-dirty HTTP server that doesn’t need fancy configuration, try some of these one-line HTTP servers in languages like Python, Ruby, and PHP. Some examples include a small script that allows you to embed the server in to your program and add more customization. These are not intended for production use.
These examples are good for:
- Temporary test servers
- Development of web apps
- Quickly sharing or moving files over HTTP
- Testing reverse proxies
These servers do not take security in to consideration. Most of them will serve your current directory, unencrypted, with a directory listing, on all public interfaces (0.0.0.0). That means with the default settings they will publicly serve up all your information in plain-text. Examples are provided whenever possible on how to specify the bind interface and port to prevent exposing data publicly. Be aware of the risks when using these.
If you want to setup a production server, I recommend Apache httpd or nginx. I have an Nginx tutorial that covers installation, usage, and basic configuration options.
Production servers should also use encryption (SSL). Check out my OpenSSL self-signed certificate tutorial and my Let’s Encrypt SSL certificate tutorial for instructions on how to obtain SSL certificates and use them with a production quality web server like Apache httpd or nginx.
Quick examples
Run these in the shell or command prompt. They will serve the current directory, usually with a directory listing if an index.html is not present. The default ports vary but are typically 8000 for Python or 8080 for Ruby. Most listen on 0.0.0.0.
python3 -m http.server
python2 -m SimpleHTTPServer
php -S 0.0.0.0:8000
ruby -run -e httpdPython 3
The Python 3 standard library comes with the http.server module. You can invoke the module directly with Python using a single command or you can use the HTTP server within your own Python application. Both examples are demonstrated below. For more information about http.server check out the official documentation at https://docs.python.org/3/library/http.server.html.
# Default listen: 0.0.0.0:8000
# Provides directory listing if no index.html present
python3 -m http.server
# Specify listen host and port information
python3 -m http.server --bind 0.0.0.0 9999
# In 3.7+ you can specify directory too
python3 -m http.server --directory /path/to/serveTo use the http.server in your own program, you can import the http.server and socketserver modules. The handler is a class that takes the incoming TCP data and processes it like an HTTP request. It implements do_GET() and do_POST() methods for example. Python comes with the SimpleHTTPRequestHandler that is used here.
# https://docs.python.org/3/library/http.server.html
import http.server
import socketserver
Handler = http.server.SimpleHTTPRequestHandler
with socketserver.TCPServer(("0.0.0.0", 9999), Handler) as httpd:
httpd.serve_forever()Python 2
The Python 2 standard library comes with the SimpleHTTPServer module. You can invoke the module directly with Python using a single command or you can use the HTTP server within your own Python application. Both examples are demonstrated below. Read more at https://docs.python.org/2/library/simplehttpserver.html.
# Default listen: 0.0.0.0:8000
# Provides directory listing if no index.html present
python2 -m SimpleHTTPServer
# Specify port, but can't change the 0.0.0.0 bind or directory
python2 -m SimpleHTTPServer 8888To embed the HTTP server inside your own Python 2 application, use the example below.
# https://docs.python.org/2/library/simplehttpserver.html
import SimpleHTTPServer
import SocketServer
Handler = SimpleHTTPServer.SimpleHTTPRequestHandler
httpd = SocketServer.TCPServer(("0.0.0.0", 9999), Handler)
httpd.serve_forever()PHP
The PHP server will serve static files just fine, but it will also process PHP scripts allowing you to create dynamic pages that execute code when they are visited in the browser. The PHP built-in server has a few more features and configuration than the simple Python servers, but it is still not intended for production use.
# Serves current directory, no directory listing
php -S localhost:9999
# Specify path to serve
php -S localhost:9999 -t /path/to/serve
# Print full usage/help info
php -SRuby
Ruby comes with the WEBrick module as part of the sandard library. It is an HTTP server that has quite a few configurable features. It is probably the most configurable and useful out of all the language examples provided so far. The documentation for WEBrick can be found in the standard library documentation. For example, the current latest version is available at https://ruby-doc.org/stdlib-2.5.1/libdoc/webrick/rdoc/WEBrick.html.
This also works with JRuby if you are in a Java environment. Just replace ruby with jruby. Since WEBrick is part of the standard library, it should work out-of-the-box with JRuby.
WEBrick even has the concept of servlets like in Java. It also supports virtual hosts and even authentication, like http basic auth. Those are out of the scope here but worth mentioning how many features WEBrick has compared to all the other examples. WEBrick also supports SSL but that's not going to be covered here.
# Defaults to 0.0.0.0:8080
# Serves current directory
# Provides directory listing if no index.html
ruby -run -e httpd
# Specify port and directory to serve
ruby -run -e httpd /path/to/serve -p 9999To use the WEBrick server within your own Ruby application, you need to require the webrick module, instantiate a new HTTPServer, and then call start. Optionally you can capture the interrupt signal (SIGINT) that is sent when a user presses CTRL-C to make it easy to kill the process from the command line.
require 'webrick'
server = WEBrick::HTTPServer.new(
:Port => 9999,
:DocumentRoot => Dir.pwd
)
# Trigger server to stop on CTRL-C (SIGINT interrupt)
# Without this, CTRL-C still works, but
# you get an unclean shutdown
trap('INT') < server.stop >
server.startYou could technically squish it all on to a single line. The -r requires the webrick module and the -e tells Ruby to execute the string provided (the code).
ruby -r webrick -e "server = WEBrick::HTTPServer.new(:Port => 9999, :DocumentRoot => Dir.pwd); trap('INT') < s.shutdown >; server.start"OpenSSL
You can use OpenSSL to run an HTTP server with SSL. First you will need an SSL certificate. You can obtain one for free from LetsEncrypt, a trusted certificate authority, or generate your own.
For more information on creating self-signed certificates, check out my tutorial Creating self-signed SSL certificates with OpenSSL. For more information about getting a signed certificate from LetsEncrypt, check out my tutorial LetsEncrypt Free SSL Certificate Tutorial.
Here is a simple example of generating your own certificate:
openssl req -newkey rsa:2048 -nodes -keyout privkey.pem -x509 -days 36500 -out certificate.pem
# Or without the interactive prompts, provide values:
openssl \
req \
-newkey rsa:2048 -nodes \
-keyout privkey.pem \
-x509 -days 36500 -out certificate.pem \
-subj "/C=US/ST=NRW/L=Earth/O=CompanyName/OU=IT/CN=www.example.com/emailAddress=email@example.com"To run the server, provide it the certificate and the port you want to bind to. The -WWW flag tells it to serve the current directory as static files. Swapping that for a -www flag would provide a status page with SSL info only. Swapping it out for a -HTTP flag would be similar to -WWW where it serves static files, but it would also assume that the files being served contained the full HTTP response including headers and all.
# There is no directory index listing, so you must visit a specific file
# e.g. https://localhost:9999/certificate.pem
openssl s_server -key privkey.pem -cert certificate.pem -accept 9999 -WWWTo get information about more options, use openssl s_server --help or man s_server.
Conclusion
If you've read everything, you should be able to run simple HTTP servers that serve a directory. You should also understand how some examples will serve index.html files while others will serve a directory listings or both. Before using them you should understand how binding to localhost is different from binding to 0.0.0.0 and understand there is no SSL or encryption in these servers. These examples are not intended for production use and are for development and convenient purposes. Use the one-line commands for quick testing and hosting or use the built-in libraries to add an HTTP server to your own application.
Support
Find answers, guides, and tutorials to supercharge your content delivery.
Enabling the Nginx Directory Index Listing
If you're using Nginx as a web server and want to display an Nginx directory index listing when navigating to a particular directory, then you have a couple of options. One way to achieve this is through the use of an index file ( index.html ). However, another method that can be used is through enabling the ngx_http_autoindex_module .
This post will go through how to enable the Nginx directory index listing using both of these methods as well as outline the directives available in the autoindex module.
Explaining the Nginx directory index file
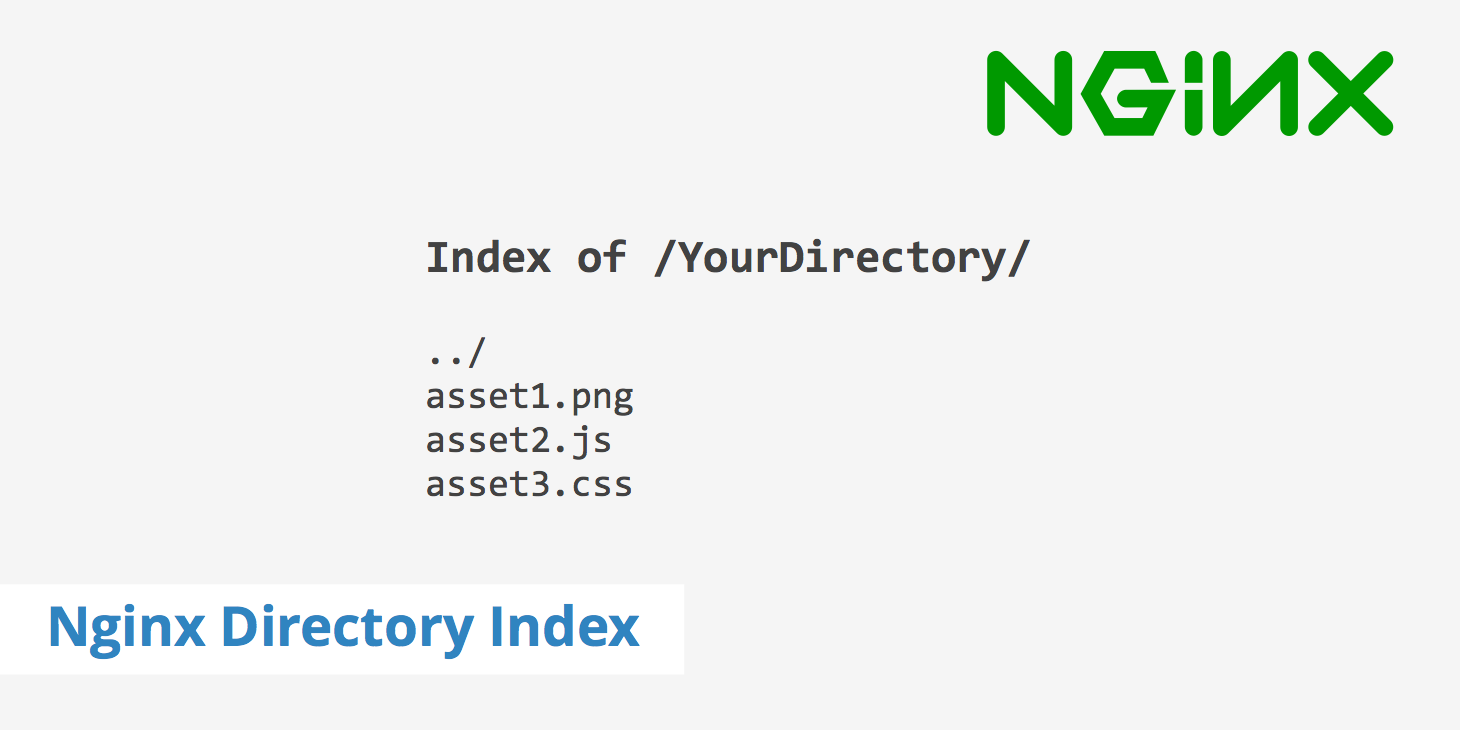
By default, Nginx tries to display a directory listing when a particular URL path ends with a / . For example, if you were to use the path /assets/css/ , then Nginx would look in the /css/ directory to see if it can find an index.html file (that is if it has permissions). If the autoindex module is not active and there is no index.html present, then Nginx will return a 404 Not Found error.
However, in the event that you do have an index.html file in that directory, then Nginx will use that to generate a directory listing of the assets that live within that directory. For example, as seen in the screenshot below, an index is generated within the /test/ directory which then displays both items that live within /test/ .
How to enable automatic Nginx directory index listings
As previously mentioned, if you don't have an index.html file in a particular directory that you want to generate a listing for, then navigating to that URL path will return a 404 Not Found error. However, the Nginx autoindex module provides an easy way for a particular directory to automatically generate a listing. Adding autoindex to your Nginx configuration is quite easy. Simply add it to your Nginx location directive as so:
Once that change is made, restart your Ngin x server sudo service nginx restart . Now, instead of returning a 404 error, the web server will return an Nginx directory index listing similar to what is shown in the previous section for the directory/directories you have defined in your location block.
Nginx autoindex directives
Besides simply using autoindex on or off, there are also three other directives you can configure with this module. These include the following:
- autoindex_exact_size; - This directive specifies whether Nginx should display the exact file sizes of the output in the directory index or simply round to the nearest KB, MB, or GB. This directive has two options: on or off .
- autoindex_format; - This directive specifies what format the Nginx index listing should be outputted to. This directive has four options: html , xml , json , or jsonp .
- autoindex_localtime; - This directive specifies whether the times for the directory listing should be outputted to local time or UTC. This directive has two options: on or off .
An example of a location directive using all four autoindex options could resemble the following.
Summary
The ngx_http_autoindex_module provides users with an easy to use method that allows them to display a directory listing whether there is an index.html present or not. This can be quite useful if you want to show the Nginx directory index listing for many directories but don't want to go through the process of creating an index file for each one. Additionally, this method also helps reduce the risk of any 404 errors in the event you forget to include an index file for a particular directory.
How to Setup Nginx HTTP/2
HTTP/2, the successor of HTTP1.x, has been widely growing in popularity due to many of its performance benefits. As webpage sizes are growing and becoming more resource intensive, it is vital to stay current with performance optimization techniques…
Using the Nginx add_header Directive
What is the Nginx add_header directive? The Nginx add_header directive allows you to define an arbitrary response header and value to be included in all response codes, which are equal to 200, 201, 204, 206, 301, 302, 303, 304, or 307. This can be…
Nginx Rewrite Rules
The two main directives used to rewrite in Nginx are the return and rewrite directives, both of which will be explained in this article. Nginx rewrite rules can be defined within your Nginx configuration file in order to change at least part or all…
Supercharge your content delivery 🚀
Try KeyCDN with a free 14 day trial, no credit card required.