- Saved searches
- Use saved searches to filter your results more quickly
- rafinskipg/neural-network-js
- Name already in use
- Sign In Required
- Launching GitHub Desktop
- Launching GitHub Desktop
- Launching Xcode
- Launching Visual Studio Code
- Latest commit
- Git stats
- Files
- README.md
- Как создать нейросеть всего из 30 строк JavaScript-кода
- Нейроны и синапсы
- Код
- Simple theory
- Forward propagation
- Backward propagation (or backpropagation or just backprop)
- Practice
- Conclusions
Saved searches
Use saved searches to filter your results more quickly
You signed in with another tab or window. Reload to refresh your session. You signed out in another tab or window. Reload to refresh your session. You switched accounts on another tab or window. Reload to refresh your session.
rafinskipg/neural-network-js
This commit does not belong to any branch on this repository, and may belong to a fork outside of the repository.
Name already in use
A tag already exists with the provided branch name. Many Git commands accept both tag and branch names, so creating this branch may cause unexpected behavior. Are you sure you want to create this branch?
Sign In Required
Please sign in to use Codespaces.
Launching GitHub Desktop
If nothing happens, download GitHub Desktop and try again.
Launching GitHub Desktop
If nothing happens, download GitHub Desktop and try again.
Launching Xcode
If nothing happens, download Xcode and try again.
Launching Visual Studio Code
Your codespace will open once ready.
There was a problem preparing your codespace, please try again.
Latest commit
Git stats
Files
Failed to load latest commit information.
README.md
Neural Network in JavaScript
Implementantion of a Perceptron neural network in JavaScript. It is a simple implementation that can serve as an example for learning, not for production use. It does not use GPU and the only activation function implemented is a sigmoid function.
For a ready to use implementation please refer to BrainJS
npm install --save vt-neural-network import Network > from 'vt-neural-network' // Define the layer structure const layers = [ 2, // This is the input layer 10, // Hidden layer 1 10, // Hidden layer 2 1 // Output ] const network = new Network(layers) // Start training const numberOfIterations = 20000 // Training data for a "XOR" logic gate const trainingData = [ input : [0,0], output: [0] >, input : [0,1], output: [1] >, input : [1,0], output: [1] >, input : [1,1], output: [0] >] for(var i = 0; i numberOfIterations; i ++) // Get a random training sample const trainingItem = trainingData[Math.floor((Math.random()*trainingData.length))] network.train(trainingItem.input, trainingItem.output); > // After training we can see if it works // we call activate to set a input in the first layer network.activate(trainingData[0].input) const resultA = network.run() network.activate(trainingData[1].input) const resultB = network.run() network.activate(trainingData[2].input) const resultC = network.run() network.activate(trainingData[3].input) const resultD = network.run() console.log('Expected 0 got', resultA[0]) console.log('Expected 1 got', resultB[0]) console.log('Expected 1 got', resultC[0]) console.log('Expected 0 got', resultD[0])
If you want to see other logic gates implementations, check the test folder.
- network.setLearningRate(0.3) : Adjust the learning rate of the network,
- network.toJSON() : returns the structure of the network
- network.layers : contains the different layers of the network
- layer.neurons : contains the different neurons on each layer
How to develop the application?
npm install npm run watch # Open public/ directory in browserRemove generated directory
If you would like to remove public/dist directory (created by Webpack):
If you would like to remove node_modules/ and remove public/dist/
If you would like to know how many lines of code you write:
Analysis of bundle file weight
If you would like to check how much a bundle file weight:
Как создать нейросеть всего из 30 строк JavaScript-кода

В этой статье мы рассмотрим, как можно создать и обучить нейросеть с помощью библиотеки Synaptic.js, позволяющей проводить глубокое обучение в связке Node.js с браузером. Давайте создадим простейшую нейросеть, решающую XOR-уравнение. Также можете изучить специально написанный интерактивный туториал.
Но прежде чем переходить к коду, давайте поговорим об основах нейросетей.
Нейроны и синапсы
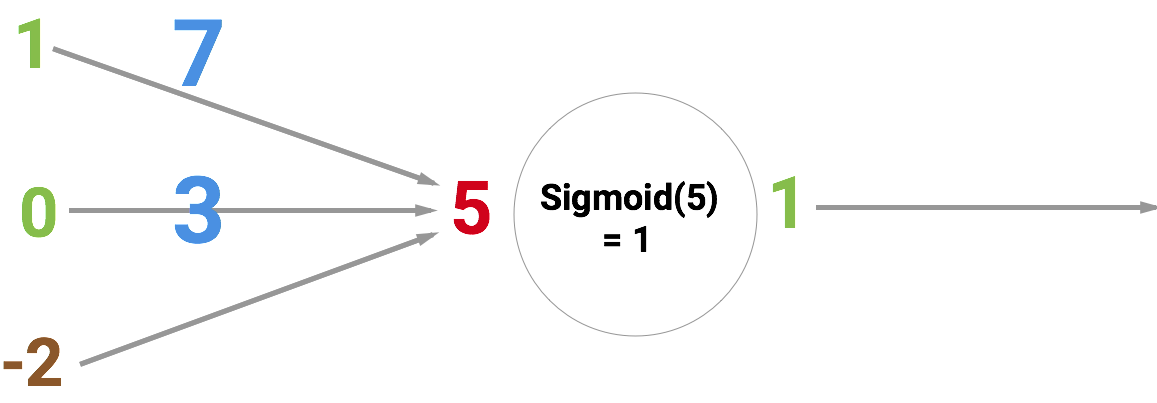
Основной «строительный» элемент нейросети, конечно же, нейрон. Как и функция, он берёт несколько входных значений и выдаёт какой-то результат. Есть разные виды нейронов. Наша сеть будет использовать сигмоиды, берущие любые числа и сводящие их к значениям в диапазоне от 0 до 1. Ниже проиллюстрирован принцип действия такого нейрона. На входе у него число 5, а на выходе 1. Стрелки обозначают синапсы, соединяющие нейрон с другими слоями нейросети.
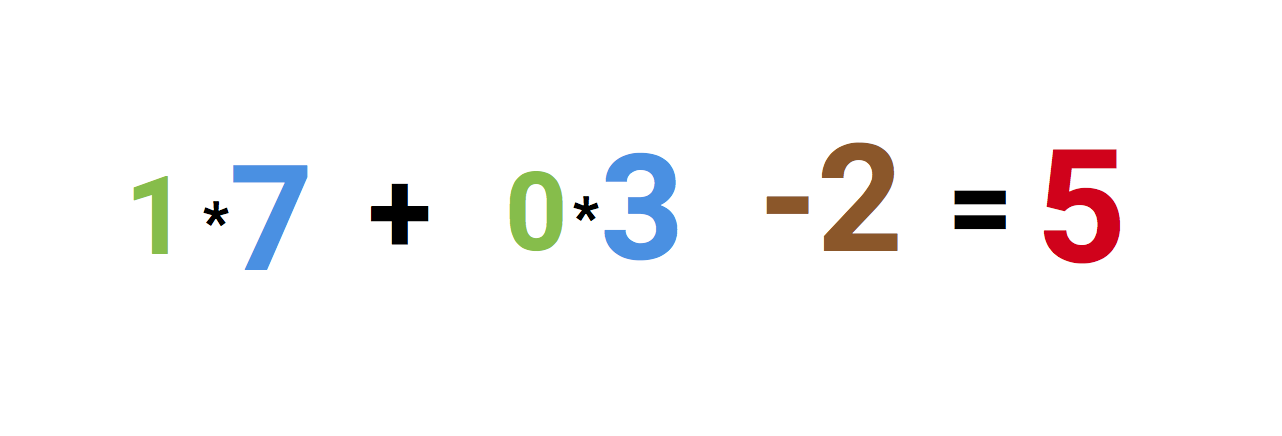
Но почему на входе у нас число 5? Это сумма трёх синапсов, «входящих» в нейрон. Давайте разберёмся.
Слева мы видим значения 1 и 0, а также смещение -2. Сначала первые два значения умножаются на их веса, которые равны 7 и 3, полученные результаты складываются и к ним прибавляется смещение, получаем 5. Это и будет входным значением для нашего искусственного нейрона.
А поскольку это сигмоида, которая любое значение сводит к диапазону от 0 до 1, то выходным значением будет 1. Если такие нейроны соединить друг с другом с помощью синапсов, то получится нейросеть, по которой значения проходят от входа к выходу и трансформируются. Примерно так:
Нейросеть обучается делать обобщения ради решения всевозможных задач, например, распознавания рукописного текста или почтового спама. И умение хорошо обобщать зависит от выбора правильных весов и смещений в рамках всей нейросети.
Для обучения вы просто даёте набор образцов и заставляете нейросеть обрабатывать их раз за разом, пока она не станет давать правильный ответ. После каждой итерации вычисляется точность прогнозирования и корректируются веса и смещения, чтобы в следующий раз ответ нейросети оказался чуть точнее. Такой процесс обучения называется методом обратного распространения ошибки (backpropagation). Если провести тысячи итераций, то ваша нейросеть научится хорошо обобщать.
Работу метода обратного распространения ошибки мы рассматривать не будем, это выходит за рамки нашего руководства. Но если вас интересуют подробности, то можете почитать эти статьи:
Код
Первым делом создадим слои, и сделаем это в синаптическом режиме с помощью функции new Layer() . Передаваемое ей число означает количество нейронов в свежем слое. Если вы не знаете, что такое слой, то посмотрите вышеупомянутый туториал.
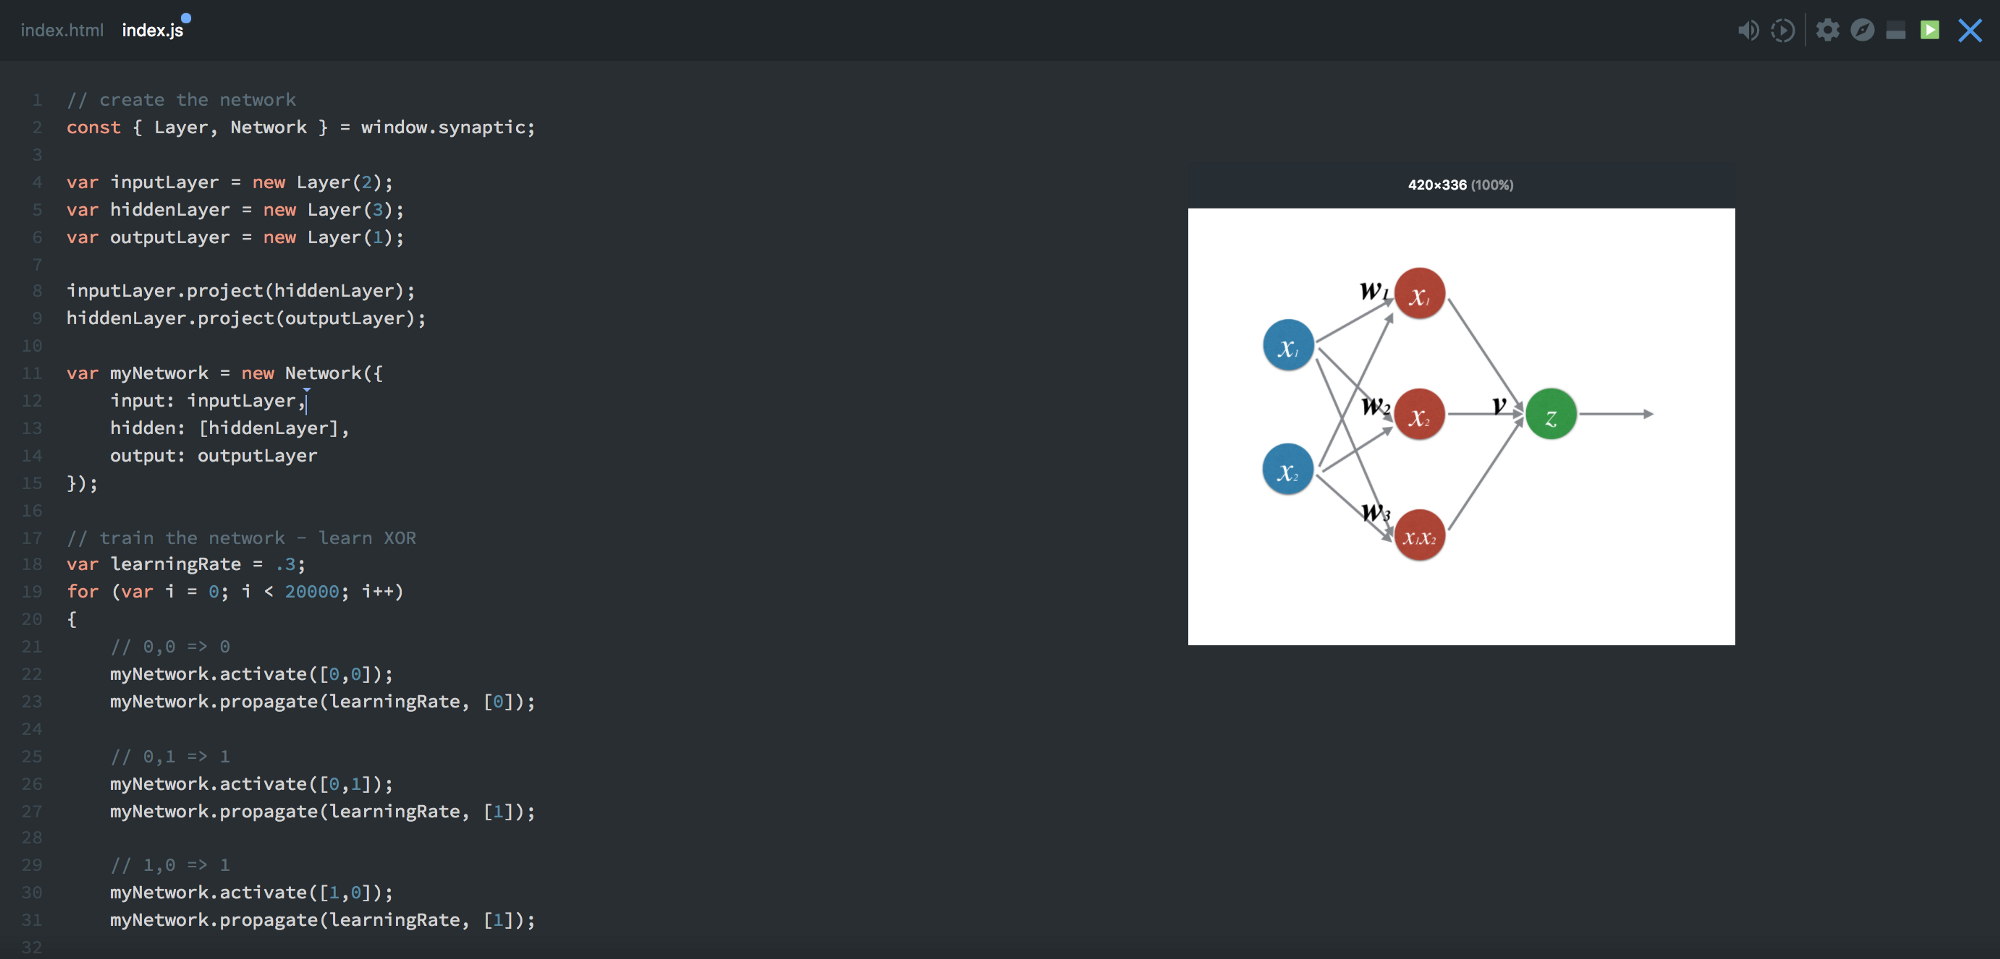
const < Layer, Network >= window.synaptic; var inputLayer = new Layer(2); var hiddenLayer = new Layer(3); var outputLayer = new Layer(1);Теперь соединим слои друг с другом и инстанцируем новую сеть.
inputLayer.project(hiddenLayer); hiddenLayer.project(outputLayer); var myNetwork = new Network(< input: inputLayer, hidden: [hiddenLayer], output: outputLayer >);У нас получилась сеть по схеме 2–3–1, которая выглядит так:
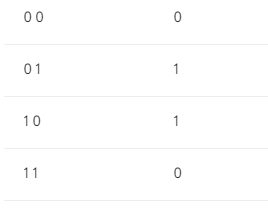
// train the network - learn XOR var learningRate = .3; for (var i = 0; i < 20000; i++) < // 0,0 =>0 myNetwork.activate([0,0]); myNetwork.propagate(learningRate, [0]); // 0,1 => 1 myNetwork.activate([0,1]); myNetwork.propagate(learningRate, [1]); // 1,0 => 1 myNetwork.activate([1,0]); myNetwork.propagate(learningRate, [1]); // 1,1 => 0 myNetwork.activate([1,1]); myNetwork.propagate(learningRate, [0]); >Мы прогнали 20 000 итераций обучения. В каждой итерации данные четыре раза прогоняются вперёд-назад, то есть на вход подаются четыре возможные комбинации значений: [0,0] [0,1] [1,0] [1,1] .
Начнём с выполнения myNetwork.activate([0,0]) , где [0,0] — входные данные. Это называется прямым распространением (forward propagation), или активацией нейросети. После каждого прямого распространения нужно сделать обратное, при котором нейросеть обновляет свои веса и смещения.
Обратное распространение выполняется с помощью myNetwork.propagate(learningRate, [0]) , где learningRate — константа, означающая, насколько нужно каждый раз корректировать веса. Второй параметр 0 представляет собой правильное выходное значение при входном [0,0] .
Далее нейросеть сравнивает получившееся выходное значение с правильным. Тем самым она определяет точность собственной работы.
По результатам сравнения нейросеть корректирует веса и смещения, чтобы в следующий раз ответить немного точнее. После 20 000 таких циклов можно проверить, насколько хорошо обучилась наша нейросеть, активировав её с помощью всех четырёх возможных входных значений:
console.log(myNetwork.activate([0,0])); -> [0.015020775950893527] console.log(myNetwork.activate([0,1])); ->[0.9815816381088985] console.log(myNetwork.activate([1,0])); -> [0.9871822457132193] console.log(myNetwork.activate([1,1])); -> [0.012950087641929467]Если округлить результаты до ближайших целочисленных значений, то получим точные ответы для XOR-уравнения. Работает!
На этом всё. Хотя мы лишь самую малость копнули тему нейросетей, вы уже можете самостоятельно поэкспериментировать с Synaptic и продолжить самообучение. В wiki авторов библиотеки есть ещё много хороших руководств.
Simple theory
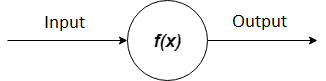
A neural network is a collection of neurons with synapses connected them. A neuron can be represented as a function that receive some input values and produced some output as a result.
Every single synapse has its own weight. So, the main elements of a neural net are neurons connected into layers in specific way.
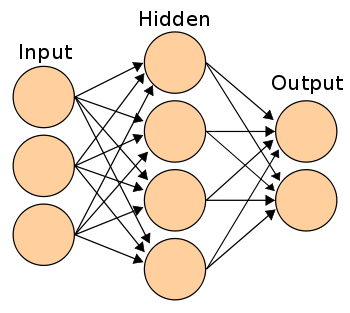
Every single neural net has at least an input layer, at least one hidden and an output layer. When each neuron in each layer is connected to all neurons in the next layer then it’s called multilayer perceptron (MLP). If neural net has more than one of hidden layer then it’s called Deep Neural Network (DNN).
The picture represents DNN of type 6–4–3–1 means 6 neurons in the input layer, 4 in the first hidden, 3 in the second one and 1 in the output layer.
Forward propagation
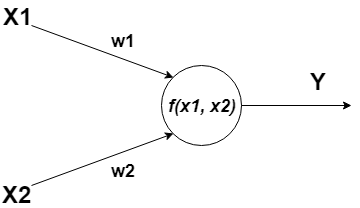
A neuron can have one or more inputs that can be an outputs of other neurons.
- X1 and X2 — input data;
- w1, w2 — weights;
- f(x1, x2) — activation function;
- Y — output value.
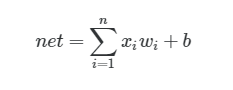
So, we can describe all the stuff above by mathematical formula:
The formula describes neuron input value. In this formula: n — number of inputs, x — input value, w — weight, b — bias (w e won’t use that feature yet, but only one thing you should know about that now — it always equals to 1).
As you can see, we need to multiply each input value by its weight and summarize products. We have sum of the products of multiplying x by w. The next step is passing the output value net through activation function. The same operation needs to be applied to each neuron in our neural net.
Finally, you know what the forward propagation is.
Backward propagation (or backpropagation or just backprop)
Backprop is one of the powerful algorithms first introduced in 1970. [Read more about how it works.]
Backprop consists of several steps you need apply to each neuron in your neural net.
target — true value, output — real output from neural net.
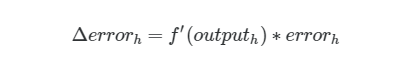
f’ — derivative of activation function.
synapse — weight of a neuron that’s connected between hidden and output layer.
Then we calculate delta again, but now for hidden layer neurons.
output — output value of a neuron in a hidden layer.
lrate — learning rate.
Buddies, we just used the simplest backprop algorithm and gradient descent😯. If you wanna dive deeper then watch this video.
And that’s it. We’re done with all math. Just code it.
Practice
So, we’ll create MLP for solving XOR problem (really, man? 😯).
From the simplest things to the hardest, bro. All in good time.
We’ll use Node.js platform and math.js library (which is similar to numpy in Python). Run these commands in your terminal:
mkdir mlp && cd mlp npm init npm install babel-cli babel-preset-env mathjsLet’s create a file called activations.js which will contain our activation functions definition. In our example we’ll use classical sigmoid function (oldschool, bro).
Then let’s create nn.js file that contains NeuralNetwork class implementation.
It seems that something is missing.. ohh, exactly! we need to add trainable ability to our network.
And just add predict method for producing result.
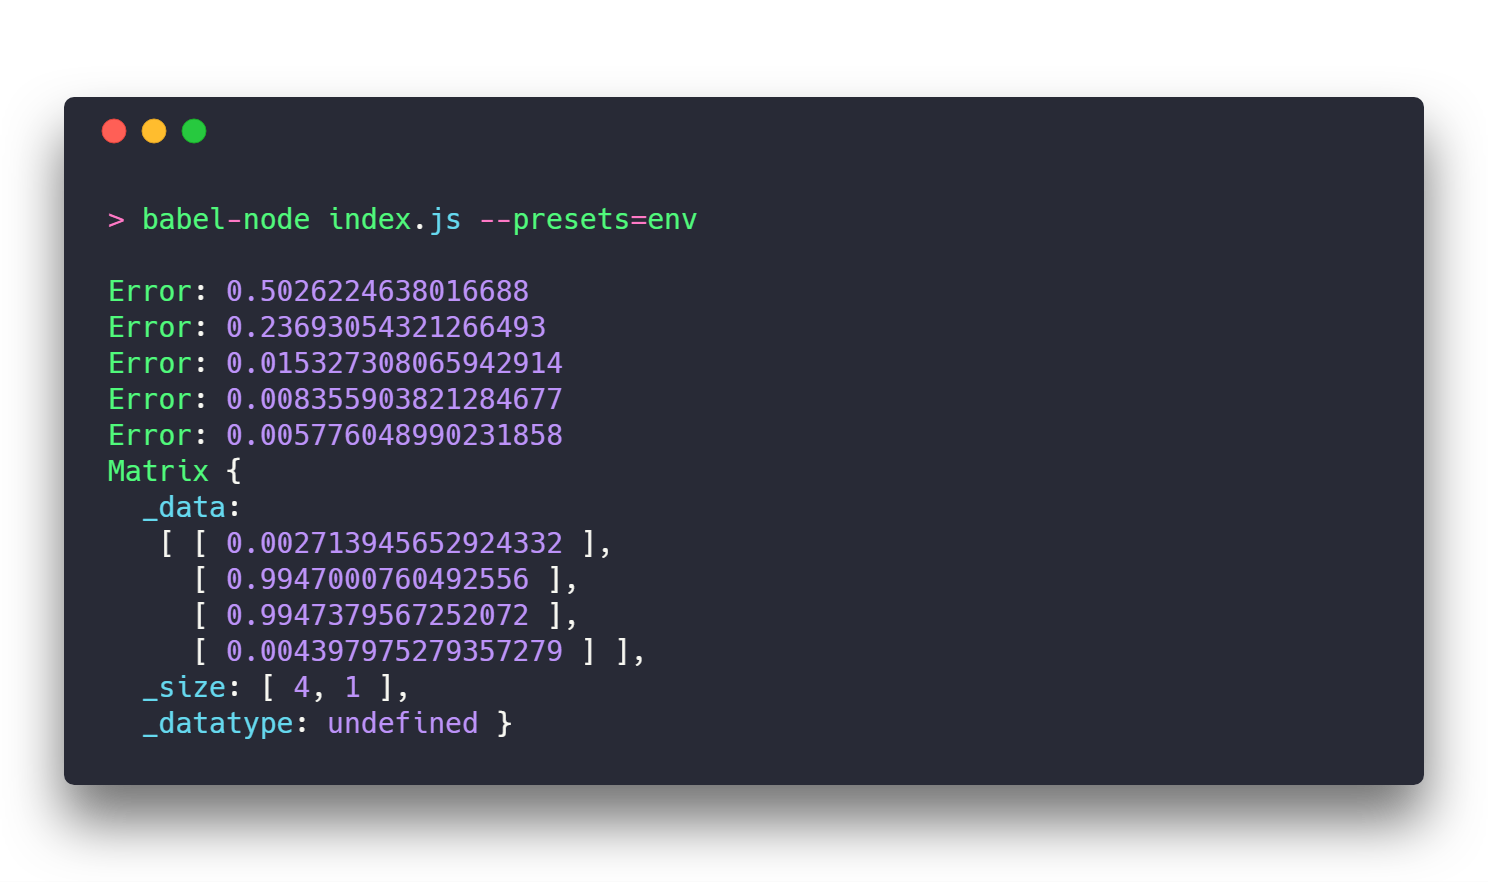
Finally, let’s create index.js file where all the stuff we created above will joined.
Predictions from our neural net:
Conclusions
As you can see, the error of the network is going to zero with each next epoch. But you know what? I’ll tell you a secret — it won’t reach zero, bro. That thing can take very long time to be done. It won’t happens. Never.
Finally, we see results that are very close to input data. The simplest neural net, but it works!
Source code is available on my GitHub.
Original article posted by me in my native language.