- ButlerCC Webhosting
- Recommended PHP Core and date directives for test server
- Check Your PHP Settings with XAMPP:
- Where Is My php.ini File?
- Tips Before Editing php.ini File
- Modify php.ini for XAMPP 7.4.8
- Where is PHP.ini in WordPress?
- Where is PHP.ini in WordPress?
- Where is PHP.ini in WAMP?
- Where to Find PHP.ini in XAMPP?
- Where to Find PHP.ini in Linux?
- Where is PHP.ini in cPanel?
- What are the Recommended Configurations for PHP.ini in WordPress?
- PHP.ini
- .htaccess file
- wp-config.php file
- PHP.ini Configurations You Can Change
- Memory_limit
- Max_execution_time
- Post_max_size
- Upload_max_filesize
- Max_input_time
ButlerCC Webhosting
This guide is intended to help you configure PHP for your local test server, and includes details for configuring PHP in XAMPP for both Windows and Mac OSX. Before you configure your php.ini file, you should first check your current settings and note the settings you need to change.
Recommended PHP Core and date directives for test server
This table contains the recommended test server settings for PHP Core and Date directives for XAMPP (both Win and Mac).
| Directive | Local Value |
|---|---|
| allow_url_fopen | On |
| allow_url_include | Off |
| display_errors | On |
| error_reporting | 32767 |
| file_uploads | On |
| log_errors | On |
| short_open_tag | Off |
| upload_tmp_dir | (Win) C:\xampp\tmp (OS X) /Applications/XAMPP/xamppfiles/temp |
| date section Default timezone | America/Chicago |
Check Your PHP Settings with XAMPP:
- Open your XAMPP Control Panel (Manager-OSX) and Start the Apache server.
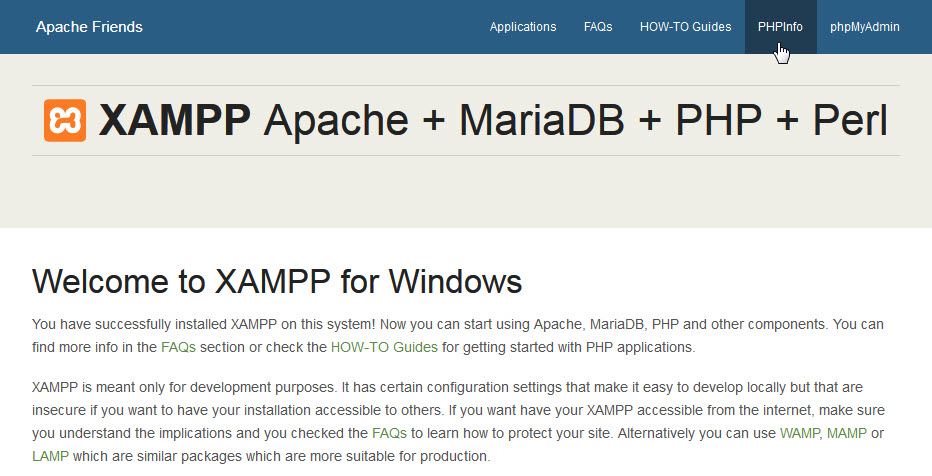
- In a browser, type http://localhost in the address bar to open the XAMPP dashboard page.
- Click PHPInfo in top navigation bar to display your current settings. The PHP Core and Date directives sections are the ones to focus on.

- Compare your Core and date values to those in the recommended test server settings for PHP Core table and note the ones that need to be changed. Your PHP directives should look similar to the old screenshot below.
- Open XAMPP Control Panel and Stop Apache server before editing PHP directives.

Where Is My php.ini File?
- In XAMPP (Windows), the php.ini file is in the C:\xampp\php folder.
- In XAMPP (Mac OSX), the php.ini file is in the /Applications/XAMPP/xamppfiles/etc folder.
Tips Before Editing php.ini File
Important points BEFORE editing your php.ini file:
- IMPORTANT! Open your XAMPP control panel and Stop Apache server before editing the php.ini file.
- Make a backup copy of the php.ini file before editing in case anything goes wrong (Name the backup copy php.ini.bak or something similar).
- The php.ini file is huge—use a text editor with line numbering, like Brackets (or Notepad++ for Win).
- Lines that begin with a semicolon (;) are comments and are ignored by PHP.
Modify php.ini for XAMPP 7.4.8
In this version of the php.ini file, there are only two directives that must be modified. (Three directives in Mac OS X) However, you should still verify all the following directives are correct in your php.ini file. Directives in the following table are organized by line number.
- Open your php.ini file in Brackets (or other text editor with line numbering) and make the necessary changes.
- (Mac OS X only) Line 228 (short_open_tag) should be as follows:
short_open_tag = Off - Line 463 or 516 (error_reporting) should be as follows: (Note: the value is case sensitive so be sure to type in all caps. Use the pipe character SHIFT + \ for separator.)
error_reporting = E_ALL | E_STRICT - Line 1969 or 1040 (date.timezone) should be as follows:
date.timezone = America/Chicago - Save and close the php.ini file.
- In XAMPP Control Panel, restart your Apache server.
- To check the changes to your PHP configuration settings, type http://localhost in address bar of a browser to open the XAMPP dashboard.
- In the XAMPP dashboard, click PHPinfo link to display your current settings. Compare your values to the Recommended PHP Core directives table.
- When your php.ini file is configured correctly, you’re ready to work on projects in your htdocs directory.
- c:\xampp\htdocs (Win)
- /Applications/xampp/htdocs (Mac OSX)
- (Optional) If you want to use PHP includes and site root relative links in your projects, review Setup Virtual Hosts with XAMPP.
Disclaimers: Butler is an “Equal Opportunity Employer/Program” and “Auxiliary Aids and Services are available upon request.”
This work is licensed under a Creative Commons Attribution-NonCommercial-ShareAlike 4.0 International License.
Where is PHP.ini in WordPress?
There are many commands in the php.ini file, by changing each command changes happen in WordPress. Therefore we need to know where is PHP.ini in wordpress.
As you probably know WordPress is developed by the powerful programming language of PHP. In this article, we would like to talk about the php.ini file and where is PHP.ini in WordPress?
Therefore, one of the most important files you may come across in the hosting panel is the php.ini file. There are many commands in the php.ini file, by changing each command a lot of things change in WordPress.
First, let us discuss where you can actually find the php.ini file in the server, Linux, XAMPP and etc. Then, we will recommend a few configurations for the php.ini file.
Where is PHP.ini in WordPress?
The first question we answer is where to find the php.ini file?
It doesn’t matter if WordPress is on a live server or a local server. The best way to find the location of this file is to create a PHP file.
It doesn’t matter what name you use for this file. You only need to use the .php extension for it.
Then copy and paste the code below into the created file:
Finally, once the file is saved, open it in the browser. After running the file, you should be able to see the information of php.ini file.
The location of php.ini should be visible in the Configuration file path or in the Loaded Configuration File.
In normal circumstances, the file will be placed in the first location. Otherwise, if the PHP is installed as a module, it will be in the second location.
Creating the .php file may not always work and you have to use other methods to find the location of the php.ini file.
Where is PHP.ini in WAMP?
If you have WordPress installed locally on your computer, you can find the file via the program you are using. Although, the location of php.ini is different in each program. Below, we discuss different programs and where to find the php.ini in each of them.
If you are using the WAMP, then finding the php.ini is an easy task. Simply, right-click on the icon of the program and from the appeared menu click on PHP. In the opened menu you will be able to see the php.ini. This is all you need to do to find the php.ini file in the WAMP server.
Where to Find PHP.ini in XAMPP?
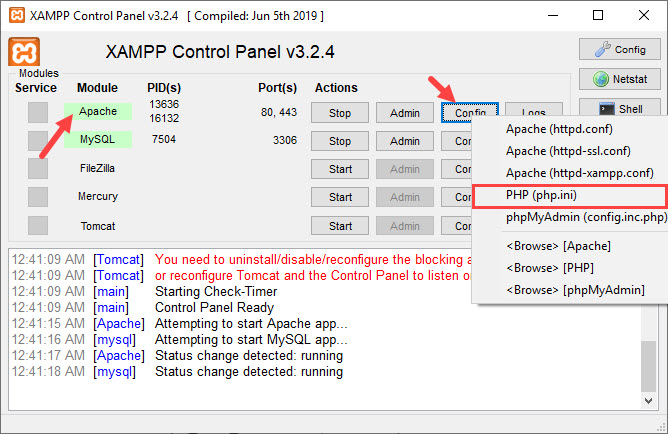
Finding php.ini in the XAMPP server is a bit different. Open the program and click on Config next to the Apache module. From the opened menu click on PHP(php.ini).
Where to Find PHP.ini in Linux?
If you are a Linux user, to find the php.ini file, type the code below in the Linux terminal:
PHP –I | grep “Loaded Configuration File”The output you receive should be like below:
Loaded Configuration File => /usr/local/lib/php.iniNormally, the php.ini file is located in the Loaded Configuration File. If you couldn’t find it there, simply change the path to Configuration File.
Where is PHP.ini in cPanel?
As mentioned above, it doesn’t matter if you have WordPress installed locally or on a live server.
In any case, there are multiple ways of finding the php.ini file in WordPress. Follow the steps below if you have WordPress installed on a live server and have access to the cPanel:
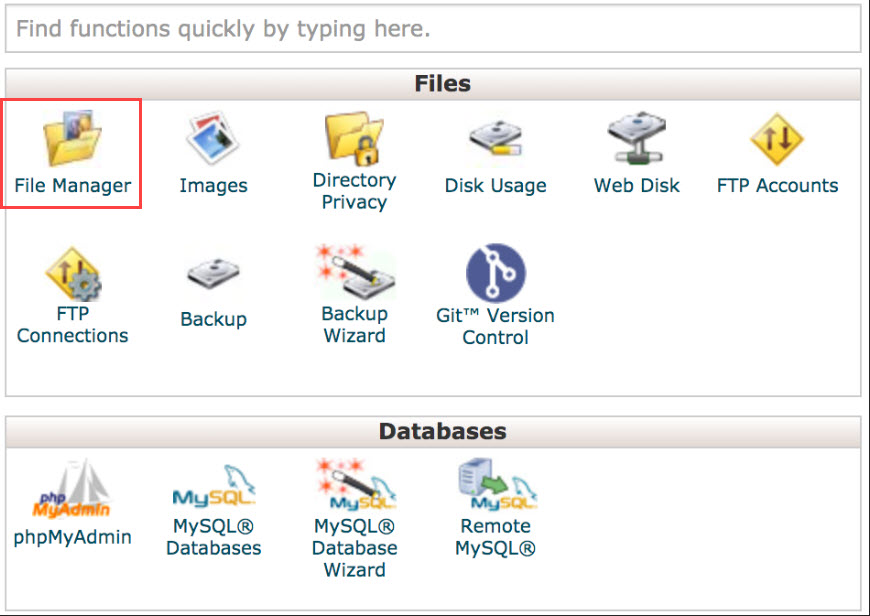
- Login to your hosting panel
- Open File Manager
- Php.ini file is located in the Root directory
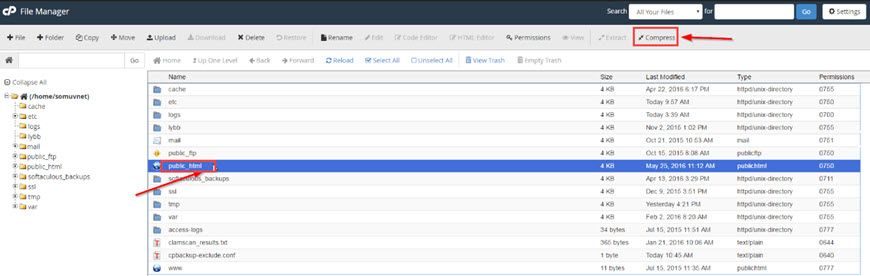
Don’t forget that the root directory is in the public_html folder. Simply click on it from the left-hand side menu.
What are the Recommended Configurations for PHP.ini in WordPress?
There are some recommended configurations for the php.ini that makes the WordPress run better. Other than php.ini configurations there are other options that we will mention down below:
PHP.ini
Copy and paste the following code in the PHP.ini file:
max_execution_time = 60 memory_limit = 128M post_max_size = 8M upload_max_filesize = 8M max_input_time = 60 file_uploads = On safe_mode = Off.htaccess file
Copy and paste the line below into the .htaccess file. This file can be found in the root directory of your website. Often, it is hidden. Therefore, use an FTP client like FileZilla to show the hidden files.
php_value max_execution_time = 60wp-config.php file
Copy and paste the line below in the wp-config.php file to eliminate the run-time limit. Or if it is already in the file, change the value to 60.
PHP.ini Configurations You Can Change
There are many commands in the php.ini file. Some of them can be changed. Below are those that we can change. Knowing what each of them does is very important.
Memory_limit
As you can probably tell by its name, memory_limit is the command to limit the memory usage of PHP in WordPress.
The value you define for the memory_limit must be more than the file you are trying to upload. This is the memory needed to upload files and run commands. The recommended value is 128 MB.
Max_execution_time
The time needed to execute every script is defined by this command. In other words, the time the server needs to run the commands.
For example, if you are uploading a fairly big size to the server, it will take more than a few seconds. Therefore, you must remove the execution time or increase it.
Post_max_size
This command defines the maximum data a post can have. To eliminate the limitation change the value to 0. By using the POST method you can call the post from the server.
Upload_max_filesize
This command defines the maximum file you are allowed to upload on WordPress. You have probably seen the limited upload number displayed in the WordPress gallery. This command defines that limitation.
If the memory limit exhaust error occurred, you must eliminate this command or increase it.
Max_input_time
This command defines the seconds required for each data to be analyzed. Data like POST and GET.
The time begins exactly when the command requests PHP from the server and it ends when the command starts. The default value is -1. To eliminate this limitation, set the value to 0.