- Multiple CSS Classes on a Single HTML Element
- What are classes in CSS?
- How to use multiple classes in CSS?
- Styling the element containing both classes:
- The Advantages of using multiple classes:
- The Disadvantage of using multiple classes in CSS:
- How to Use Multiple CSS Classes on a Single Element
- One or More Classes in CSS?
- Multiple Classes, Semantics, and JavaScript
- Advantages of Multiple Classes
- Disadvantages of Multiple Classes
Multiple CSS Classes on a Single HTML Element
Users use the Cascading Style Sheet (CSS) to define a web page’s element appearance. There are different attributes that users can apply to these elements.
In HTML and CSS, users can avoid multiple repetitions of the codes if they use multiple classes in one HTML element. In CSS, there are different features to style and define one or more than one class, and users can use CSS to add multiple classes to a single element.
So, to use multiple CSS classes, users need to use the space-separated syntax. In this article, users will learn the approaches of using multiple classes using CSS and HTML.
What are classes in CSS?
As we have discussed, to define the elements of HTML, users need to use the CSS classes. In short terms, classes are nothing but attributes that define the HTML elements so that users can apply style and format those elements using CSS.
How to use multiple classes in CSS?
Users can apply multiple classes to a single element in HTML only using CSS. First, let us learn how to use two classes in an HTML element. Then we will proceed with multiple classes as well.
Assign classes to an element:
Users write the names of the classes inside the class attribute. But note that users must add the names with the space-separated method.
Secondly, users can style the two classes separately using the following syntax, or they can style the whole element containing both classes.
The syntax of styling both classes individually:
Explanation of the syntax:
Using the HTML tag, we have added two classes and styles and defined these using CSS.
Styling the individual CSS classes:
Let us understand with the following code snippets:
Code Snippet:
.demo1 < font-size: larger; margin-bottom: 40px; padding: 10px; background-color: grey; >.demo2 Hey, this is CSS and HTML
Let us learn how to add multiple classes in CSS!
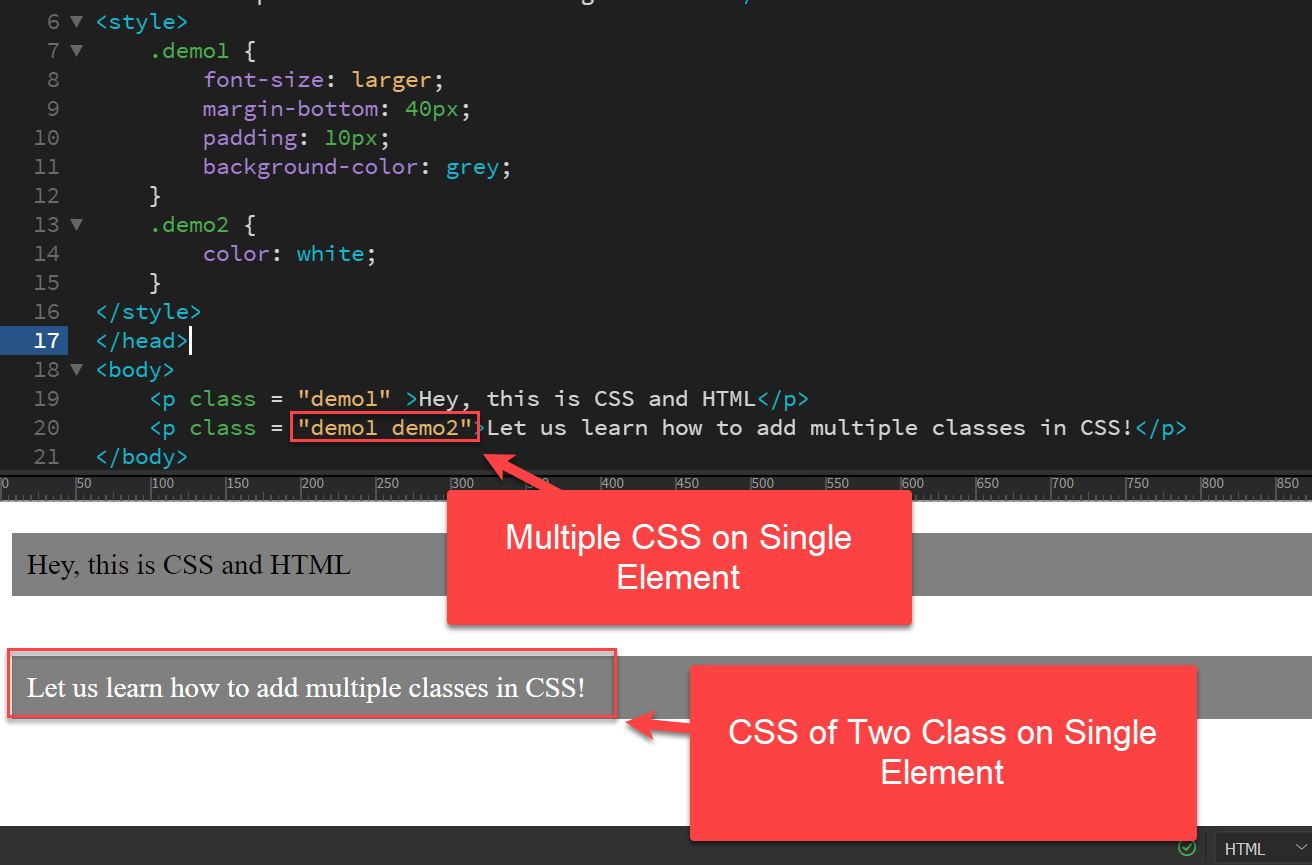
Explanation:
In the above code snippet, we have used the tag to apply the style to the individual classes. Here, we applied the style of the first class, i.e., class demo1, to both the classes and the style of the class demo2 to only the second class.
Styling the element containing both classes:
Using this technique, we can style that HTML element only that contains both classes. Users cannot apply the style to other HTML elements containing zero or one class.
Code Snippet:
.demo1.demo2 It is CSS.
Here, we are going to learn CSS classes
How to add multiple classes in CSS?
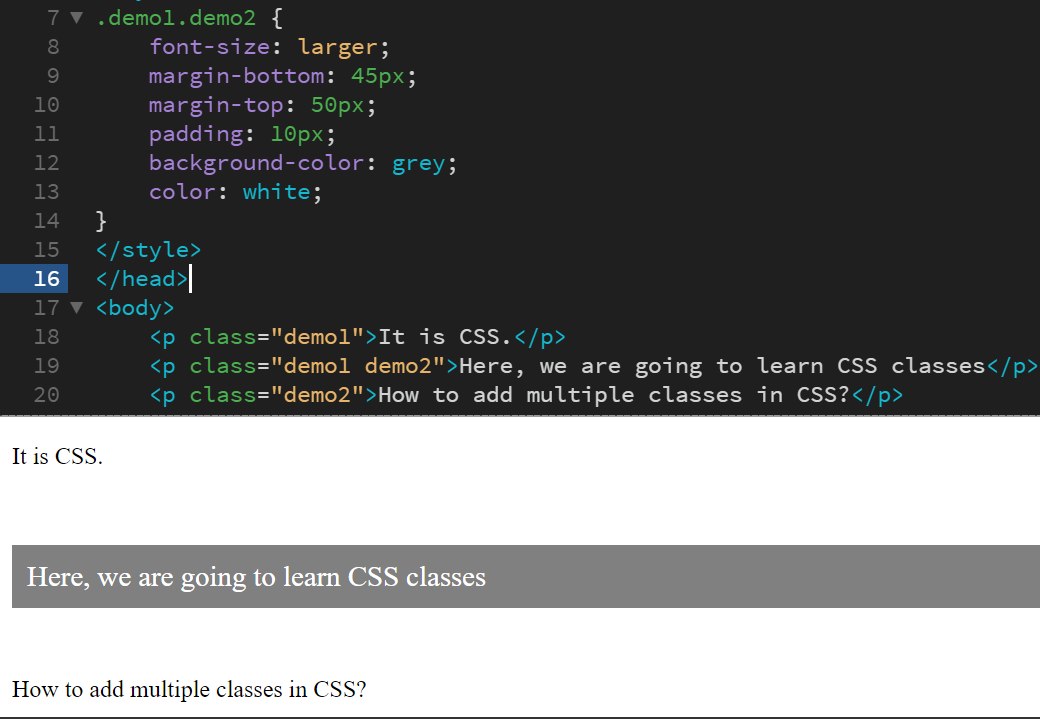
Explanation:
Here, we have applied the style to only the second paragraph named «.demo1.demo2» as it is the only element containing both classes.
Syntax of using multiple classes:
Again, using the following syntax, users can use two or more classes (multiple classes in the same element).
For styling the individual classes:
For styling the element containing the classes:
The Advantages of using multiple classes:
Using multiple classes can help add several features and effects without creating a new style for that element. We can easily add different effects or stylings to the texts using multiple CSS classes consecutively.
Sometimes, users need to create HTML elements that require a different style of different classes consecutively. Therefore, they can use different classes for the same element.
The Disadvantage of using multiple classes in CSS:
One of the most notable disadvantages of using multiple simultaneous classes on an element is that it can create a code cumbersomely and cannot manage over time. Often, users face difficulty deciding which styles affect the HTML element or if any scripts affect it.
For instance, we can see the example of many frameworks available today, such as Bootstrap, that extensively use HTML elements with multiple classes. As they use multiple classes, the code might get out of hand as these become much more intricate and unwieldy and is challenging to work with very quickly if users are not careful.
There is a chance of the style of one class overriding the style of another when users use multiple classes in CSS. This situation becomes quite difficult for users to handle as the code becomes complex to figure out why the styles are not working even when it seems they should.
It is always better to be aware of specificity, even when users apply the attributes to a particular element.
To use multiple classes in CSS, users must be aware of both the advantages and the disadvantages of it. So, users should check that their code snippets are not complex while using multiple classes and can readily notice where to figure out any problem. But despite the disadvantages, multiple CSS classes allow users to reuse a class where identical elements exist and apply different CSS properties consecutively.
- Difference between Sensor and Transducer
- Difference between NFA and DFA
- Xero vs QuickBooks
- AWS vs Azure
- IaaS vs PaaS vs SaaS
- Fibonacci Series Program
- What is GPU Scaling
- Agile vs Waterfall
- IaaS vs PaaS vs SaaS
- Kubernetes vs Docker
- Difference between System Software and Application Software
- Difference between StringBuffer and String
- Types of Servers
- Padding vs Margin
- Python vs Ruby
- Variance vs Standard Deviation
- Difference between SQL and PLSQL
- Software Developer vs Software Engineer
- Difference between SRAM and DRAM
- Difference between Ienumerable and Iqueryable
How to Use Multiple CSS Classes on a Single Element
Jennifer Kyrnin is a professional web developer who assists others in learning web design, HTML, CSS, and XML.
Cascading Style Sheets define a webpage element’s appearance by hooking into the attributes that you apply to that element. These attributes can be either an ID or a class and, like all attributes, they add helpful information to the elements that they are attached to.
:max_bytes(150000):strip_icc()/182147263-56a9f69f3df78cf772abc6aa.jpg)
Depending on which attribute you add to an element, you can write a CSS selector to apply the necessary visual styles that are needed to achieve the look and feel for that element and the website as a whole.
While either IDs or classes work for the purpose of hooking into them with CSS rules, modern web design methods favor classes over IDs, in part, because they are less specific and easier to work with overall.
One or More Classes in CSS?
In most cases, you assign a single class attribute to an element, but you actually aren’t limited to just one class they way you are with IDs. While an element can only have a single ID attribute, you can give an element several classes and, in some cases, doing so will make your page easier to style and much more flexible.
If you need to assign several classes to an element, add the additional classes and simply separate them with a space in your attribute.
For example, this paragraph has three classes:
This would be the text of the paragraph
This sets the following three classes on the paragraph tag:
Notice the spaces between each one of these class values. Those spaces are what sets them up as different, individual classes. This is also why class names cannot have spaces in them because doing so would set them as separate classes.
Once you have your class values in HTML, you can then assign these as classes in your CSS and apply the styles you would want to add. For example.
.pullquote < . >
.featured < . >
p.left
In these examples, the CSS declarations and values pairs appear inside the curly braces, which is how those styles would be applied to the appropriate selector.
If you set a class to a specific element (for example, p.left), you can still use it as part of a list of classes; however, be aware that it will only affect those elements that are specified in the CSS. In other words, the p.left style will only apply to paragraphs with this class since your selector is actually saying to apply it to «paragraphs with a class value of left,» By contrast, the other two selectors in the example do not specify a certain element, so they would apply to any element that uses those class values.
Multiple Classes, Semantics, and JavaScript
Another advantage of using several classes is that it increases interactivity possibilities.
Apply new classes to existing elements using JavaScript without removing any of the initial classes. You can also use classes to define the semantics of an element — add additional classes to define what that element means semantically. This approach is how Microformats works.
Advantages of Multiple Classes
Layering several classes can make it easier to add special effects to elements without having to create a whole new style for that element.
For example, to float elements to the left or right, you might write two classes:
in them. Then, whenever you had an element you need to float left, you would simply add the class «left» to its class list.
There is a fine line to walk here, however. Remember that web standards dictate the separation of style and structure. Structure is handled using HTML while style is in CSS. If your HTML document is filled with elements that all have class names like «red» or «left,» which are names that dictate how elements should look rather than what they are, you are crossing that line between structure and style.
Disadvantages of Multiple Classes
The biggest disadvantage of using several simultaneous classes on your elements is that it can make them a bit unwieldy to look at and manage over time. It may become difficult to determine what styles are affecting an element and if any scripts affect it. Many of the frameworks available today, like Bootstrap, make heavy use of elements with multiple classes. That code can get out of hand and hard to work with very quickly if you are not careful.
When you use several classes, you also run the risk of the style for one class overriding the style of another. This collision then can make it difficult to figure out why your styles aren’t being applied even when it appears that they should. Remain aware of specificity, even with the attributes applied to that one element.
By using a tool like the Webmaster tools in Google Chrome, you can more easily see how your classes are affecting your styles and avoid this problem of conflicting styles and attributes.