For example, the HTML heading elements ( through ) are block-level elements that automatically place their content onto a new line and push any content that follows onto a new line. Each of these six heading elements represent a different heading size.
Let’s study how this works in practice. At the bottom of your index.html file, try pasting in the highlighted code snippet:
strong>My strong textstrong> br> em>My emphasized textem> h1>Heading 1h1> h2>Heading 2h2> h3>Heading 3h3> h4>Heading 4h4> h5>Heading 5h5> h6>Heading 6h6> Save your file and reload it in the browser. You should receive something like this:

Let’s now inspect the block-level heading elements to study how they differ from the inline-level text elements above. Open up the Firefox Web Developer Inspector and hover over each of the elements to inspect their occupied space as indicated by the blue highlighting. You should be able to confirm that the occupied horizontal space of each of the inline-level elements is determined by its text content, while the occupied horizontal space of each of the block-level elements stretches across the entire web page:
Block-level elements will always push inline-level elements down to the next line, even if you write those HTML elements on the same line of the HTML document. To confirm this for yourself, try writing a block-level element and an inline-level element on the same line of your index.html file. Erase the existing content from your file and add the following code snippet:
strong>My strong textstrong>h1>My headingh1>em>My emphasized texta> Can you guess how this HTML code will render in the browser? Save your file and reload it in the browser. You should receive something like this:

Notice that the heading element has started on a new line and pushed the subsequent text element to a new line even though the elements were written on the same line in the HTML document.
You should now have an understanding of how inline-level and block-level elements are positioned and how they affect the position of nearby elements. Remembering their distinct behaviors can be useful when arranging HTML elements in the future.
We’ll continue learning about new inline and block elements in the tutorials ahead.
// Tutorial //
How To Nest HTML Elements
This tutorial will teach you how to nest HTML elements in order to apply multiple HTML tags to a single piece of content.
HTML elements can be nested, meaning that one element can be placed inside another element. Nesting allows you to apply multiple HTML tags to a single piece of content. For example, try pasting the following code snippet inside your index.html file:
strong>My bold text and em>my bold and emphasized textem>strong> Save your file and reload it in the browser. (For instructions on creating an index.html file, please see our tutorial here or for loading the file in your browser, see our tutorial here.) You should receive something like this:
My bold text and my bold and emphasized text
Nesting Best Practices
Note that it is recommended to always close nested tags in the reverse order that they were opened.
For example, in the example below, the tag closes first as it was the last tag to open. The tag closes last as it was the first to open.
This sentence contains HTML elements that are strong>em>nested according to best practicesem>strong>. As a counter example, the following HTML code contains tags that are not nested according to best practices, as the tag closes before the tag:
This sentence contains HTML elements that are strong>em>not nested according to best practicesstrong>em>. While not technically necessary for rendering your HTML in the browser, nesting your tags in the proper order can help improve the readability of your HTML code for you or other developers.
// Tutorial //
How To Use HTML Attributes
HTML attributes can be used to change the color, size, and other features of HTML elements. For example, you can use an attribute to change the color or size of a font for a text element or the width and height for an image element. In this tutorial, we’ll learn how to use HTML attributes to set values for the size and color properties of HTML text elements.
An HTML attribute is placed in the opening tag like this:
element attribute="property:value;"> One common attribute is style , which allows you to add style properties to an HTML element. While it’s more common to use a separate stylesheet to determine the style of an HTML document, we will use the style attribute in our HTML document for this tutorial.
Using the Style Attribute
We can change multiple properties of an element with the style attribute. Clear your “index.html” file and paste the code below into your browser. (If you have not been following the tutorial series, you can review instructions for setting up an index.html file in our tutorial Setting Up Your HTML Project.
h1 style="font-size:40px;color:green;">This text is 40 pixels and green.h1> Before we load the file in our browser, let’s review each of the parts of this HTML element:
- h1 is the name of the tag. It refers to the largest-sized Heading element.
- style is the attribute. This attribute can take a variety of different properties.
- font-size is the first property we’re setting for the style attribute.
- 40px; is the value for the property font-size , which sets the text content of the element to 40 pixels.
- color is the second property we’re setting for the style attribute.
- green is the value for the property color , which sets the text content color to green
Note that the properties and values are contained by quotation marks, and that each property:value pair ends with a semicolon ; .
Save the file and reload it in your browser. (For instructions on loading the file in your browser, see our tutorial here.) You should receive something like this:
This text is 40 pixels and green.
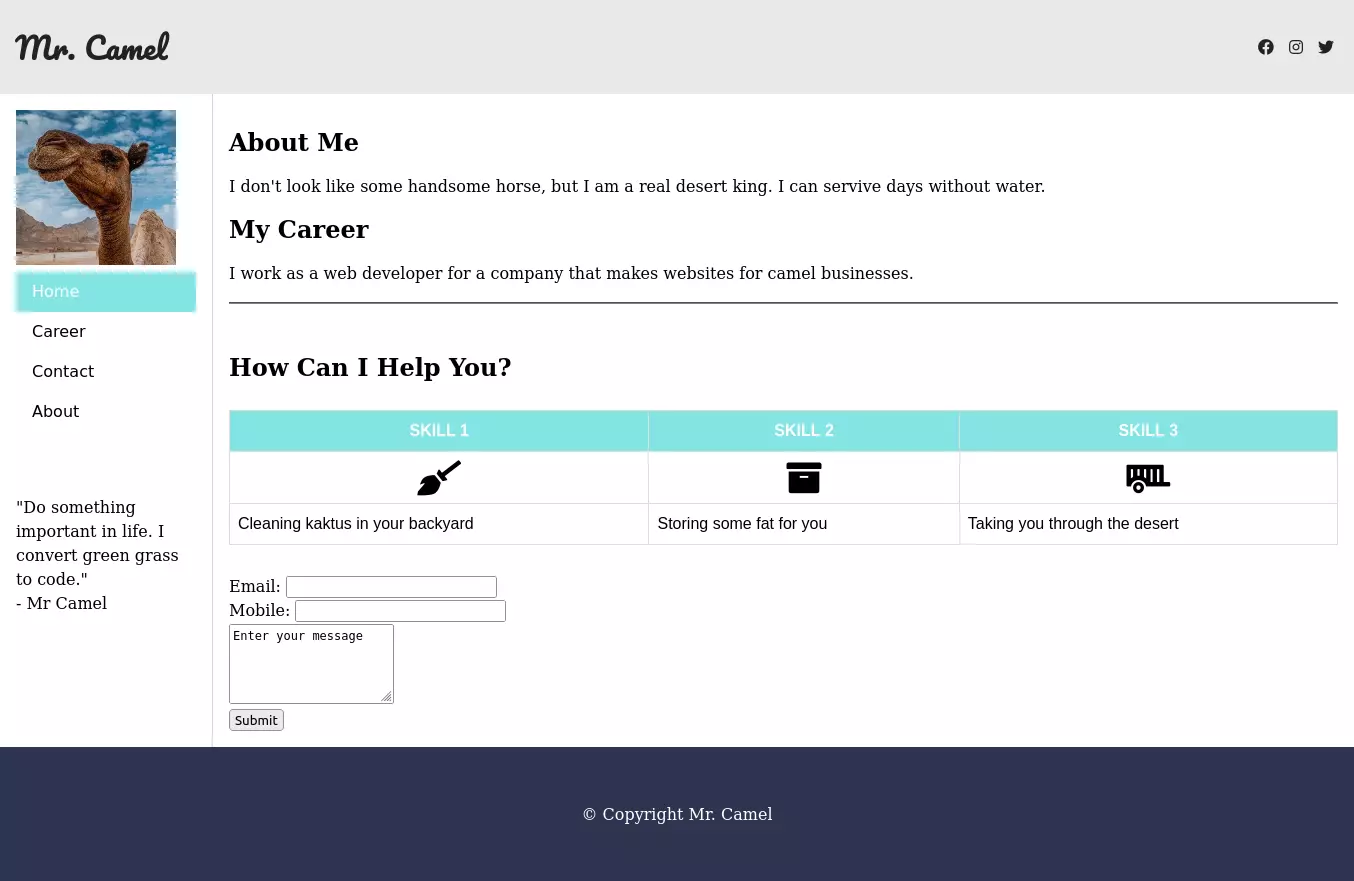
HTML Web Page Examples with Source Code
In this article, we are going to see some HTML web page examples with source code. We will also see some of the key points to learn how to create these web pages.
HTML Web Page Example 1
This is an example of a simple HTML web page that shows the profile of a professional camel.
Here is how the camel profile is designed in HTML:
- Container — The complete HTML web page is wrapped in a container. The container is a div element with the class container .
- Header — Inside the container, we have a header element that contains the logo and the navigation menu.
- Aside — Aside contains the profile picture and other navigational links.
- Main — The main element contains the profile information. Like the name, the career, the skills, the contact form, etc.
- Footer — The footer contains copyright information.
Here is the complete code of the camel profile:
@import url('https://fonts.googleapis.com/css2?family=Pacifico&display=swap'); body < margin: 0; box-sizing: border-box; >.container < line-height: 150%; >.header < display: flex; justify-content: space-between; align-items: center; padding: 15px; background-color: #e9e9e9; >.header h1 < color: #222222; font-size: 30px; font-family: 'Pacifico', cursive; >.header .social a < padding: 0 5px; color: #222222; >.left < float: left; width: 180px; margin: 0; padding: 1em; >.content < margin-left: 190px; border-left: 1px solid #d4d4d4; padding: 1em; overflow: hidden; >ul < list-style-type: none; margin: 0; padding: 0; font-family: sans-serif; >li a < display: block; color: #000; padding: 8px 16px; text-decoration: none; >li a.active < background-color: #84e4e2; color: white; >li a:hover:not(.active) < background-color: #29292a; color: white; >table < font-family: arial, sans-serif; border-collapse: collapse; width: 100%; margin: 30px 0; >td, th < border: 1px solid #dddddd; padding: 8px; >tr:nth-child(1) < background-color: #84e4e2; color: white; >tr td i.fas < display: block; font-size: 35px; text-align: center; >.footerMr. Camel
- Home
- Career
- Contact
- About
"Do something important in life. I convert green grass to code."
- Mr Camel
About MeI don't look like some handsome horse, but I am a real desert king. I can survive days without water.
My Career
I work as a web developer for a company that makes websites for camel businesses.
How Can I Help You?
SKILL 1 SKILL 2 SKILL 3 Cleaning kaktus in your backyard Storing some fat for you Taking you through the desert
Mobile: