- Tkinter Pack
- Introduction to the Tkinter pack geometry manager
- Tkinter pack geometry manager example
- 1) Pack with default options
- 2) ipadx & ipady: setting internal paddings
- 3) Using the fill option
- 4) Using the expand option
- 5) Using the anchor option
- 6) Using the side option
- 6) padx and pady: set the external paddings
- When to use the pack geometry manager
- Using pack to create a login form example
- Summary
Tkinter Pack
Summary: in this tutorial, you’ll learn about the Tkinter pack geometry manager and how to use it to arrange widgets on a window.
Introduction to the Tkinter pack geometry manager
So far, you have learned how to use the pack() method to add widgets to a window.
Tkinter uses the geometry manager to arrange widgets on a window. The pack() method is one of three geometry managers in Tkinter. The other geometry managers are grid() and place() .
The pack arranges widgets around the edges of their container. The container can be the root window or a frame.
Let’s start with a simple program to understand each option better.
Tkinter pack geometry manager example
The pack geometry manager has many configurations. The following are the most commonly used options: fill , expand , side , anchor , ipadx , ipady , padx , and pady .
1) Pack with default options
The following shows how to use the pack geometry manager to arrange two Label widgets on the root window:
import tkinter as tk root = tk.Tk() root.title('Pack Demo') root.geometry("350x200") # box 1 box1 = tk.Label(root, text="Box 1", bg="green", fg="white") box1.pack() # box 2 box2 = tk.Label(root, text="Box 2", bg="red", fg="white") box2.pack() root.mainloop()Code language: PHP (php)
In this example, we have two boxes: green and red. The pack() places the boxes on top of each other because it uses the default options.
Before diving into other options, you need to understand the x and y coordinates of the window:
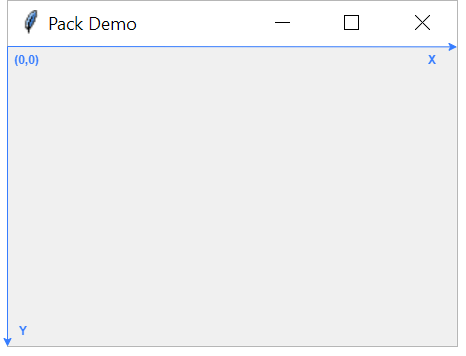
The top left corner of the window is the origin with the coordinate (0,0) . The x-coordinate increments from left to right and the y-coordinate increments from top to bottom.
2) ipadx & ipady: setting internal paddings
To create internal paddings for widgets, you use the ipadx and ipady parameters:
- ipadx creates padding left and right, or padding along the x-axis.
- ipady creates padding top and bottom, or padding along the y-axis.
For example, the following program uses ipadx and ipady parameters to set the internal paddings of each box:
import tkinter as tk root = tk.Tk() root.title('Pack Demo') root.geometry("350x200") # box 1 box1 = tk.Label(root, text="Box 1", bg="green", fg="white") box1.pack(ipadx=10, ipady=10) # box 2 box2 = tk.Label(root, text="Box 2", bg="red", fg="white") box2.pack(ipadx=10, ipady=10) root.mainloop()Code language: Python (python)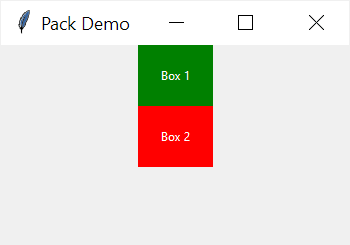
3) Using the fill option
The fill option accepts one of three string constants defined in the tkinter module.
- tkinter.X – fill available space along the x-axis
- tkinter.Y – fill available space along the y-axis
- tkiniter.BOTH – fill available space long both axises
These string constants are equivalent to ‘x’ , ‘y’ , and ‘both’ .
Note that if you import the tkinter module as tk , you need to reference the constants X , Y , and BOTH using the tk prefix e.g., tk.X , tk.Y , and tk.BOTH .
The following example uses the fill parameter to set the fill option for the first label:
box1.pack(ipadx=20, ipady=20, fill=tk.X)Code language: Python (python)… you’ll see that the widget fills all available space across the x-axis:
However, if you change to fill=tk.Y as follows:
box1.pack(ipadx=20,ipady=20,fill=tk.Y)Code language: Python (python)… you’ll see that the first widget doesn’t fill all spaces vertically:
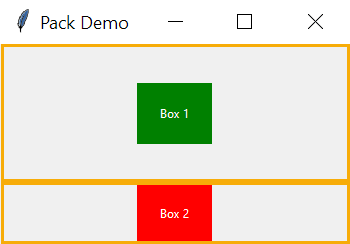
This is because the pack allocates space to each widget as highlighted in the following picture:
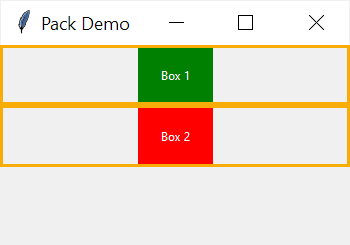
When you use the fill option, the area each widget can fill is constrained by their allocated areas.
4) Using the expand option
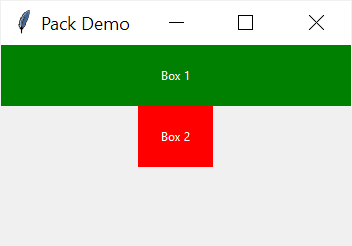
The expand option allocates more available space to a widget. If you add the expand option to the first widget:
box1.pack(ipadx=20,ipady=20,expand=True)Code language: Python (python)…you’ll get the following output:
In this example, the first widget takes all available space in the window except for the space allocated to the second widget.
Since the first widget doesn’t have the fill option, it floats in the middle of the allocated area.
If you set fill option of the first widget to tk.BOTH :
box1.pack(ipadx=20, ipady=20, fill=tk.BOTH, expand=True)Code language: Python (python)…you’ll see that the first widget fills up all of its allocated space:

If you add the expand option to both widgets, the pack manager will allocate the space to them evenly. For example:
import tkinter as tk root = tk.Tk() root.title('Pack Demo') root.geometry("350x200") # box 1 box1 = tk.Label(root, text="Box 1", bg="green", fg="white") box1.pack(ipadx=20, ipady=20, fill=tk.BOTH, expand=True) # box 2 box2 = tk.Label(root, text="Box 2", bg="red", fg="white") box2.pack(ipadx=20, ipady=20, expand=True) root.mainloop()Code language: Python (python)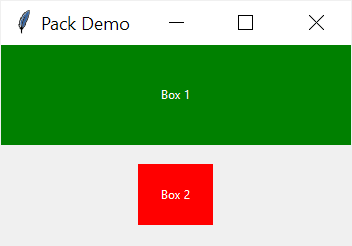
Notice that the second widget doesn’t use all allocated space because it doesn’t have the fill option.
When you set the expand to True for all widgets, the pack geometry manager will allocate spaces to them evenly. However, this is only true when all the widgets share the same side .
5) Using the anchor option
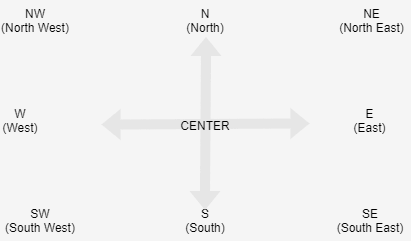
The anchor allows you to anchor the widget to the edge of the allocated space. It accepts one of the following values:
| Sticky | Description |
|---|---|
| N | North or Top Center |
| S | South or Bottom Center |
| E | East or Right Center |
| W | West or Left Center |
| NW | North West or Top Left |
| NE | North East or Top Right |
| SE | South East or Bottom Right |
| SW | South West or Bottom Left |
| CENTER | Center |
The following picture illustrates the anchor options:
For example, the following program shows widgets that use E and W anchors:
import tkinter as tk root = tk.Tk() root.title('Pack Demo') root.geometry("350x200") # box 1 box1 = tk.Label(root, text="Box 1", bg="green", fg="white") box1.pack(ipadx=20, ipady=20, anchor=tk.E, expand=True) # box 2 box2 = tk.Label(root, text="Box 2", bg="red", fg="white") box2.pack(ipadx=20, ipady=20, anchor=tk.W, expand=True) root.mainloop()Code language: PHP (php)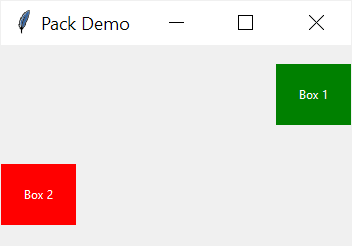
6) Using the side option
The side option specifies the alignment of the widget:
They are equivalent to ‘left’ , ‘top’ , ‘right’ , and ‘bottom’ .
The side defaults to TOP . In other words, widgets are aligned to the top of their container.
The following example sets the side for the first widget to tkinter.LEFT :
import tkinter as tk root = tk.Tk() root.title('Pack Demo') root.geometry("350x200") # box 1 box1 = tk.Label(root, text="Box 1", bg="green", fg="white") box1.pack(ipadx=20, ipady=20, fill=tk.BOTH, expand=True, side=tk.LEFT) # box 2 box2 = tk.Label(root, text="Box 2", bg="red", fg="white") box2.pack(ipadx=20, ipady=20, fill=tk.BOTH, expand=True) root.mainloop()Code language: Python (python)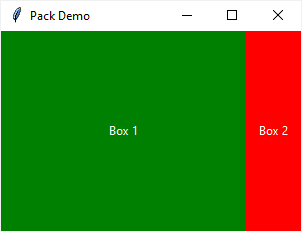
In this example, the expand option may not work as you expected. The reason is that widgets have different sides.
To make their space even again, you can:
- Set the side of both widgets to ‘left’
- Or set the side of a widget to ‘left’ and the side of the other widget to ‘right’ .
import tkinter as tk root = tk.Tk() root.title('Pack Demo') root.geometry("350x200") # box 1 box1 = tk.Label(root, text="Box 1", bg="green", fg="white") box1.pack(ipadx=20, ipady=20, fill=tk.BOTH, expand=True, side=tk.LEFT) # box 2 box2 = tk.Label(root, text="Box 2", bg="red", fg="white") box2.pack(ipadx=20, ipady=20, fill=tk.BOTH, expand=True, side=tk.RIGHT) root.mainloop()Code language: Python (python)
6) padx and pady: set the external paddings
To set the external paddings of widgets, you use the padx and pady parameters:
- padx – fill available space along the x-axis
- pady – fill available space along the y-axis
import tkinter as tk root = tk.Tk() root.title('Pack Demo') root.geometry("350x200") # box 1 box1 = tk.Label(root, text="Box 1", bg="green", fg="white") box1.pack(ipadx=20, ipady=20, padx=20, pady=20, fill=tk.BOTH, expand=True) # box 2 box2 = tk.Label(root, text="Box 2", bg="red", fg="white") box2.pack(ipadx=20, ipady=20, padx=20, pady=20, fill=tk.BOTH, expand=True) root.mainloop()Code language: PHP (php)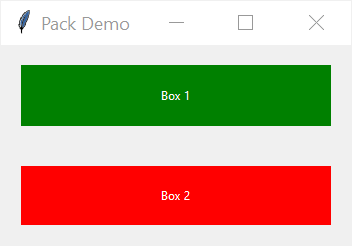
When to use the pack geometry manager
The pack geometry manager is suitable for the following:
See the following example:
import tkinter as tk from tkinter import ttk root = tk.Tk() root.title('Pack Demo') root.geometry("300x200") ipadding = 'ipadx': 10, 'ipady': 10> # place widgets top down label1 = tk.Label(root, text='Box 1', bg="red", fg="white") label1.pack(**ipadding, fill=tk.X) label2 = tk.Label(root, text='Box 2', bg="green", fg="white") label2.pack(**ipadding, fill=tk.X) label3 = tk.Label(root, text='Box 3', bg="blue", fg="white") label3.pack(**ipadding, fill=tk.X) # place widgets side by side label4 = tk.Label(root, text='Left', bg="cyan", fg="black") label4.pack(**ipadding, expand=True, fill=tk.BOTH, side=tk.LEFT) label5 = tk.Label(root, text='Center', bg="magenta", fg="black") label5.pack(**ipadding, expand=True, fill=tk.BOTH, side=tk.LEFT) label6 = tk.Label(root, text='Right', bg="yellow", fg="black") label6.pack(**ipadding, expand=True, fill=tk.BOTH, side=tk.LEFT) root.mainloop()Code language: Python (python)
Using pack to create a login form example
The following example uses the pack() method to create a login form:
import tkinter as tk from tkinter import ttk root = tk.Tk() root.title('Login') root.geometry("350x220") fields = <> fields['username_label'] = ttk.Label(text='Username:') fields['username'] = ttk.Entry() fields['password_label'] = ttk.Label(text='Password:') fields['password'] = ttk.Entry(show="*") for field in fields.values(): field.pack(anchor=tk.W, padx=10, pady=5, fill=tk.X) ttk.Button(text='Login').pack(anchor=tk.W, padx=10, pady=5) root.mainloop() Code language: JavaScript (javascript)
First, initialize a dictionary to store the widgets:
Second, create Label and Entry widgets:
fields['username_label'] = ttk.Label(text='Username:') fields['username'] = ttk.Entry() fields['password_label'] = ttk.Label(text='Password:') fields['password'] = ttk.Entry(show="*")Code language: JavaScript (javascript)Third, iterate through the widgets and pack them:
for field in fields.values(): field.pack(anchor=tk.W, padx=10, pady=5, fill=tk.X)Finally, add the login button:
ttk.Button(text='Login').pack(anchor=tk.W, padx=10, pady=5)Code language: JavaScript (javascript)Summary
- Use Tkinter pack geometry manager to arrange widgets in a top-down layout or side by side.
- Use the fill , expand , and side options of pack geometry manager to control how widgets are arranged.