- Создание выезжающего меню с помощью CSS Grid
- Базовая структура страницы
- CSS Grid Menu Layout With Display Flex | Responsive Grid Design
- Preview Of Responsive Grid Layout
- CSS Grid Menu Source Code
- How to add a CSS Grid Navigation Menu
- CSS Grid Nav-Bar
- Полное визуальное руководство/шпаргалка по CSS Grid
- Что такое CSS Grid ?
- Архитектура CSS Grid
- Схема CSS Grid
- Настройка проекта
- HTML
Создание выезжающего меню с помощью CSS Grid
От автора: выезжающий шаблон – классический подход в адаптивной навигации. Когда вьюпорт сужается и не может уместить меню целиком, оно скрывается за пределы экрана и отображается по нажатию на кнопку. Сегодня мы создадим выезжающее меню, которое будет переключаться с помощью CSS (без JS). Для структурирования страницы возьмем нашего хорошего знакомого Grid.
Полноэкранное демо с конечным результатом.
Базовая структура страницы
Начнем с создания стандартной страницы. Создадим примерно следующее:
Стандартная структура страницы. На маленьких вьюпортах все съезжает в одну колонку, на больших aside отображается сбоку. Для ясности тег nav окрашен в синий цвет. Разметка:

Онлайн курс по JavaScript
Научитесь создавать приложения со сложными интерфейсами
Это основной язык для современной веб-разработки — почти 100% сайтов работает на JavaScript. Освойте его с нуля всего за 4 месяца, и вы сможете зарабатывать от 70 000 рублей.
< p >Curabitur orci lacus , auctor ut facilisis nec , ultricies quis nibh . Phasellus id diam sollicitudin , malesuada turpis id , gravida erat . Maecenas placerat elit vel hendrerit convallis . Sed in mauris ut justo vulputate viverra feugiat ac dui . Fusce feugiat arcu in vehicula vehicula . Donec varius justo at nulla aliquet volutpat . < / p >
< p >Ut id rutrum eros . Nulla tristique , magna et mattis vulputate , mi eros suscipit turpis , nec bibendum turpis nunc feugiat sapien . Nunc arcu est , lacinia id diam quis , sagittis euismod neque . Nullam fringilla velit sed porta gravida . Proin eu vulputate libero . Ut a lacinia enim . Etiam venenatis mauris et orci tempor congue . Sed tempor eros et ultricies congue . Aenean sed efficitur orci . Nulla vel tempus mi . < / p >
< p >Ut cursus suscipit augue , id sagittis nibh faucibus eget . Etiam suscipit ipsum eu augue ultricies , at rhoncus mi faucibus . In et tellus vitae leo scelerisque fringilla nec at nunc . < / p >
CSS Grid Menu Layout With Display Flex | Responsive Grid Design

I am sure that you know what is CSS Grid, & almost every designer or developer knows how to create girds. Using CSS grid and flex properties, the easiest point is making an object responsive. Nowadays the grid-based menu is on trend, Many creative developers now choose a grid-based menu over simple navbar .
Yesterday, I was surfing some personal websites, Then I saw a menu with grid view. Believe me, I feel these types of the menu is more attractive than a list type menu . If you want to make your website simple and fast, then don’t use this. Otherwise, you can use this to make your website more good looking.
Now the question is how to create the menu? Don’t worry, because today I am sharing CSS Grid Menu Layout Using Display Flex. In other words, I am sharing a Responsive Grid Based Menu Design. I added using display flex because I am also using it along with grid property. & it is also responsive, means it fits on every screen sizes.
If you are thinking now how this menu actually is, then see the preview given below.
Preview Of Responsive Grid Layout
See this video preview to getting an idea of how this menu looks like.
Now you can see this visually. If you like this, then get the source code of its.
CSS Grid Menu Source Code
As always, Before sharing source code let’s talk about it. As you know I got inspiration from a personal portfolio website to creating this. Actually, I created a clone of that website’s menu, sadly I forget the websites name. I used HTML CSS and JavaScript to create this menu.
Actually, JavaScript has a very small part of this menu. I used JavaScript to just create a toggle button , nothing else. Left all is based on Pure CSS and of course HTML also. All we know that we can’t create a webpage without HTML.
First I created Button using HTML and put two class, one for styling and one for creating a toggle effect.
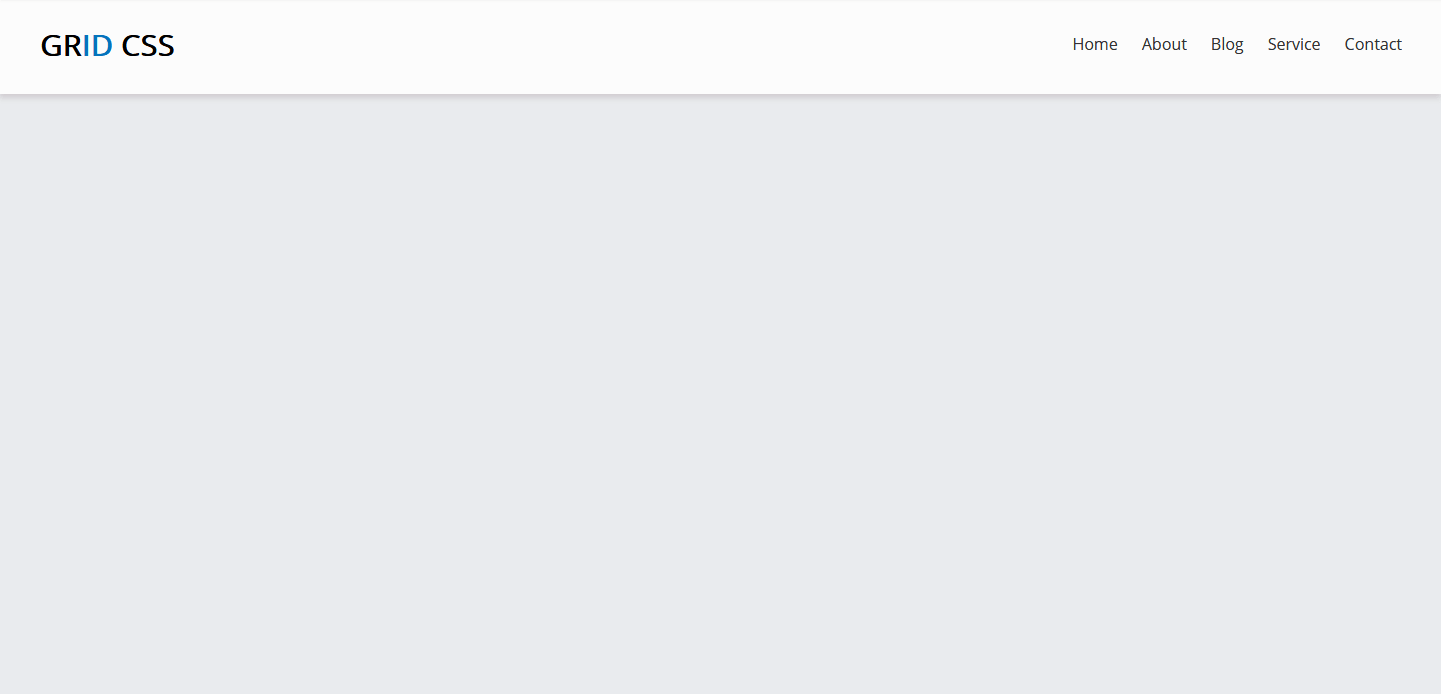
How to add a CSS Grid Navigation Menu
In this tutorial I will show you how easy it is to add a fully responsive navigation menu to your website, using HTML, CSS grid and a little JavaScript.
CSS grid is the new modern way to build responsive websites without having to use CSS library’s such as Bootstrap, Foundation, Materialize and more of the others.
Here is an example of what we will be building in this tutorial. The desktop view of the navigation menu.
The mobile view of the navigation menu.

CSS Grid Nav-Bar
First we start with the HTML, within the body tags you’ll see the header and nav tags.
Few things going on here, we have a logo div followed by the menu links.
As you see there are two menu lists, main top menu and mobile menu. The mobile menu will only display at a smaller screen size.
There is also a div (mobile-btn) with a onclick javascript function that will trigger the mobile menu view when on smaller screens.
Next we’ll add the CCS file
body < margin: 0; background-color: #e9ebee; >#navbar < display: grid; min-height: 100px; grid-auto-flow: column; background-color: #fcfcfc; grid-gap: 1.5em; padding: 0 40px; -webkit-box-shadow: -1px 4px 5px 0px rgba(209, 205, 209, 1); -moz-box-shadow: -1px 4px 5px 0px rgba(209, 205, 209, 1); box-shadow: -1px 4px 5px 0px rgba(209, 205, 209, 1); >#logo < display: grid; justify-content: start; align-content: center; font-family: "Open Sans", sans-serif; font-size: 30px; font-weight: 700; color: #000; text-transform: uppercase; >.logo span < color: #0474bc; >#links < display: grid; justify-content: right; align-content: center; grid-auto-flow: column; grid-gap: 1.5em; font-family: "Open Sans", sans-serif; >a < text-decoration: none; color: #333; >a:hover < color: #0474bc; >/* ======================= ******* Mobile Menu ****** ========================*/ .mobile-menu < display: block; list-style-type: none; background-color: #fff; float: right; width: 150px; padding: 5px 0 50px 0; border: 1px solid #eee; z-index: 55; >.mobile-links li < line-height: 2.8rem; >.mobile-btn < display: grid; justify-content: right; align-content: center; grid-auto-flow: column; cursor: pointer; >.nav-list < font-family: "Open Sans", sans-serif; list-style-type: none; >.nav-list:hover < opacity: 0.5; cursor: pointer; >/* Mobile to Tablet */ @media (min-width: 320px) and (max-width: 767px) < #links, .mobile-menu < display: none; >> /* Tablet to Desktop */ @media (min-width: 768px) < .mobile-menu, .mobile-btn, .fa-bars < display: none; >> In the css file, we first set the body margin to 0px with our background color. Next we set the navbar and logo’s height, responsiveness and styles.
Furthermore, we add some media queries for a little more customization for smaller and larger screens.
Now finally we add the JavaScript function to open and close the navigation menu while on mobile size screens.
// Mobile Menu Toggle Button JavaScript function myFunction() < var x = document.getElementById("mobile-menu"); if (x.style.display === "none") < x.style.display = "block"; >else < x.style.display = "none"; >>Our JavaScript toggle function, here we first set a variable x to the id of the mobile-menu and then checking if it’s not displaying on screen, to display otherwise don’t display.
Here is the same function using jQuery, in case you are using it.
// Mobile Menu Toggle Button jQuery $("#menu-btn").click(function()< $(".mobile-menu").toggle(); >); To get started using CSS grid and learn more about the fundamentals I would suggest this website you get more of a visual, drag and drop approach while also getting the code needed to use on your project.
To get all the source code for this tutorial please visit my codepen
Hope this helps you to build your next responsive navigation menu using CSS grid, and thanks for visiting the website.
Полное визуальное руководство/шпаргалка по CSS Grid

Сегодня мы с вами рассмотрим свойства CSS Grid (далее также — Грид), позволяющие создавать адаптивные или отзывчивые макеты веб-страниц. Я постараюсь кратко, но полно объяснить, как работает каждое свойство.
Что такое CSS Grid ?

Грид — это макет для сайта (его схема, проект).
Грид-модель позволяет размещать контент сайта (располагать его определенным образом, позиционировать). Она позволяет создавать структуры, необходимые для обеспечения отзывчивости сайтов на различных устройствах. Это означает, что сайт будет одинаково хорошо смотреться на компьютере, телефоне и планшете.
Вот простой пример макета сайта, созданного с помощью Грида.


Архитектура CSS Grid
Как же Грид работает? Элементы Грида (grid items) располагаются вдоль главной или основной (main) и поперечной (cross) оси (axis). При помощи различных свойств мы можем манипулировать элементами для создания макетов.

Помимо прочего, у нас имеется возможность объединять строки и колонки подобно тому, как мы это делаем в Excel , что предоставляет нам большую гибкость, чем Флекс ( Flexbox ).
К слову, если вас интересует Флекс, вот соответствующая статья.
Схема CSS Grid

Схема содержит все возможные свойства, предоставляемые Гридом. Эти свойства делятся на:
Обратите внимание: красным цветом отмечены сокращения для свойств:


К концу настоящей статьи у вас будет полное понимание того, как работает каждое из них.
Настройка проекта
Для данного проекта требуются начальные знания HTML , CSS и умение работать с VSCode (или другим редактором по вашему вкусу). Делаем следующее:
- Создаем директорию для проекта, например, Project1 и открываем ее в редакторе ( cd Project1 , code . )
- Создаем файлы index.html и style.css
- Устанавливаем в VSCode сервер для разработки ( Live Server , расширение) и запускаем его
Или вы можете просто открыть Codepen (или любую другую песочницу) и начать писать код.
Все готово, можно приступать к делу.

HTML
Создаем 3 контейнера внутри body :