- CSS Horizontal Navigation Bar
- Inline List Items
- Example
- Floating List Items
- Example
- Example
- Horizontal Navigation Bar Examples
- Example
- Active/Current Navigation Link
- Example
- Right-Align Links
- Example
- Border Dividers
- Example
- Fixed Navigation Bar
- Fixed Top
- Fixed Bottom
- Gray Horizontal Navbar
- Example
- Sticky Navbar
- Example
- More Examples
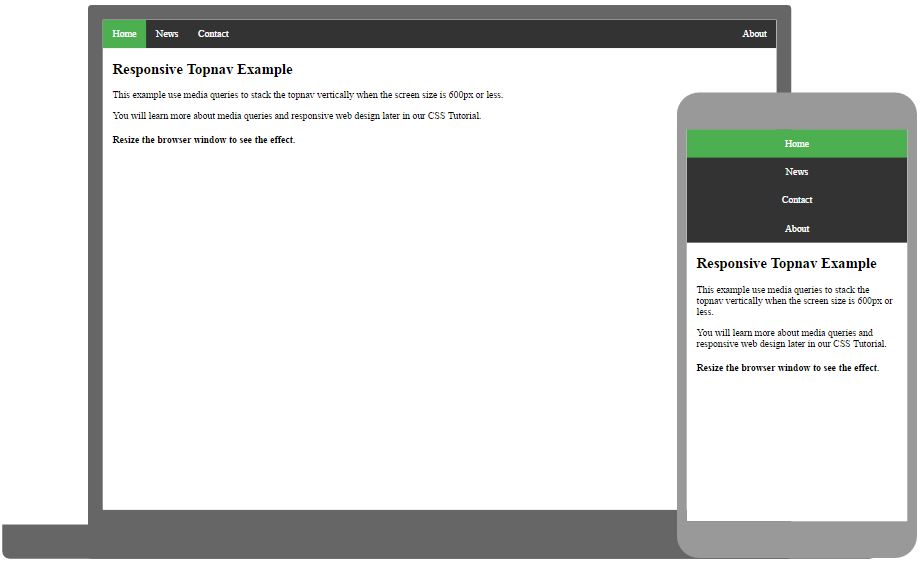
- Responsive Topnav
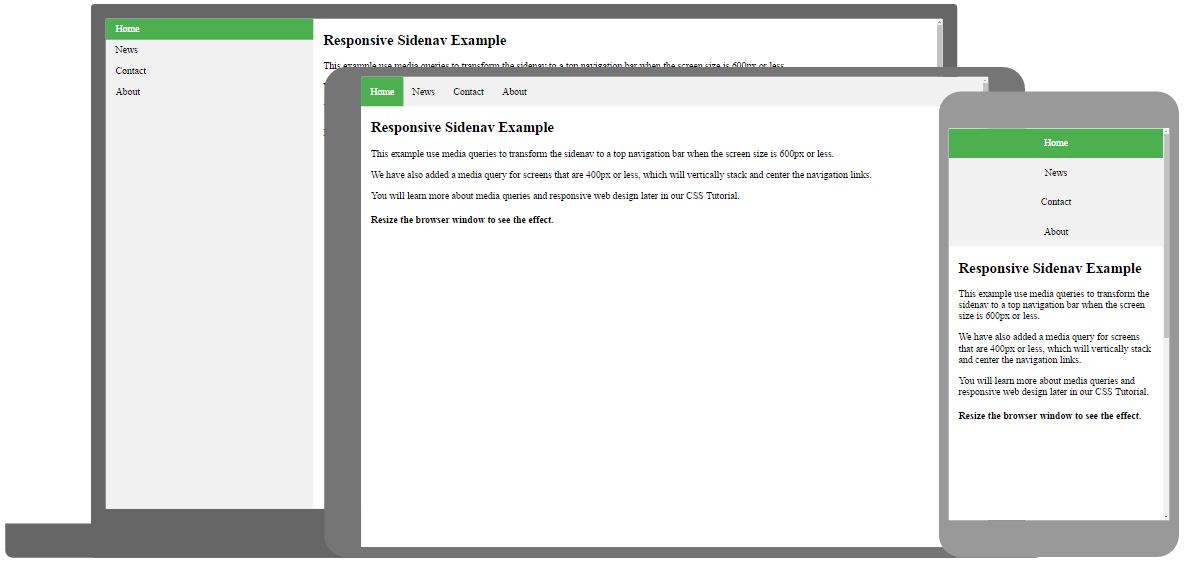
- Responsive Sidenav
- Dropdown Navbar
- CSS Navigation Bar
- Navigation Bar = List of Links
- Example
- Example
- COLOR PICKER
- Report Error
- Thank You For Helping Us!
- How To Build a Simple Navbar with HTML and CSS
- Requirements
- Implementation
- Step 1
- Step 2
- Step 3
- Step 4
- Step 5
- Step 6
- Step 7
- Step 8
- Conclusion
CSS Horizontal Navigation Bar
There are two ways to create a horizontal navigation bar. Using inline or floating list items.
Inline List Items
Example
- display: inline; — By default,
- elements are block elements. Here, we remove the line breaks before and after each list item, to display them on one line
Floating List Items
Example
a display: block;
padding: 8px;
background-color: #dddddd;
>
- float: left; — Use float to get block elements to float next to each other
- display: block; — Allows us to specify padding (and height, width, margins, etc. if you want)
- padding: 8px; — Specify some padding between each element, to make them look good
- background-color: #dddddd; — Add a gray background-color to each element
Example
Horizontal Navigation Bar Examples
Create a basic horizontal navigation bar with a dark background color and change the background color of the links when the user moves the mouse over them:
Example
ul <
list-style-type: none;
margin: 0;
padding: 0;
overflow: hidden;
background-color: #333;
>
li a display: block;
color: white;
text-align: center;
padding: 14px 16px;
text-decoration: none;
>
/* Change the link color to #111 (black) on hover */
li a:hover background-color: #111;
>
Active/Current Navigation Link
Add an «active» class to the current link to let the user know which page he/she is on:
Example
Right-Align Links
Right-align links by floating the list items to the right ( float:right; ):
Example
Border Dividers
Example
/* Add a gray right border to all list items, except the last item (last-child) */
li border-right: 1px solid #bbb;
>
li:last-child border-right: none;
>
Fixed Navigation Bar
Make the navigation bar stay at the top or the bottom of the page, even when the user scrolls the page:
Fixed Top
Fixed Bottom
Note: Fixed position might not work properly on mobile devices.
Gray Horizontal Navbar
An example of a gray horizontal navigation bar with a thin gray border:
Example
ul <
border: 1px solid #e7e7e7;
background-color: #f3f3f3;
>
Sticky Navbar
- to create a sticky navbar.
A sticky element toggles between relative and fixed, depending on the scroll position. It is positioned relative until a given offset position is met in the viewport — then it «sticks» in place (like position:fixed).
Example
Note: Internet Explorer do not support sticky positioning. Safari requires a -webkit- prefix (see example above). You must also specify at least one of top , right , bottom or left for sticky positioning to work.
More Examples
Responsive Topnav
How to use CSS media queries to create a responsive top navigation.
Responsive Sidenav
How to use CSS media queries to create a responsive side navigation.
Dropdown Navbar
How to add a dropdown menu inside a navigation bar.
Ever heard about W3Schools Spaces? Here you can create your website from scratch or use a template, and host it for free.
CSS Navigation Bar
Having easy-to-use navigation is important for any web site.
With CSS you can transform boring HTML menus into good-looking navigation bars.
Navigation Bar = List of Links
A navigation bar needs standard HTML as a base.
In our examples we will build the navigation bar from a standard HTML list.
- and
elements makes perfect sense:
Example
Now let’s remove the bullets and the margins and padding from the list:
Example
- list-style-type: none; — Removes the bullets. A navigation bar does not need list markers
- Set margin: 0; and padding: 0; to remove browser default settings
The code in the example above is the standard code used in both vertical, and horizontal navigation bars, which you will learn more about in the next chapters.

COLOR PICKER


Report Error
If you want to report an error, or if you want to make a suggestion, do not hesitate to send us an e-mail:
Thank You For Helping Us!
Your message has been sent to W3Schools.
Top Tutorials
Top References
Top Examples
Get Certified
W3Schools is optimized for learning and training. Examples might be simplified to improve reading and learning. Tutorials, references, and examples are constantly reviewed to avoid errors, but we cannot warrant full correctness of all content. While using W3Schools, you agree to have read and accepted our terms of use, cookie and privacy policy.
How To Build a Simple Navbar with HTML and CSS
We will be building a simple navbar with HTML and CSS. We will use the below design as the guideline for our component.

Requirements
Below are the requirements we need to build the navbar.
- Navbar background-color is #333333
- Navbar hover background-color is #272727
- Navbar active background-color is #272727
- Text color is #e7e7e7
- Brand font-size is 24px
- Links should have 24px of padding all around
- RS should be a link
Implementation
Step 1
The first thing I do is ask myself what elements might make sense to build a navbar. With HTML we know we have semantic elements we can choose from. In this case, since we know it’s a navigation component we will use the nav element as our wrapping container. Let’s also add a class of navbar so we can apply styles later
Step 2
Next, I would review the content inside the navigation.
I would split the content into two parts:
The reason I would split this up is that the brand content isn’t necessarily a navigation item and I want the HTML to have the correct meaning.
Step 3
Next, let’s implement option one from Step 2, The brand content. Since we know from the requirements it needs to be a link I would use the anchor tag. I will also add a class name of brand so we can style it later.
Our code should now look like this:
class="navbar"> class="brand" href="#">RS ![]()
Step 4
Next, let’s implement option two from Step 2, the navigational items. I would classify these as a list of links. Keeping with ensuring our HTML structure is semantic I would use a list to structure the items.
Our code should now look like this:
class="navbar"> class="brand" href="#">RS href="#">Blog href="#">About href="#">Profile href="#">Contact 
Step 5
Next, let’s start adding some styles. I am going to use flexbox (checkout CSS-TRICKS for an in-depth explanation on flexbox) to align the brand and navigation horizontally and start adding some of the required styles.
Our styles should now look like this:
/* We don't want any links to be underlined. Let's remove that globally */ a text-decoration: none; > .navbar background-color: #333333; display: flex; /* let's align the items so everything is nice and centered */ align-items: center; > /* We want all links in the navbar to be #e7e7e7 */ .navbar a color: #e7e7e7; > 
Step 6
Next, let’s style the list. Since we want the list to be horizontal we can use flexbox again to achieve this.
Our list styles should look like this:
.navbar ul /* Let's reset the margin and padding of the list so it's is flush. */ margin: 0; padding: 0; /* Let's remove the bullet points */ list-style-type: none; /* display the list flex and align the items centered */ display: flex; align-items:center; > Overall, our styles should look like this:
/* We don't want any links to be underlined. Let's remove that globally */ a text-decoration: none; > .navbar background-color: #333333; display: flex; /* let's align the items so everything is nice and centered */ align-items: center; > /* We want all links in the navbar to be #e7e7e7 */ .navbar a color: #e7e7e7; > .navbar ul /* Let's reset the margin and padding of the list so it's is flush. */ margin: 0; padding: 0; /* Let's remove the bullet points */ list-style-type: none; /* display the list flex and align the items centered */ display: flex; align-items:center; > ![]()
Step 7
Next, let’s style the brand and navigation links. We need to add the spacing around the brand and links.
Our link and brand styles should look like this:
.navbar .brand display: block; color: #e7e7e7; /* Remove padding from top/bottom and add 24px padding right/left */ padding: 0 24px; font-size: 24px; > .navbar ul li a color: #e7e7e7; padding: 24px; /*Let's make the anchor display block. This will ensure when we hover, focus, or is active we get the full width and height of the container. */ display: block; > /* When a use hovers or focuses to a link change the background */ .navbar ul a:hover, .navbar ul a:focus background-color: #272727; > Overall, our styles should look like this:
/* We don't want any links to be underlined. Let's remove that globally */ a text-decoration: none; > .navbar background-color: #333333; display: flex; /* let's align the items so everything is nice and centered */ align-items: center; > /* We want all links in the navbar to be #e7e7e7 */ .navbar a color: #e7e7e7; > .navbar ul /* Let's reset the margin and padding of the list so it's is flush. */ margin: 0; padding: 0; /* Let's remove the bullet points */ list-style-type: none; /* display the list flex and align the items centered */ display: flex; align-items:center; > .navbar .brand /*Let's make the anchor display block. This will ensure when we get the full width of the container. */ display: block; color: #e7e7e7; /* Remove padding from top/bottom and add 24px padding right/left */ padding: 0 24px; font-size: 24px; > .navbar ul li a color: #e7e7e7; padding: 24px; /*Let's make the anchor display block. This will ensure when we hover, focus, or is active we get the full width and height of the container. */ display: block; > /* When a use hovers or focuses a link change the background */ .navbar ul a:hover, .navbar ul a:focus background-color: #272727; > 
Step 8
Next, we need one final piece, styling the active navigation link.
First, let’s update the HTML to add the active class to the About link.
class="navbar"> class="brand" href="#">RS href="#">Blog class="active" href="#">About href="#">Profile href="#">Contact Next, let’s add the active style. Since the active style is the same as focus and hover we can add the active styles to it:
.navbar ul a:hover, .navbar ul a:focus, .navbar ul .active background-color: #272727; > Overall, our styles should look like this:
/* We don't want any links to be underlined. Let's remove that globally */ a text-decoration: none; > .navbar background-color: #333333; display: flex; /* let's align the items so everything is nice and centered */ align-items: center; > /* We want all links in the navbar to be #e7e7e7 */ .navbar a color: #e7e7e7; > .navbar ul /* Let's reset the margin and padding of the list so it's is flush. */ margin: 0; padding: 0; /* Let's remove the bullet points */ list-style-type: none; /* display the list flex and align the items centered */ display: flex; align-items:center; > .navbar .brand /*Let's make the anchor display block. This will ensure when we get the full width of the container. */ display: block; color: #e7e7e7; /* Remove padding from top/bottom and add 24px padding right/left */ padding: 0 24px; font-size: 24px; > .navbar ul li a color: #e7e7e7; padding: 24px; /*Let's make the anchor display block. This will ensure when we hover, focus, or is active we get the full width and height of the container. */ display: block; > /* When a user hovers, focuses or if the link is active change the background */ .navbar ul a:hover, .navbar ul a:focus, .navbar ul .active background-color: #272727; >
Full code below via codepen:
Conclusion
With some basic knowledge of HTML and CSS, we were able to create a fully functioning navbar component.
If you haven’t already please follow me on Twitter (@RoccoSangllino) where I share more information on web development.