- froemken / testEmailServer.php
- Как проверить работу функции mail() php
- froemken / testEmailServer.php
- PHP Mail Script for Testing Email Sending
- The PHP Mail Function
- Start with a Basic Web Page to Run PHP
- Create Some Strings to Store the Email Settings
- How to Split Long Lines in PHP Emails
- How to Set the PHP Mail Header
- Call the PHP Mail Function
- PHP Mail Error Checking
- PHP Mail Script for Testing Email Sending
- Running the PHP Mail Test Script
- See Also
- Do you have a question or comment about this article?
froemken / testEmailServer.php
This file contains bidirectional Unicode text that may be interpreted or compiled differently than what appears below. To review, open the file in an editor that reveals hidden Unicode characters. Learn more about bidirectional Unicode characters
| // For port 24 host without scheme is just fine |
| // Add scheme, if using secure connection. Port 465 or 587 |
| $ host = ‘ssl://smtp.strato.de’ ; |
| //$host = ‘tls://smtp.strato.de’; |
| $ port = 465 ; |
| //$port = 25; |
| $ errorNumber ; |
| $ error ; |
| $ timeout = 10 ; |
| $ enableLog = true ; |
| $ logFile = ‘smtp_tester.log’ ; |
| $ now = new \ DateTime ( ‘now’ ); |
| if ( $ enableLog ) |
| $ fp = fopen( $ logFile , ‘a’ ); |
| > |
| echo ‘ Host: ‘ . $ host . ‘, Port: ‘ . $ port . ‘, Timeout: ‘ . $ timeout . ‘ ‘ ; |
| $ mTime = microtime( true ); |
| $ connection = fsockopen( $ host , $ port , $ errorNumber , $ error , $ timeout ); |
| if (! $ connection ) |
| echo ‘ Connection ERROR ‘ ; |
| echo ‘ Error no.: ‘ . $ errorNumber . ‘ ‘ ; |
| echo ‘ Error: ‘ . $ error . ‘ ‘ ; |
| if ( $ enableLog ) fwrite( $ fp , $ now -> format ( ‘d.m.Y H:i:s’ ) . ‘ ERROR ‘ . $ errorNumber . ‘ ‘ . $ error . chr( 10 )); |
| > else |
| echo ‘ Connection established ‘ ; |
| if ( $ enableLog ) fwrite( $ fp , $ now -> format ( ‘d.m.Y H:i:s’ ) . ‘ SUCCESS Connection established’ . chr( 10 )); |
| $ res = fgets( $ connection , 256 ); |
| echo ‘ Welcome res: ‘ . $ res . ‘ ‘ ; |
| if (substr( $ res , 0 , 3 ) !== ‘220’ ) |
| echo ‘Error. Status has to be 220’ ; |
| if ( $ enableLog ) fwrite( $ fp , $ now -> format ( ‘d.m.Y H:i:s’ ) . ‘ ERROR Welcome status <> 220′ . chr( 10 )); |
| > |
| fputs( $ connection , » HELO » . $ _SERVER [ ‘HTTP_HOST’ ] . «\n»); |
| $ res = fgets( $ connection , 256 ); |
| echo ‘ HELO res: ‘ . $ res . ‘ ‘ ; |
| if (substr( $ res , 0 , 3 ) !== ‘250’ ) |
| echo ‘Error. HELO was not responded with status 250’ ; |
| if ( $ enableLog ) fwrite( $ fp , $ now -> format ( ‘d.m.Y H:i:s’ ) . ‘ ERROR HELO status <> 250′ . chr( 10 )); |
| > |
| fputs( $ connection , » QUIT \n»); |
| $ res = fgets( $ connection , 256 ); |
| echo ‘ QUIT res: ‘ . $ res . ‘ ‘ ; |
| if (substr( $ res , 0 , 3 ) !== ‘221’ ) |
| echo ‘Error. QUIT was not responded with status 221’ ; |
| if ( $ enableLog ) fwrite( $ fp , $ now -> format ( ‘d.m.Y H:i:s’ ) . ‘ ERROR QUIT status <> 221′ . chr( 10 )); |
| > |
| > |
| echo ‘ Dump SMTP connection ' ; |
| var_dump( $ connection ); |
| echo ' ‘ ; |
| fclose( $ connection ); |
| echo ‘ Execution time: ‘ . (microtime( true ) — $ mTime ) . ‘ ‘ ; |
| if ( $ enableLog ) fclose( $ fp ); |
Как проверить работу функции mail() php

Внимание! Не забудьте удалить созданный тестовый php файл сразу же после проверки, иначе этим могут воспользоваться злоумышленники и начать рассылать спам с вашего веб-сайта, что может привести к блокировке заказанных услуг.
Иногда бывают ситуации, когда не совсем очевидно, на сайте отправка писем настроена, но письма не доходят или не отправляются. В этой ситуации самое простое решение — проверить функцию mail() php, а работает ли она? Или же возможно ограничена отправка писем?
Для проверки работоспособности PHP-функции mail() нужно создавать тестовый PHP-файл (например, mailtest55.php) следующего содержания:
".$_POST['email'].".
"; >else< $message = "Failed sending message to ".$_POST['email'].".
"; > >else< if (isset($_POST['submit']))< $message = "No email address specified!
"; > > if (!empty($message))< $message .= "
n"; > ?> Загрузите созданный файл в рабочую папку веб-сайта, доступную по HTTP-протоколу (там где располжен index.php index.html).
Запустите файл, набрав его адрес (URL) в адресной строке браузера, например: http://example.com/mailtest55.php
Введите в поля открывшейся страницы адрес электронной почты, тему и текст проверочного сообщения и нажмите на кнопку «send», чтобы отправить сообщение.
В случае успешной отправки на странице появится сообщение вида «Email has been sent to . ». В противном случае появится сообщение вида «Failed sending message to. ».
froemken / testEmailServer.php
This file contains bidirectional Unicode text that may be interpreted or compiled differently than what appears below. To review, open the file in an editor that reveals hidden Unicode characters. Learn more about bidirectional Unicode characters
| // For port 24 host without scheme is just fine |
| // Add scheme, if using secure connection. Port 465 or 587 |
| $ host = ‘ssl://smtp.strato.de’ ; |
| //$host = ‘tls://smtp.strato.de’; |
| $ port = 465 ; |
| //$port = 25; |
| $ errorNumber ; |
| $ error ; |
| $ timeout = 10 ; |
| $ enableLog = true ; |
| $ logFile = ‘smtp_tester.log’ ; |
| $ now = new \ DateTime ( ‘now’ ); |
| if ( $ enableLog ) |
| $ fp = fopen( $ logFile , ‘a’ ); |
| > |
| echo ‘ Host: ‘ . $ host . ‘, Port: ‘ . $ port . ‘, Timeout: ‘ . $ timeout . ‘ ‘ ; |
| $ mTime = microtime( true ); |
| $ connection = fsockopen( $ host , $ port , $ errorNumber , $ error , $ timeout ); |
| if (! $ connection ) |
| echo ‘ Connection ERROR ‘ ; |
| echo ‘ Error no.: ‘ . $ errorNumber . ‘ ‘ ; |
| echo ‘ Error: ‘ . $ error . ‘ ‘ ; |
| if ( $ enableLog ) fwrite( $ fp , $ now -> format ( ‘d.m.Y H:i:s’ ) . ‘ ERROR ‘ . $ errorNumber . ‘ ‘ . $ error . chr( 10 )); |
| > else |
| echo ‘ Connection established ‘ ; |
| if ( $ enableLog ) fwrite( $ fp , $ now -> format ( ‘d.m.Y H:i:s’ ) . ‘ SUCCESS Connection established’ . chr( 10 )); |
| $ res = fgets( $ connection , 256 ); |
| echo ‘ Welcome res: ‘ . $ res . ‘ ‘ ; |
| if (substr( $ res , 0 , 3 ) !== ‘220’ ) |
| echo ‘Error. Status has to be 220’ ; |
| if ( $ enableLog ) fwrite( $ fp , $ now -> format ( ‘d.m.Y H:i:s’ ) . ‘ ERROR Welcome status <> 220′ . chr( 10 )); |
| > |
| fputs( $ connection , » HELO » . $ _SERVER [ ‘HTTP_HOST’ ] . «\n»); |
| $ res = fgets( $ connection , 256 ); |
| echo ‘ HELO res: ‘ . $ res . ‘ ‘ ; |
| if (substr( $ res , 0 , 3 ) !== ‘250’ ) |
| echo ‘Error. HELO was not responded with status 250’ ; |
| if ( $ enableLog ) fwrite( $ fp , $ now -> format ( ‘d.m.Y H:i:s’ ) . ‘ ERROR HELO status <> 250′ . chr( 10 )); |
| > |
| fputs( $ connection , » QUIT \n»); |
| $ res = fgets( $ connection , 256 ); |
| echo ‘ QUIT res: ‘ . $ res . ‘ ‘ ; |
| if (substr( $ res , 0 , 3 ) !== ‘221’ ) |
| echo ‘Error. QUIT was not responded with status 221’ ; |
| if ( $ enableLog ) fwrite( $ fp , $ now -> format ( ‘d.m.Y H:i:s’ ) . ‘ ERROR QUIT status <> 221′ . chr( 10 )); |
| > |
| > |
| echo ‘ Dump SMTP connection ' ; |
| var_dump( $ connection ); |
| echo ' ‘ ; |
| fclose( $ connection ); |
| echo ‘ Execution time: ‘ . (microtime( true ) — $ mTime ) . ‘ ‘ ; |
| if ( $ enableLog ) fclose( $ fp ); |
PHP Mail Script for Testing Email Sending
A dynamic website created with PHP may need to support email delivery. Most web hosting sites that provide PHP support will include configuration for emailing from a PHP script. There are PHP libraries that support advanced emailing functions, for example PHPMailer, but an easy way to check if mail support from PHP is working is to write a simple test script. In this tutorial article a PHP mail script for testing email sending from your web server is provided. The PHP mail script provided here uses PHP’s built in mail function.

WARNING: Be careful when running scripts that generate email. Get it wrong and you will end up spamming out large amounts of email. Your website will slow down, the web server will slow down, the hosting provider will not be happy and could turn off your hosting, and you could be blacklisted as a source of spam. Ensure your emailing software works before deploying it to a live web server.
The PHP Mail Function
At its most basic the mail function is a one liner:
mail('some.body@example.com', 'Subject of the Email', 'Message in the email');However, reading the documentation on the mail function there are a few considerations. These are discussed as the script is developed. The script is a basic HTML page with some PHP code. It can be uploaded to your website and when the browser is pointed to the mail test page it’ll generate a test email. The test page can then be deleted so that some idiot doesn’t constantly run it.
Start with a Basic Web Page to Run PHP
Create a basic HTML page to run some PHP code, see Hello World in HTML if you are new to HTML web pages. Save it as a PHP file, e.g. php-mail.php:
Sending email..
Create Some Strings to Store the Email Settings
Between the PHP script markers, , create some strings for the email. You need an email address that will receive the test email:
//Use your test email address $to = 'some.body@example.com';Obviously, replace some.body@example.com with a valid email to which you have access. Next a subject for the email:
//Use an appropriate email subject $subject = 'A Test Email';Now a message for the content of the email.
$message = 'The quick brown fox jumped over the lazy dog. Then the fox jumped over the dog again.';How to Split Long Lines in PHP Emails
The PHP documentation states the following about the email content:
Each line should be separated with a CRLF ( \r\n ). Lines should not be larger than 70 characters.
So if the content in the string is long it will need splitting into 70 character lines, use the PHP wordwrap function:
//wordwrap long content $message = wordwrap($message, 70, "\r\n");There is also a warning in the PHP documentation about handling strings ending with full stops for Windows based PHP scripts that send email via SMTP. If that applies to your script see the PHP’s mail function documentation.
How to Set the PHP Mail Header
The PHP documentation also states:
When sending mail, the mail must contain a From header. This can be set with the additional_headers parameter, or a default can be set in php.ini .
This can be done by adding a From: entry to the $additional_headers parameter:
$headers = 'From: some.body@example.com';Call the PHP Mail Function
Finally, to send the email use the PHP mail function:
mail($to, $subject, $message, $headers);PHP Mail Error Checking
If required it is possible to check the return value of the mail function, for example use the return for a sent message or last error message:
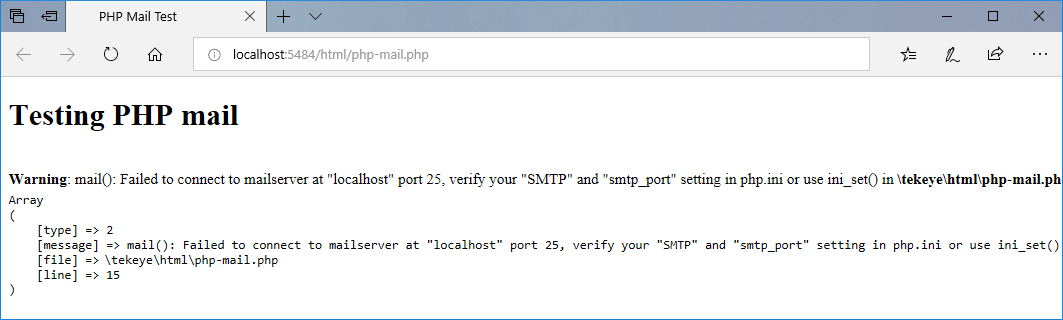
if(mail($to, $subject, $message, $headers)) < echo 'Email sent out'; >else < echo ''; print_r(error_get_last()); echo ''; >
PHP Mail Script for Testing Email Sending
Here is the full PHP mail script that can be added to a website server to test the email sending from PHP, remember to change the email addresses to your valid email.
Testing PHP mail
else < echo ''; print_r(error_get_last()); echo ''; > ?>
Running the PHP Mail Test Script
Upload the PHP email test script to your server and point the browser at it, e.g. http://www.example.com/php-mail.php (obviously use your server’s address and the file name you gave your test script). The email should find its way to the inbox of the email address you set for $to . Remember that email is not instant messaging and can take from a few seconds to several minutes, or longer, to get to the inbox.
Don’t forget to delete the script once finished with the testing. Alternatively, if this test script is used as the basis of other email functionality, for example a comments or contact form, add anti-spam measures, such as reCAPTCHA.
See Also
- See another article on How to Send Emails in PHP
- Need to install PHP on Windows? The easiest way to install PHP on Windows is with the Web Platform Installer.
- New to HTML, see a basic web page in Hello World in HTML.
- Need to know how to run PHP on Windows for development, see Developing PHP on Windows with Eclipse PDT.
- View the Tek Eye full Index for other articles.
Author: Daniel S. Fowler Published: 2019-02-10


Do you have a question or comment about this article?
(Alternatively, use the email address at the bottom of the web page.)
↓markdown↓ CMS is fast and simple. Build websites quickly and publish easily. For beginner to expert.
Free Android Projects and Samples: