- How To Install Java 8 On Mac
- System Checks
- Download Java 8
- Install Java 8
- Getting started with Java — Hello World
- Summary
- How To Install Java 14 On Mac
- System Checks
- Download Java 14
- Install Java 14
- Switch JDK
- Getting started with Java — Hello World
- Summary
- How to Install Java on macOS Sierra
- How to Install Java in macOS High Sierra & Sierra
- How to Install Java JRE 6 on macOS High Sierra
How To Install Java 8 On Mac
It provides all the steps required to install Java 8 on Mac systems including macOS Sierra, High Sierra, Mojave, and Catalina.
In this tutorial, we will discuss how to install Java 8 on Mac systems. The steps should be the same on macOS Sierra, High Sierra, Mojave, and Catalina.
System Checks
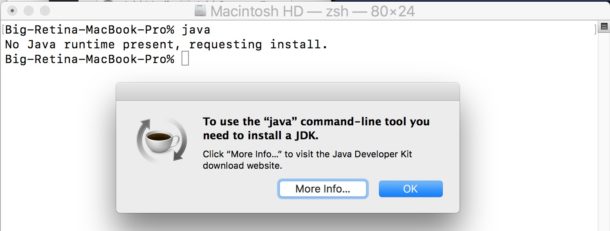
In this step, we will test whether Java is already installed or not. To do so, open the terminal and type java -version as shown in Fig 1. It shows that Java is not installed on my system and also opens a dialog to get more info. It might show existing version of Java if it is already installed on your system.
Now press the OK Button to hide the dialog.
Download Java 8
Open the download link to select the available versions as shown in Fig 2. Also, go through the new Oracle JDK License started since April 16, 2019.
Click the Download Option as highlighted in Fig 2. It will ask to accept the License Agreement before starting the download as shown in Fig 3 and Fig 4. It might also ask to login to Oracle before starting the download.
Install Java 8
Double click the DMG file downloaded in the previous step to start installing Oracle JDK 8 on Mac. It will mount the DMG disk and shows the installer as shown in Fig 5 and Fig 6. Make sure that you have gone through the updated License Agreement of Oracle JDK.
Now double-click the installer to start installing Java 8 on Mac.
macOS Catalina — With the release of macOS 10.15, Apple introduced security checks used by the Gatekeeper to verify the content of distributed software. Since JDK 8 is not notarized, the Gatekeeper shows security error as shown in Fig 7.
You may either install JDK 14 which complies with the notarization requirements or follow the below-mentioned solution to continue with JDK 8 installation. Click OK Button to close the security error dialog and open the System Preferences using the Finder application as shown in Fig 8.
Now click the General Tab as highlighted in Fig 9.
Click the Open Anyway Button to open the installer. It will ask for final confirmation before opening the file as shown in Fig 10.
Click the Open Button to execute the installer. The rest of the steps are the same for Catalina and older macOS systems.
The installer shows the Welcome Screen as shown in Fig 11.
Click the Continue Button to start the installation. It provide options to choose the installation type as shown in Fig 12.
You may change the installation location by clicking the Go Back Button. It did not allow me to change installation location on macOS Catalina. Now click the Install Button to start installing Java 8 on Mac. It also asks for permission to complete the installation as shown in Fig 13.
It will show the installation progress as shown in Fig 13 a.
It shows the success message after completing the installation as shown in Fig 14.
Now unmount the DMG image by right-clicking it as shown in Fig 15.
We can check the JDK version to confirm the installation as shown in Fig 16.
This is all about installing JDK 8 on Mac systems including macOS Sierra, High Sierra, Mojave, and Catalina.
Getting started with Java — Hello World
In this step, we will write, compile, and execute our first program in Java using the standard Hello World example.
Now write the first Java program as shown below, save the program as HelloWorld.java and exit the editor. Make sure that the class name and file name are the same.
class HelloWorld
public static void main( String[] args )
System.out.println( "Hello World !!" );
>
>
Now open the command prompt and navigate to the path where you have saved your Java program. Use the below-mentioned commands to compile and execute the program.
# Compile - Specify file name and extension
javac HelloWorld.java

# Execute - Spicy file name
java HelloWorld

# Output
Hello World !!
These are the easy to install steps required to install Oracle JDK on Mac and write, compile and execute the first Java program.
Summary
This tutorial provided all the steps required to install Oracle JDK 8 on Mac and also provided the steps required to compile and run the first Java program using a simple Hello World program.
How To Install Java 14 On Mac
It provides all the steps required to install Java 14 on Mac systems including macOS Sierra, High Sierra, Mojave, and Catalina.
In this tutorial, we will discuss how to install Oracle Java 14 on Mac systems. It provides the steps required to install Java 14 on macOS Catalina. The steps should be the same for other versions of macOS including Sierra, High Sierra, and Mojave.
System Checks
In this step, we will test whether Java is already installed or not. To do so, open the terminal and type java -version as shown in Fig 1. It shows that Java is already installed on my system.
Now press the OK Button to hide the dialog. It might show the message — «No Java runtime present, requesting install» in absence of Java and also opens a dialog to know more about it as shown in Fig 2.
Download Java 14
Open the download link to select the available versions as shown in Fig 3. Also, go through the new Oracle JDK License started since April 16, 2019.
Click the Download Option as highlighted in Fig 3. It will ask to accept the License Agreement before starting the download as shown in Fig 4 and Fig 5. It might also ask to login to Oracle before starting the download.
Install Java 14
Double click the DMG file downloaded in the previous step to start installing Oracle JDK 14 on Mac. It will mount the DMG disk and shows the installer as shown in Fig 6 and Fig 7. Make sure that you have gone through the updated License Agreement of Oracle JDK.
Now double-click the installer to start installing Java 14 on Mac. The installer shows the Welcome Screen as shown in Fig 8.
Click the Continue Button to start the installation. It provides options to choose the installation type as shown in Fig 9.
You may change the installation location by clicking the Go Back Button. It did not allow me to change the installation location on macOS Catalina. Now click the Install Button to start installing Java 14 on Mac. It also asks for permission to complete the installation as shown in Fig 10.
It shows the success message after completing the installation as shown in Fig 11.
Now unmount the DMG image by right-clicking it as shown in Fig 12.
We can check the JDK version to confirm the installation as shown in Fig 13.
This is all about installing Oracle JDK 14 on Mac systems including macOS Sierra, High Sierra, Mojave, and Catalina.
Switch JDK
It might be required to switch the active Java in case multiple JDKs are installed on the same Mac machine. You can follow How To Switch Java Version On Mac.
Getting started with Java — Hello World
In this step, we will write, compile, and execute our first program in Java using the standard Hello World example.
Now write the first Java program as shown below, save the program as HelloWorld.java and exit the editor. Make sure that the class name and file name are the same.
class HelloWorld
public static void main( String[] args )
System.out.println( "Hello World !!" );
>
>
Now open the command prompt and navigate to the path where you have saved your Java program. Use the below-mentioned commands to compile and execute the program.
# Compile - Specify file name and extension
javac HelloWorld.java

# Execute - Spicy file name
java HelloWorld

# Output
Hello World !!
These are the easy to install steps required to install Oracle JDK on Mac and write, compile and execute the first Java program.
Summary
This tutorial provided all the steps required to install Oracle JDK 14 on Mac and also provided the steps required to compile and run the first Java program using a simple Hello World program.
How to Install Java on macOS Sierra
Some Mac users may need to install Java into macOS Sierra or MacOS High Sierra. Typically the need for Java is for specific app usage, particular app compatibility, or for developers, and it’s worth mentioning that most Mac users won’t need to bother installing Java at all. For those that do need Java however, you will find it’s easy to get onto the latest versions of MacOS.
As you may know by now, MacOS no longer ships with Java preinstalled, so you’ll need to download and install java on your own if you need it in MacOS 10.13 or 10.12. This is to insure that the most recent version of Java is installed on the Mac if it’s needed, aiming to lessen potential security issues that may come up with older versions of the Java software (though older versions of Java can be installed if need be for a specific reason).
Note: if you do not specifically need Java, you should not install it onto a Mac.
How to Install Java in macOS High Sierra & Sierra
The best approach to install Java on the Mac is to get the latest version of Java JRE directly from Oracle. This is fairly straight forward and you can either initiate the process from the terminal application in macOS or by going directly to the Java download page on Oracles website.
- Open the Terminal app and type the following:
This will allow you to download and install the newest most recent version of Java available for the Mac, which is currently JRE8.
Additionally, you can choose to go directly to the Java downloads page on Oracle.com where you can find the latest release of Java JRE and as well as the JDK if you need one, the other, or both. If you need an older version of Java for whatever reason, some Mac OS releases support JRE 6 as described here.
How to Install Java JRE 6 on macOS High Sierra
Some users may need to run JRE6 in modern MacOS releases, in which case you can download an updated installer appropriate for macOS High Sierra, Sierra, El Cap, and Mavericks too.
The download notes from Apple for that releases are as follows:
Java for macOS 2017-001 installs the legacy Java 6 runtime for macOS 10.13 High Sierra, macOS 10.12 Sierra, macOS 10.11 El Capitan, macOS 10.10 Yosemite, macOS 10.9 Mavericks, macOS 10.8 Mountain Lion, and macOS 10.7 Lion.
This package is exclusively intended for support of legacy software and installs the same deprecated version of Java 6 included in the 2015-001, 2014-001, and 2013-005 releases.
Quit any Java applications before installing this update.
Download and run that Java installer to install Java Runtime Environment 6 in modern Mac OS versions if needed.
Users might need to turn off SIP protection on the Mac before being allowed to complete the installation of Java.
You can also uninstall Java from a Mac if need be after the fact, or you can just disable Java too.
Know of another approach to installing Java in macOS 10.13 or macOS 10.12? Have any opinions or thoughts on the matter? Let us know in the comments!