- Website with Login & Registration Form in HTML CSS & JavaScript
- Website with Login & Registration Form in HTML CSS & JS
- Steps for Creating a Website with Login & Registration Form
- Login and Registration Form in HTML CSS and JavaScript
- Login & Registration Form in HTML CSS JavaScript
- You Might Like This:
- Login and Registration Form [Source Code]
Website with Login & Registration Form in HTML CSS & JavaScript

While learning web development creating a website with a Login and Registration Form could be the best project for beginners to intermediate-level web developers.
Today in this blog you will learn how to build a website that includes a Login and Registration Form using HTML, CSS, and JavaScript. While I have previously designed many websites with Login and Registration Forms, they were created as separate entities.
As you can see on the given image of the Website with the Login & Signup Form that you will be going to learn to create today. The website will have a navigation bar with a logo and nav links with a button that will toggle the form. To toggle the login and registration form there is a button at the bottom of the form.
Website with Login & Registration Form in HTML CSS & JS
As demonstrated in the video tutorial of the website featuring a login and registration form, initially, a website with a navigation bar was presented. Upon clicking the login button, the login form was displayed, and upon clicking the signup button, the registration form appeared.
I would highly recommend you watch the provided video tutorial. In the video tutorial, I have shown to create a website with a login and registration form step by step as well as I have commented on the code to make it easier to understand.
Steps for Creating a Website with Login & Registration Form
To create a Website with Login & Registration Form using HTML, CSS, and vanilla JavaScript, follow the given steps line by line:
- Create a folder. You can name this folder whatever you want, and inside this folder, create the mentioned files.
- Create an index.html file. The file name must be index and its extension .html
- Create a style.css file. The file name must be style and its extension .css
- Create a script.js file. The file name must be script and its extension .js
- Download the background image and put this image inside the project folder. This is the website background image.
Once you create these files, paste the given codes into the specified files. If you don’t want to do these then scroll down and download all the source code files of the Website with the Login & Registration Form, by clicking on the given download button.
First, paste the following codes into your index.html file.
Second, paste the following codes into your style.css file.
/* Import Google font — Poppins */ @import url(«https://fonts.googleapis.com/css2?family=Poppins:wght@200;300;400;500;600;700&display=swap»); * < margin: 0; padding: 0; box-sizing: border-box; font-family: "Poppins", sans-serif; >a < text-decoration: none; >.header < position: fixed; height: 80px; width: 100%; z-index: 100; padding: 0 20px; >.nav < max-width: 1100px; width: 100%; margin: 0 auto; >.nav, .nav_item < display: flex; height: 100%; align-items: center; justify-content: space-between; >.nav_logo, .nav_link, .button < color: #fff; >.nav_logo < font-size: 25px; >.nav_item < column-gap: 25px; >.nav_link:hover < color: #d9d9d9; >.button < padding: 6px 24px; border: 2px solid #fff; background: transparent; border-radius: 6px; cursor: pointer; >.button:active < transform: scale(0.98); >/* Home */ .home < position: relative; height: 100vh; width: 100%; background-image: url("bg.jpg"); background-size: cover; background-position: center; >.home::before < content: ""; position: absolute; height: 100%; width: 100%; background-color: rgba(0, 0, 0, 0.6); z-index: 100; opacity: 0; pointer-events: none; transition: all 0.5s ease-out; >.home.show::before < opacity: 1; pointer-events: auto; >/* From */ .form_container < position: fixed; max-width: 320px; width: 100%; top: 50%; left: 50%; transform: translate(-50%, -50%) scale(1.2); z-index: 101; background: #fff; padding: 25px; border-radius: 12px; box-shadow: rgba(0, 0, 0, 0.1); opacity: 0; pointer-events: none; transition: all 0.4s ease-out; >.home.show .form_container < opacity: 1; pointer-events: auto; transform: translate(-50%, -50%) scale(1); >.signup_form < display: none; >.form_container.active .signup_form < display: block; >.form_container.active .login_form < display: none; >.form_close < position: absolute; top: 10px; right: 20px; color: #0b0217; font-size: 22px; opacity: 0.7; cursor: pointer; >.form_container h2 < font-size: 22px; color: #0b0217; text-align: center; >.input_box < position: relative; margin-top: 30px; width: 100%; height: 40px; >.input_box input < height: 100%; width: 100%; border: none; outline: none; padding: 0 30px; color: #333; transition: all 0.2s ease; border-bottom: 1.5px solid #aaaaaa; >.input_box input:focus < border-color: #7d2ae8; >.input_box i < position: absolute; top: 50%; transform: translateY(-50%); font-size: 20px; color: #707070; >.input_box i.email, .input_box i.password < left: 0; >.input_box input:focus ~ i.email, .input_box input:focus ~ i.password < color: #7d2ae8; >.input_box i.pw_hide < right: 0; font-size: 18px; cursor: pointer; >.option_field < margin-top: 14px; display: flex; align-items: center; justify-content: space-between; >.form_container a < color: #7d2ae8; font-size: 12px; >.form_container a:hover < text-decoration: underline; >.checkbox < display: flex; column-gap: 8px; white-space: nowrap; >.checkbox input < accent-color: #7d2ae8; >.checkbox label < font-size: 12px; cursor: pointer; user-select: none; color: #0b0217; >.form_container .button < background: #7d2ae8; margin-top: 30px; width: 100%; padding: 10px 0; border-radius: 10px; >.login_signup
Third, paste the following codes into your script.js file.
const formOpenBtn = document.querySelector("#form-open"), home = document.querySelector(".home"), formContainer = document.querySelector(".form_container"), formCloseBtn = document.querySelector(".form_close"), signupBtn = document.querySelector("#signup"), loginBtn = document.querySelector("#login"), pwShowHide = document.querySelectorAll(".pw_hide"); formOpenBtn.addEventListener("click", () => home.classList.add("show")); formCloseBtn.addEventListener("click", () => home.classList.remove("show")); pwShowHide.forEach((icon) => < icon.addEventListener("click", () => < let getPwInput = icon.parentElement.querySelector("input"); if (getPwInput.type === "password") < getPwInput.type = "text"; icon.classList.replace("uil-eye-slash", "uil-eye"); >else < getPwInput.type = "password"; icon.classList.replace("uil-eye", "uil-eye-slash"); >>); >); signupBtn.addEventListener("click", (e) => < e.preventDefault(); formContainer.classList.add("active"); >); loginBtn.addEventListener("click", (e) => < e.preventDefault(); formContainer.classList.remove("active"); >); That’s all, now you’ve successfully created a Website with a Login & Registration Form. If your code doesn’t work or you’ve faced any problems, please download the source code files from the given download button. It’s free and a zip file containing the project folder with source code files will be downloaded.
Login and Registration Form in HTML CSS and JavaScript
Hello friend I hope you are doing awesome. Today here we will learn to create a Responsive Login and Registration Form in HTML CSS and JavaScript. You can also check out the 16 Free Login & Registration Forms that I have created to date. But this project has several facilities and features.
The login form is the section on the webpage where users need to fill required details to enter the particular website or webpage. Same as the Registration form is the section with a combination of input fields where users need to fill in details to create a login id and password.
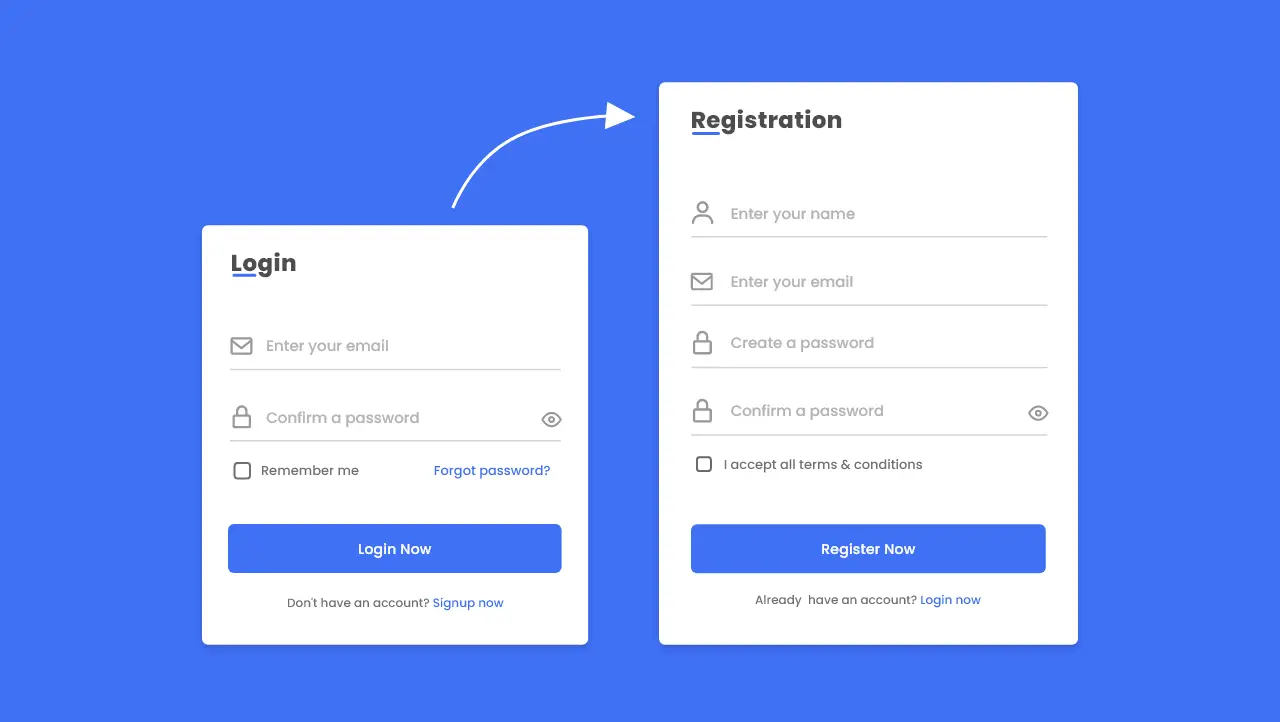
Let’s have a quick look at the given image of our project [Login and Registration Form]. On the left side, we can see a login form with some input fields, buttons,s, and text with links, similarly, on the right side, we can see a registration form. Actually, at first, there will be one form which is the login form and when we click on the signup now button the login form will disappear and the registration form will appear.
Now we are going to watch the real demo of this project [Login and Registration Form], and all the animation that I have included in this template. Also by watching the video tutorial, we will get an idea, of how all HTML CSS and JavaScript code works properly behind this beautiful form design.
Login & Registration Form in HTML CSS JavaScript
I have provided all the HTML CSS and JavaScript code that I have used to create this beautiful Login and Registration Form, before Jumping into the source code file, you need to know some important points outs of this video tutorial.
As you have seen on the video tutorial of this Login and Registration Form. We saw only on the login form on the screen with the login title some input filed with beautiful focus animation and a button and some text and nav links and also we have seen password hide and show eye toggle button. When I clicked on the signup now link sign-up button disappear and the registration form appeared with a beautiful sliding animation.
Similarly, on the registration form, we have seen a title, an input field, a button, and some text with nav links. Again when I clicked on the Login now link, the registration form disappear and the login form appear.
For the UI design I have used only HTM and CSS and to toggle the Login and Registration Form and Password Show Hide feature I have used Some JavaScript code. If you want this type of Login and Registration Form in HTM and CSS Only then you can click the link.
I believe, now you can easily create this login form, if you are feeling difficulty, I have provided all the HTML CSS, and JavaScript code that I have used to create this Login and Registration Form below:
You Might Like This:
Login and Registration Form [Source Code]
To take the source code of this Login and Registration Form Template first, you need to create two files: an HTML file and a CSS file. After creating these two files then you can copy-paste the following source code. You can also directly download all source codes of this Login and Registration Form by clicking on the given download button.
LoginForgot password?Not a member? Signup NowRegistrationAlready a member? Login Now/* ===== Google Font Import — Poformsins ===== */ @import url(‘https://fonts.googleapis.com/css2?family=Poppins:wght@300;400;500;600;700&display=swap’); * < margin: 0; padding: 0; box-sizing: border-box; font-family: 'Poppins', sans-serif; >body < height: 100vh; display: flex; align-items: center; justify-content: center; background-color: #4070f4; >.container < position: relative; max-width: 430px; width: 100%; background: #fff; border-radius: 10px; box-shadow: 0 5px 10px rgba(0, 0, 0, 0.1); overflow: hidden; margin: 0 20px; >.container .forms < display: flex; align-items: center; height: 440px; width: 200%; transition: height 0.2s ease; >.container .form < width: 50%; padding: 30px; background-color: #fff; transition: margin-left 0.18s ease; >.container.active .login < margin-left: -50%; opacity: 0; transition: margin-left 0.18s ease, opacity 0.15s ease; >.container .signup < opacity: 0; transition: opacity 0.09s ease; >.container.active .signup < opacity: 1; transition: opacity 0.2s ease; >.container.active .forms < height: 600px; >.container .form .title < position: relative; font-size: 27px; font-weight: 600; >.form .title::before < content: ''; position: absolute; left: 0; bottom: 0; height: 3px; width: 30px; background-color: #4070f4; border-radius: 25px; >.form .input-field < position: relative; height: 50px; width: 100%; margin-top: 30px; >.input-field input < position: absolute; height: 100%; width: 100%; padding: 0 35px; border: none; outline: none; font-size: 16px; border-bottom: 2px solid #ccc; border-top: 2px solid transparent; transition: all 0.2s ease; >.input-field input:is(:focus, :valid) < border-bottom-color: #4070f4; >.input-field i < position: absolute; top: 50%; transform: translateY(-50%); color: #999; font-size: 23px; transition: all 0.2s ease; >.input-field input:is(:focus, :valid) ~ i < color: #4070f4; >.input-field i.icon < left: 0; >.input-field i.showHidePw < right: 0; cursor: pointer; padding: 10px; >.form .checkbox-text < display: flex; align-items: center; justify-content: space-between; margin-top: 20px; >.checkbox-text .checkbox-content < display: flex; align-items: center; >.checkbox-content input < margin-right: 10px; accent-color: #4070f4; >.form .text < color: #333; font-size: 14px; >.form a.text < color: #4070f4; text-decoration: none; >.form a:hover < text-decoration: underline; >.form .button < margin-top: 35px; >.form .button input < border: none; color: #fff; font-size: 17px; font-weight: 500; letter-spacing: 1px; border-radius: 6px; background-color: #4070f4; cursor: pointer; transition: all 0.3s ease; >.button input:hover < background-color: #265df2; >.form .login-signup
const container = document.querySelector(".container"), pwShowHide = document.querySelectorAll(".showHidePw"), pwFields = document.querySelectorAll(".password"), signUp = document.querySelector(".signup-link"), login = document.querySelector(".login-link"); // js code to show/hide password and change icon pwShowHide.forEach(eyeIcon =>< eyeIcon.addEventListener("click", ()=>< pwFields.forEach(pwField =>< if(pwField.type ==="password")< pwField.type = "text"; pwShowHide.forEach(icon =>< icon.classList.replace("uil-eye-slash", "uil-eye"); >) >else< pwField.type = "password"; pwShowHide.forEach(icon =>< icon.classList.replace("uil-eye", "uil-eye-slash"); >) > >) >) >) // js code to appear signup and login form signUp.addEventListener("click", ( )=>< container.classList.add("active"); >); login.addEventListener("click", ( )=>< container.classList.remove("active"); >);If you face any difficulties while creating your Login and Registration Form or your code is not working as expected, you can download the source code files for this Login and Registration Page for free by clicking on the download button, and you can also view a live demo of this card slider by clicking on the view live button.
- TAGS
- Animated Login & Registration Form
- css form
- Form Design
- free login form template
- free registration form template
- HTML and CSS
- HTML CSS JavaScript
- HTML Form
- login & signup form with source code