Android List View
Android ListView is a view which groups several items and display them in vertical scrollable list. The list items are automatically inserted to the list using an Adapter that pulls content from a source such as an array or database.
List View
An adapter actually bridges between UI components and the data source that fill data into UI Component. Adapter holds the data and send the data to adapter view, the view can takes the data from adapter view and shows the data on different views like as spinner, list view, grid view etc.
The ListView and GridView are subclasses of AdapterView and they can be populated by binding them to an Adapter, which retrieves data from an external source and creates a View that represents each data entry.
Android provides several subclasses of Adapter that are useful for retrieving different kinds of data and building views for an AdapterView ( i.e. ListView or GridView). The common adapters are ArrayAdapter,Base Adapter, CursorAdapter, SimpleCursorAdapter,SpinnerAdapter and WrapperListAdapter. We will see separate examples for both the adapters.
ListView Attributes
Following are the important attributes specific to GridView −
This is the ID which uniquely identifies the layout.
This is drawable or color to draw between list items.
This specifies height of the divider. This could be in px, dp, sp, in, or mm.
Specifies the reference to an array resource that will populate the ListView.
android:footerDividersEnabled
When set to false, the ListView will not draw the divider before each footer view. The default value is true.
android:headerDividersEnabled
When set to false, the ListView will not draw the divider after each header view. The default value is true.
ArrayAdapter
You can use this adapter when your data source is an array. By default, ArrayAdapter creates a view for each array item by calling toString() on each item and placing the contents in a TextView. Consider you have an array of strings you want to display in a ListView, initialize a new ArrayAdapter using a constructor to specify the layout for each string and the string array −
ArrayAdapter adapter = new ArrayAdapter(this,R.layout.ListView,StringArray);
Here are arguments for this constructor −
- First argument this is the application context. Most of the case, keep it this.
- Second argument will be layout defined in XML file and having TextView for each string in the array.
- Final argument is an array of strings which will be populated in the text view.
Once you have array adapter created, then simply call setAdapter() on your ListView object as follows −
ListView listView = (ListView) findViewById(R.id.listview); listView.setAdapter(adapter);
You will define your list view under res/layout directory in an XML file. For our example we are going to using activity_main.xml file.
Example
Following is the example which will take you through simple steps to show how to create your own Android application using ListView. Follow the following steps to modify the Android application we created in Hello World Example chapter −
| Step | Description |
|---|---|
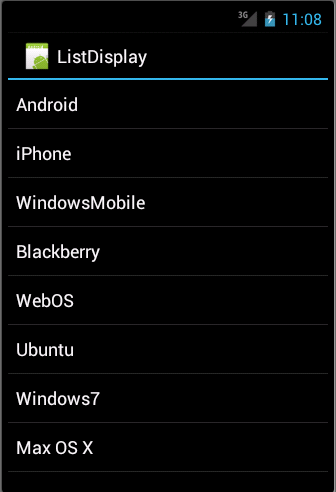
| 1 | You will use Android Studio IDE to create an Android application and name it as ListDisplay under a package com.example.ListDisplay as explained in the Hello World Example chapter. |
| 2 | Modify the default content of res/layout/activity_main.xml file to include ListView content with the self explanatory attributes. |
| 3 | No need to change string.xml, Android studio takes care of default string constants. |
| 4 | Create a Text View file res/layout/activity_listview.xml. This file will have setting to display all the list items. So you can customize its fonts, padding, color etc. using this file. |
| 6 | Run the application to launch Android emulator and verify the result of the changes done in the application. |
Following is the content of the modified main activity file src/com.example.ListDisplay/ListDisplay.java. This file can include each of the fundamental life cycle methods.
package com.example.ListDisplay; import android.os.Bundle; import android.app.Activity; import android.view.Menu; import android.widget.ArrayAdapter; import android.widget.ListView; public class ListDisplay extends Activity < // Array of strings. String[] mobileArray = ; @Override protected void onCreate(Bundle savedInstanceState) < super.onCreate(savedInstanceState); setContentView(R.layout.activity_main); ArrayAdapter adapter = new ArrayAdapter(this, R.layout.activity_listview, mobileArray); ListView listView = (ListView) findViewById(R.id.mobile_list); listView.setAdapter(adapter); > >
Following will be the content of res/layout/activity_main.xml file −
Following will be the content of res/values/strings.xml to define two new constants −
Following will be the content of res/layout/activity_listview.xml file −

Let’s try to run our modified Hello World! application we just modified. I assume you had created your AVD while doing environment set-up. To run the app from Android studio, open one of your project’s activity files and click Run icon from the tool bar. Android studio installs the app on your AVD and starts it and if everything is fine with your set-up and application, it will display following Emulator window −
SimpleCursorAdapter
You can use this adapter when your data source is a database Cursor. When using SimpleCursorAdapter, you must specify a layout to use for each row in the Cursor and which columns in the Cursor should be inserted into which views of the layout.
For example, if you want to create a list of people’s names and phone numbers, you can perform a query that returns a Cursor containing a row for each person and columns for the names and numbers. You then create a string array specifying which columns from the Cursor you want in the layout for each result and an integer array specifying the corresponding views that each column should be placed −
String[] fromColumns = ; int[] toViews = ;
When you instantiate the SimpleCursorAdapter, pass the layout to use for each result, the Cursor containing the results, and these two arrays −
SimpleCursorAdapter adapter = new SimpleCursorAdapter(this, R.layout.person_name_and_number, cursor, fromColumns, toViews, 0); ListView listView = getListView(); listView.setAdapter(adapter);
The SimpleCursorAdapter then creates a view for each row in the Cursor using the provided layout by inserting each from Columns item into the corresponding toViews view.
Урок 42. Список — ListView
Перед тем, как начать говорить про компонент ListView, предлагаю вспомнить еще раз прошлый урок и механизм построения списка, который мы там использовали. Мы перебирали массив данных, в каждой итерации создавали пункт списка, заполняли его данными и помещали в список.
При создании ListView создавать пункты за нас будет адаптер. Адаптеру нужны от нас данные и layout-ресурс пункта списка. Далее мы присваиваем адаптер списку ListView. Список при построении запрашивает у адаптера пункты, адаптер их создает (используя данные и layout) и возвращает списку. В итоге мы видим готовый список.
Есть различные типы списков и адаптеров. Мы пока что рассмотрим простейший вариант.
Project name: P0421_SimpleList
Build Target: Android 2.3.3
Application name: SimpleList
Package name: ru.startandroid.develop.p0421simplelist
Create Activity: MainActivity
Открываем main.xml и добавим на экран компонент ListView (вкладка Composite):
ListView – это и есть компонент списка.
Теперь надо создать адаптер. Открываем MainActivity.java и пишем:
package ru.startandroid.develop.p0421simplelist; import android.app.Activity; import android.os.Bundle; import android.widget.ArrayAdapter; import android.widget.ListView; public class MainActivity extends Activity < String[] names = < "Иван", "Марья", "Петр", "Антон", "Даша", "Борис", "Костя", "Игорь", "Анна", "Денис", "Андрей" >; /** Called when the activity is first created. */ public void onCreate(Bundle savedInstanceState) < super.onCreate(savedInstanceState); setContentView(R.layout.main); // находим список ListView lvMain = (ListView) findViewById(R.id.lvMain); // создаем адаптер ArrayAdapteradapter = new ArrayAdapter(this, android.R.layout.simple_list_item_1, names); // присваиваем адаптер списку lvMain.setAdapter(adapter); > >
Вы не поверите, но это весь код, необходимый для создания списка )
В качестве данных используем массив имен. В onCreate мы находим список, создаем адаптер и присваиваем адаптер списку. Давайте разберемся, как создали адаптер.
и передали ему следующие параметры:
this – контекст
android.R.layout.simple_list_item_1 – это системный layout-файл, который представляет собой TextView
names – массив данных, которые мы хотим вывести в список
Мы можем посмотреть содержимое использованного simple_list_item_1. Для этого в вашем проекте найдите пункт Android 2.3.3., раскройте его, и раскройте android.jar

Проматывайте в самый низ и открывайте res.layout.

И внутри находим используемый нами simple_list_item_1

Двойной клик на него и смотрим содержимое:
Обычный TextView с набором параметров.
Когда список при формировании запрашивает очередной пункт, адаптер берет этот Layout-ресурс simple_list_item_1, прогоняет его через LayoutInflater и получает View, преобразует View к TextView, присваивает ему текст из массива данных и отдает списку.
Все сохраним и запустим. Видим список из наших данных.

Использование системного layout-ресурса simple_list_item_1 хорошо тем, что нам не надо самим layout рисовать. Однако, если нас не устраивает то, как выглядит список с использованием simple_list_item_1 в качестве пункта списка, мы можем создать свой layout-ресурс.
Создадим layout-файл my_list_item.xml в папке res/layout нашего проекта:
TextView с указанием цвета и размера шрифта, выравнивания текста и отступов.
Изменим существующий код, укажем адаптеру наш созданный layout-ресурс my_list_item:
// создаем адаптер ArrayAdapter adapter = new ArrayAdapter(this, R.layout.my_list_item, names);
Теперь адаптер будет использовать его при создании пунктов списка.
Все сохраним и запустим. Видим наш зеленый список:

В layout-ресурсе для пункта списка вместо TextView вы можете использовать какой-нибудь его производный класс – например Button. Главное, чтобы объект прошел преобразование к TextView. Адаптер присвоит ему текст методом setText и отдаст списку.
Немного про Context
На одном из прошлых уроков я говорил, что Context (контекст) используется для доступа к базовым функциям приложения. В этом уроке у нас получилось хорошее подтверждение этим словам.
ArrаyAdapter использует LayoutInflater, чтобы конвертнуть layout-ресурс в View. Но получение объекта LayoutInflater – это одна из базовых функций и она недоступна для класса ArrаyAdapter. Поэтому мы в ArrаyAdapter в качестве контекста передаем ссылку на Activity (Activity имеет доступ к базовым функциям через восходящую иерархию классов). А класс ArrayAdapter внутри себя использует переданный ему контекст, чтобы вызвать LayoutInflater. Без контекста он не смог бы это сделать.
— используем список ListView для одиночного и множественного выбора элементов
public ArrayAdapter (Context context, int textViewResourceId, T[] objects)
Присоединяйтесь к нам в Telegram:
— в канале StartAndroid публикуются ссылки на новые статьи с сайта startandroid.ru и интересные материалы с хабра, medium.com и т.п.
— в чатах решаем возникающие вопросы и проблемы по различным темам: Android, Compose, Kotlin, RxJava, Dagger, Тестирование, Performance
— ну и если просто хочется поговорить с коллегами по разработке, то есть чат Флудильня