- Saved searches
- Use saved searches to filter your results more quickly
- License
- TomSchimansky/CustomTkinter
- Name already in use
- Sign In Required
- Launching GitHub Desktop
- Launching GitHub Desktop
- Launching Xcode
- Launching Visual Studio Code
- Latest commit
- Git stats
- Files
- Readme.md
- About
- Красивое оформление tkinter python
- Определение и применение стилей
- Имена стилей
- Расширение встроенных стилей
- Применение стиля ко всем виджетам
- Using themes in tkinter
- So, how can I use themes in tkinter?
- Theming with a Style object
- Using the built-in themes
- Using a tcl theme file
- Using a theme package
- Using the ttkthemes package
- Usage of ttkthemes
Saved searches
Use saved searches to filter your results more quickly
You signed in with another tab or window. Reload to refresh your session. You signed out in another tab or window. Reload to refresh your session. You switched accounts on another tab or window. Reload to refresh your session.
A modern and customizable python UI-library based on Tkinter
License
TomSchimansky/CustomTkinter
This commit does not belong to any branch on this repository, and may belong to a fork outside of the repository.
Name already in use
A tag already exists with the provided branch name. Many Git commands accept both tag and branch names, so creating this branch may cause unexpected behavior. Are you sure you want to create this branch?
Sign In Required
Please sign in to use Codespaces.
Launching GitHub Desktop
If nothing happens, download GitHub Desktop and try again.
Launching GitHub Desktop
If nothing happens, download GitHub Desktop and try again.
Launching Xcode
If nothing happens, download Xcode and try again.
Launching Visual Studio Code
Your codespace will open once ready.
There was a problem preparing your codespace, please try again.
Latest commit
Git stats
Files
Failed to load latest commit information.
Readme.md
CustomTkinter is a python UI-library based on Tkinter, which provides new, modern and fully customizable widgets. They are created and used like normal Tkinter widgets and can also be used in combination with normal Tkinter elements. The widgets and the window colors either adapt to the system appearance or the manually set mode (‘light’, ‘dark’), and all CustomTkinter widgets and windows support HighDPI scaling (Windows, macOS). With CustomTkinter you’ll get a consistent and modern look across all desktop platforms (Windows, macOS, Linux).

| complex_example.py on Windows 11 with dark mode and ‘blue’ theme

| complex_example.py on macOS in light mode and standard ‘blue’ theme
Install the module with pip:
pip3 install customtkinter Update existing installation: pip3 install customtkinter —upgrade
(update as often as possible because this library is under active development)
The official documentation can be found here:
To test customtkinter you can try this simple example with only a single button:
import customtkinter customtkinter.set_appearance_mode("System") # Modes: system (default), light, dark customtkinter.set_default_color_theme("blue") # Themes: blue (default), dark-blue, green app = customtkinter.CTk() # create CTk window like you do with the Tk window app.geometry("400x240") def button_function(): print("button pressed") # Use CTkButton instead of tkinter Button button = customtkinter.CTkButton(master=app, text="CTkButton", command=button_function) button.place(relx=0.5, rely=0.5, anchor=customtkinter.CENTER) app.mainloop()
which results in the following window on macOS:

In the examples folder, you can find more example programs and in the Documentation you can find further information on the appearance mode, scaling, themes and all widgets.
More Examples and Showcase
Appearance mode change and scaling change
CustomTkinter can adapt to the Windows 10/11 light or dark mode:
| complex_example.py on Windows 11 with system appearance mode change and standard ‘blue’ theme
On macOS you either need python3.10 or higher or the anaconda python version to get a dark window header (Tcl/Tk >= 8.6.9 required):
| complex_example.py on macOS with system appearance mode change, user-scaling change and standard ‘blue’ theme
It’s possible to put an image on a CTkButton. You just have to pass a PhotoImage object to the CTkButton with the image argument. If you want no text at all you have to set text=»» or you specify how to position the text and image at once with the compound option:

| image_example.py on Windows 11

Scrollable frames are possible in vertical or horizontal orientation and can be combined with any other widgets. | scrollable_frame_example.py on Windows 11
Integration of TkinterMapView widget
In the following example I used a TkinterMapView which integrates well with a CustomTkinter program. It’s a tile based map widget which displays OpenStreetMap or other tile based maps:
| examples/map_with_customtkinter.py from TkinterMapView repository on Windows 11
You can find the TkinterMapView library and example program here: https://github.com/TomSchimansky/TkinterMapView
About
A modern and customizable python UI-library based on Tkinter
Красивое оформление tkinter python
Стиль описывает внешний вид виджета. За установку стиля в виджетах отвечает параметр style . Встроенные виджеты по умолчанию применяют некоторые встроенные стили. В частности, все кнопки применяют стиль TButton, который описывает, как выглядят кнопки. Каждый стиль имеет имя. При создании, изменении или применении стиля к виджетам, необходимо знать его имя.
Чтобы узнать стиль определенного виджета, можно обратиться к его параметру style :
label = ttk.Label(text="Hello World") label.pack(anchor=CENTER, expand=1) print(label["style"])
Если возвращается пустая строка, то значит, что к виджету применяется стиль по умолчанию. В этом случае название стиля можно получить с помощью метода winfo_class() :
label = ttk.Label(text="Hello World") print(label.winfo_class()) # TLabel
Как правило, встроенные стили называются по имени класса виджета и предваряются буквой T. Например, для виджета Label — стиль TLabel, для Button — TButton.
Определение и применение стилей
Стиль в Tkinter представляет объект Style . У данного объект есть метод configure() , который позволяет настроить стиль
from tkinter import * from tkinter import ttk root = Tk() root.title("METANIT.COM") root.geometry("250x200") label_style = ttk.Style() label_style.configure("My.TLabel", # имя стиля font="helvetica 14", # шрифт foreground="#004D40", # цвет текста padding=10, # отступы background="#B2DFDB") # фоновый цвет label = ttk.Label(text="Hello World", style="My.TLabel") label.pack(anchor=CENTER, expand=1) root.mainloop() 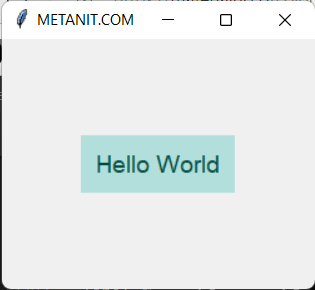
Здесь создается стиль в виде объекта label_style. В методе configure() первым параметром передается имя стиля — в даннои случае «My.TLabel». Все остальные параметры настраивают различные аспекты стиля, так здесь устанавливаются шрифт, цвет фона и текста и отступы.
label_style.configure("My.TLabel", # имя стиля font="helvetica 14", # шрифт foreground="#004D40", # цвет текста padding=10, # отступы background="#B2DFDB") # фоновый цвет Затем применяем этот стиль, передавая его параметру style :
label = ttk.Label(text="Hello World", style="My.TLabel")
Имена стилей
Имя создаваемых стилей имеют следующий формат:
новый_стиль.встроенный_стиль
Например, в примере выше название стиля «My.TLabel» указывает, что фактически он называется «My» и наследуется от «TLabel». И те параметры, которые не будут явным образом определены, будут унаследованы от родительского стиля «TLabel»
Расширение встроенных стилей
Вместо создания новых стилей можно просто изменить отдельные характеристики уже существующих:
from tkinter import * from tkinter import ttk root = Tk() root.title("METANIT.COM") root.geometry("250x200") ttk.Style().configure("TLabel", font="helvetica 13", foreground="#004D40", padding=8, background="#B2DFDB") ttk.Label(text="Hello World!").pack(anchor=NW, padx=6, pady=6) ttk.Label(text="Bye World..").pack(anchor=NW, padx=6, pady=6) root.mainloop() 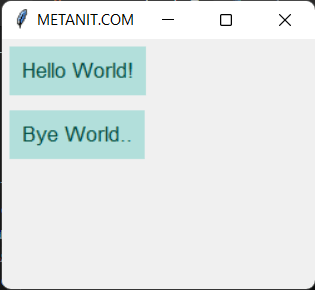
В данном случае изменяется встроенный стиль TLabel. Он применяется к меткам по умолчанию, поэтому данный стиль не надо явным образом устанавливать для меток.
Применение стиля ко всем виджетам
Выше стиль применялся к меткам Label, к другим же типам виджетов он не применялся. Если же мы хотим, чтобы у нас был бы общий стиль для всех типов виджетов, то в метод configure() в качестве имени стиля передается «.»
from tkinter import * from tkinter import ttk root = Tk() root.title("METANIT.COM") root.geometry("250x200") ttk.Style().configure(".", font="helvetica 13", foreground="#004D40", padding=8, background="#B2DFDB") ttk.Label(text="Hello World!").pack(anchor=NW, padx=6, pady=6) ttk.Button(text="Click").pack(anchor=NW, padx=6, pady=6) root.mainloop() Подобный стиль также не надо явно применять, он применяется автоматически ко всем виджетам
Using themes in tkinter

Tkinter looks terrible by default.
But you can easily make it look modern. Never heard of it? Not surprising, no one talks about it, but now you can learn it!
So, how can I use themes in tkinter?
- Using a Style object to set one of the built-in or third-party themes, or
- Using the ttkthemes package, which contains many different themes, and makes them really easy to use
Theming with a Style object
Using the built-in themes
- alt
- clam
- classic
- default
- vista
- winnative
- xpnative
If you want to use a builtin theme, you don’t need to do too much
style = ttk.Style() style.theme_use("clam") # clam is a quite nice theme Using a tcl theme file
If you have a theme with a single tcl file, you have to import it with tcl calls. You can do it on any tkinter widget, here we use the root window for this purpose. A full list of third-party themes can be found here.
To import the file we can use the source keyword. After which we put the path of our file.
Now this file gets executed, just like a Python script, and it created a theme that we can set just like a built-in theme.
style = ttk.Style() root.tk.call("source", "azure.tcl") style.theme_use("azure") Using a theme package
There are packages that contain multiple themes, such as awthemes and scid themes. They contain a pkgIndex.tcl file, which is quite the same as __init__.py in python.
First, we need to add the path of this folder into Tcl’s auto_path (same, as sys.path in python).
lappend auto_path "path/to/awthemes") Then we can just simply import a theme from the package, in this case awdark . Now, that the theme is created, we can set the theme as in the other cases. Fiunally the code looks like this:
style = ttk.Style() root.tk.call("lappend", "auto_path", "path/to/awthemes") root.tk.call("package", "require", "awdark") style.theme_use("awdark") Using the ttkthemes package
The ttkthemes package gives you more than 30 different themes (most of them are pretty ugly), collected from different creators, and you can dinamically modify them, if you want to tweak it at runtime.
Ttkthemes is a quite popular package, and it has several very useful features, on which you can find detailed documentation here.
The installation is very straightforward. Just one pip command, and all the themes are installed on your machine.
Usage of ttkthemes
Now let’s see how you can use it.
We don’t even have to import tkinter anymore, because everything that’s needed from it is included in ttkthemes. We will use ttk widgets, because remember, only these can be themed.
We’ll use the ThemedTk object instead of tkinter.Tk , this allows us to easily set the appearance of the entire tkinter app.
If you are interested in what themes are available in ttkthemes, you can easily find out with
You can set the application theme with a parameter when creating the ThemedTk instance, or use the set_theme method for this purpose. Of course, you can change theme using the config method, or you can query the current theme using cget .
from tkinter import ttk from ttkthemes import ThemedTk root = ThemedTk(theme="arc") button = ttk.Button(root, text="Quit", command=lambda: root.config(theme="breeze")) button.pack(pady=20) root.mainloop()