- Saved searches
- Use saved searches to filter your results more quickly
- License
- gc986/kotlin-helloworld
- Name already in use
- Sign In Required
- Launching GitHub Desktop
- Launching GitHub Desktop
- Launching Xcode
- Launching Visual Studio Code
- Latest commit
- Git stats
- Files
- README.md
- Tutorial: Create your first Kotlin application
- Create a new project
- Write code
- Run code from IntelliJ IDEA
- Package as JAR
- Run the JAR
- Run from IntelliJ IDEA
- Run from CLI
Saved searches
Use saved searches to filter your results more quickly
You signed in with another tab or window. Reload to refresh your session. You signed out in another tab or window. Reload to refresh your session. You switched accounts on another tab or window. Reload to refresh your session.
Пишем свой HelloWorld на Kotlin
License
gc986/kotlin-helloworld
This commit does not belong to any branch on this repository, and may belong to a fork outside of the repository.
Name already in use
A tag already exists with the provided branch name. Many Git commands accept both tag and branch names, so creating this branch may cause unexpected behavior. Are you sure you want to create this branch?
Sign In Required
Please sign in to use Codespaces.
Launching GitHub Desktop
If nothing happens, download GitHub Desktop and try again.
Launching GitHub Desktop
If nothing happens, download GitHub Desktop and try again.
Launching Xcode
If nothing happens, download Xcode and try again.
Launching Visual Studio Code
Your codespace will open once ready.
There was a problem preparing your codespace, please try again.
Latest commit
Git stats
Files
Failed to load latest commit information.
README.md
Пишем свой HelloWorld на Kotlin
Чем интересен Kotlin? Это современный язык программирования который компилируется в обычный Java байт код и выполняется, соответственно, на обычной виртуальной Java машине. Основную популярность обрёл после объявления основным языком разработки для OS Android. Это был вынужденный шаг, так как корпорация Google столкнулась с противодействием Oracle, владелицей патентов на технологии Java, при внедрении современных версий Java. Развитие Java (на платформе Android) остановилось на версии 7 (для сравнения, сейчас актуальна версия 17). Конечно была внедрена частичная поддержка Java 8, но этого было очень мало и без каких либо дальнейших перспектив. Чтобы преодолеть платформозависимый Java кризис, на помощь пришёл JetBrains, который предложил свою технологию Kotlin. Kotlin является современным, динамично развивающимся языком программирования, который имеет все современные плюшки и фичи, но при этом байт код компилируется для обычной Java машины без необходимости использовать патенты регулирующие современные Java технологии.
Основным инструментом для написания Kotlin программ является IDE (интегрированная среда разработки) IntelliJ IDEA. Данное приложение разрабатывается компанией Jetbrains из Санкт-Петербурга. Также она является базовым IDE для среды разработки Android Studio(да да, именно так, ребята из Питера делаю всемирноизвестный инструмент).

- Идём сюда и качаем свежую версию IDEA CommunityEdition -https://www.jetbrains.com/idea/download/, для своей операционной системы, конечно (Linux, Win, Mac). Нужен именно Community так как её функциональности нам за глаза, а платить ничего не нужно. Это версия для общественного некоммерческого использования. Устанавливаем как обычно.
- Запускаем установленную версию. В появившемся окне списка проектов выбираем пункт «New Project».
В появившемся окне «New Project» выбираем:
В левом меню — «Kotlin» ->
Указываем имя проекта «HelloKotlinWorld» ->
Выбираем папку для хранения проекта или оставляем как есть ->
Выбираем «Project Template» как «Application» ->
Далее выбираем «Build System» как «Gradle Kotlin». Данная штука будет собирать для нас проект ->
Выбираем «Project JDK». В моём случае это будет «14 java version ‘14.0.2’», у вас возможно что-то другоеПосле этого нажимаем «Next». В появившемся окне оставляем всё как есть и нажимаем Finish. Откроется окно редактора.


- 3) Переходим в локацию проекта и нажимаем правой кнопкой мыши на папке «Kotlin» и в выпадающем меню выбираем «New -> Kotlin Class/File». В появившемся меню выбираем «File» и указываем имя файла «main.kt». Откроется окно/вкладка редактора кода, в котором мы будем создавать наше приложение.
4) В редакторе пишем следующий код:
Разберём что мы написали:
— fun — это объявление функции. Просто объявление и больше ничего. Далее идут скобки в которых можно перечислисть входные параметры функции. В нашем случае они пустые, так как у нашей функции нет входных параметров.
— Символы » » являются операторными скобками. Операторные скобки, это специальные символы (или как в паскале, команды begin и end) которые огораживают логические куски кода, которые выполнают некие алгоритмы.
— Команда «println(«Hello Kotlin World»)» выводит на экран строку текста (которую получает в качестве параметра) и переводит коретку курсора на следющую строку. В нашем случае программа пишет текст «Hello Kotlin World».


Если вы всё сделали правильно, проект соберётся и запустится. В результате вы сможете видеть нашу строку «Hello Kotlin World» в консоли выполнения программы.
Всё, поздравляю, вы написали своё первое приложение на языке программирования Kotlin 🙂
Tutorial: Create your first Kotlin application
You can choose to build your app with one of the four supported build tools.
The instructions are provided for Gradle and Kotlin as DSL. To learn how to accomplish the same using other build tools, use the Build tool switcher at the top of the page.
The instructions are provided for Gradle and Groovy as DSL. To learn how to accomplish the same using other build tools, use the Build tool switcher at the top of the page.
The instructions are provided for Maven. To learn how to accomplish the same using other build tools, use the Build tool switcher at the top of the page.
The instructions are provided for IntelliJ IDEA build tool. To learn how to accomplish the same using other build tools, use the Build tool switcher at the top of the page.
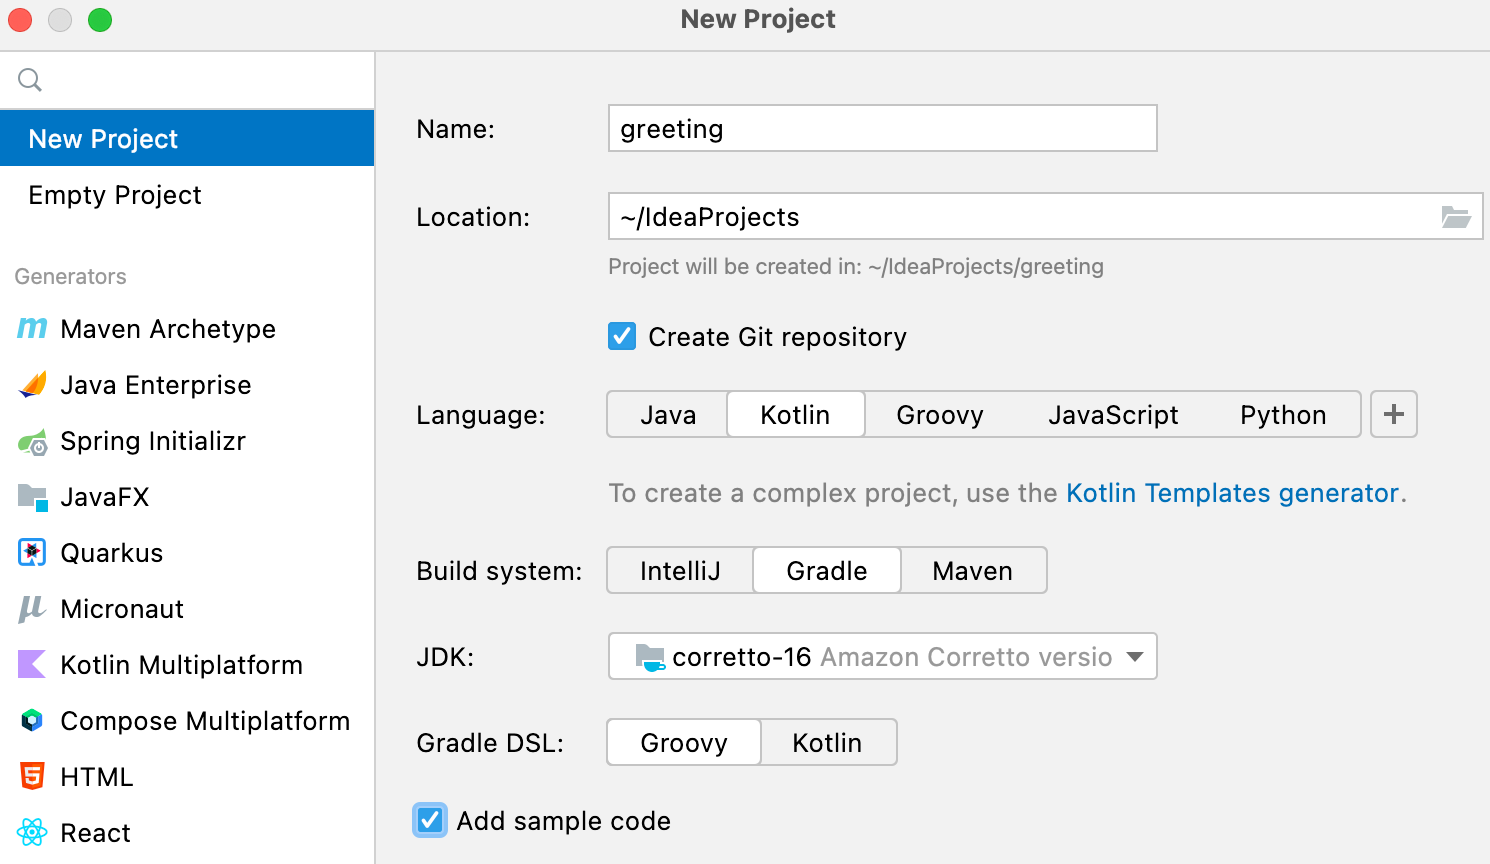
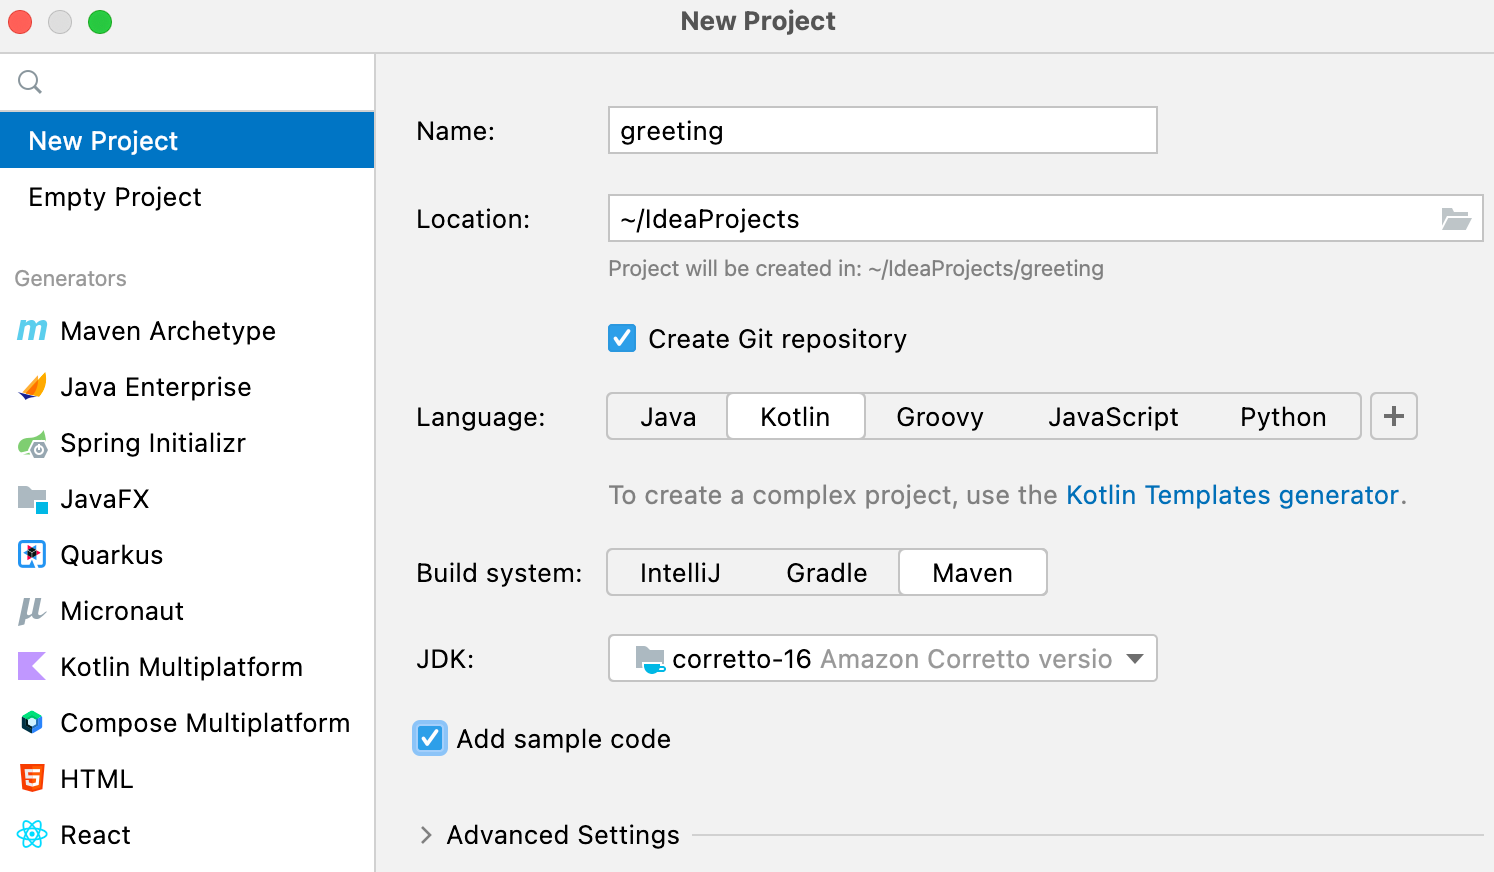
Create a new project
In IntelliJ IDEA, a project helps you organize everything that is necessary for developing your application in a single unit.
- On the Welcome screen, click New Project . Otherwise, from the main menu, select File | New | Project .
- From the list on the left, select New Project .
- Name your new project and change its location if necessary.
- Select the Create Git repository checkbox to place the new project under version control. You will be able to do it later at any time.
- From the Language list, select Kotlin .
- Select the Gradle IntelliJ Maven build system.
- Choose the Groovy Kotlin language for the build script.
- From the JDK list, select the JDK that you want to use in your project. If the JDK is installed on your computer, but not defined in the IDE, select Add JDK and specify the path to the JDK home directory. If you don’t have the necessary JDK on your computer, select Download JDK .
- Enable the Add sample code option to create a file with a sample Hello World! application.


- Click Create .


Write code
Source code is the central part of your project. In source code, you define what your application will be doing. Real projects may be very big and contain hundreds of thousands lines of code. In this tutorial we are going to start with a simple three-line application that asks the user their name and greets them.
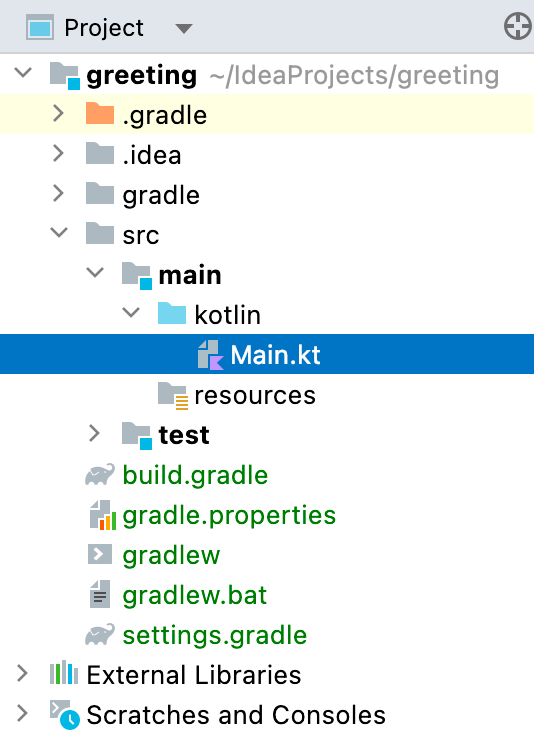
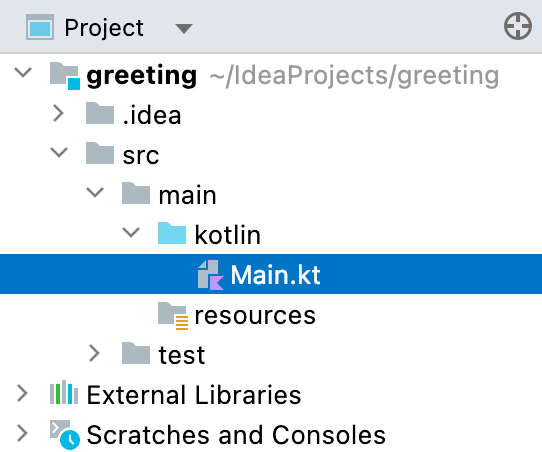
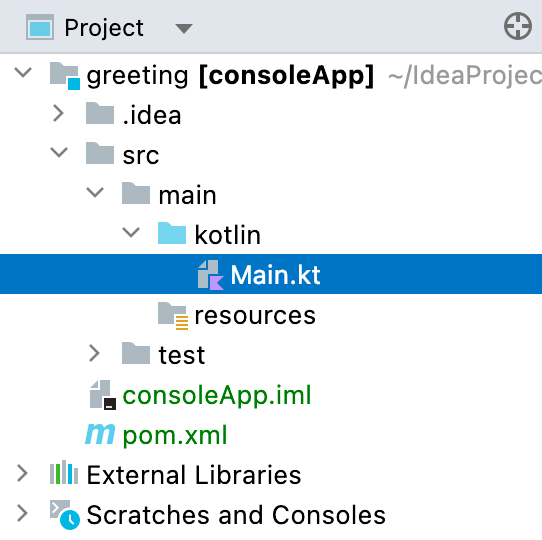
- In the Project tool window on the left, expand the node named after your project and open the /src/main/kotlin/main.kt file.


- The file only contains the main() function with print statements. This function is the entry point of your program. Replace the Hello World! sample with the following code snippet:


 This feature is called live templates. To learn about other available live templates or configure your own, go to Settings | Editor | Live Templates | Kotlin .
Now we have a working code that reads the username from the console, stores it in a read-only variable, and outputs a greeting using the stored value.
Run code from IntelliJ IDEA
Let’s verify that our program works as expected.
IntelliJ IDEA allows you to run applications right from the editor. You don’t need to worry about the technical aspect because IntelliJ IDEA automatically does all the necessary preparations behind the scenes.

- Click the Run icon in the gutter and select Run ‘MainKt’ or press Ctrl+Shift+F10 .
When the program has started, the Run tool window opens, where you can review the output and interact with the program.

Package as JAR
At this point, you know how to write code and run it from IntelliJ IDEA, which is convenient in the development process. However, this is not the way the users are supposed to run applications. For the users to run it on their computers, we are going to build and package the application as a jar file.
JAR is a file format for distributing applications as a single file.
Building the app includes the following steps:
- Compiling the sources – in this step, you translate the code you’ve just written into JVM bytecode. The compiled sources have the .class extension.
- Bundling the dependencies – for the application to function correctly, we need to provide the libraries it depends on. The only required library for this project is Kotlin runtime, but still, it needs to be included. Otherwise, the users will have to provide it themselves every time they run the program, which is not very convenient.
Both the compiled sources and the dependencies end up in the resulting .jar file. The result of the build process such as .jar file is called an artifact .
The instructions are provided for Gradle and Kotlin as DSL. To learn how to accomplish the same using other build tools, use the Build tool switcher at the top of the page.
The instructions are provided for Gradle and Groovy as DSL. To learn how to accomplish the same using other build tools, use the Build tool switcher at the top of the page.
The instructions are provided for Maven. To learn how to accomplish the same using other build tools, use the Build tool switcher at the top of the page.
The instructions are provided for IntelliJ IDEA build tool. To learn how to accomplish the same using other build tools, use the Build tool switcher at the top of the page.
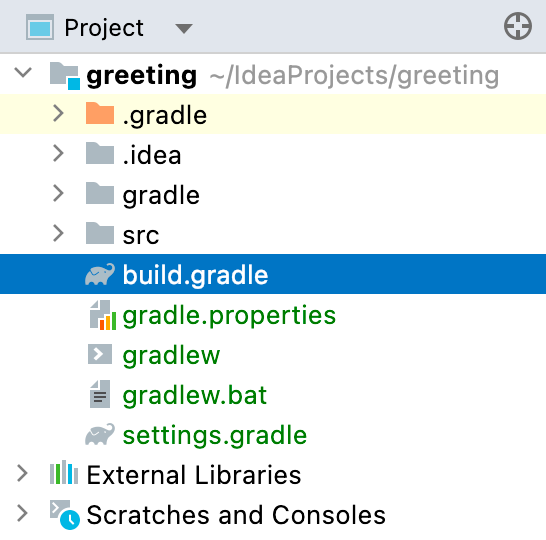
- Open the build.gradle.kts build.gradle script.

 The build script is the file that tells the build tool how exactly to build the project. The build script is the file that tells the build tool how exactly to build the project. It is written in Kotlin just like the source code of your program.
 - In the build script, add the following task definition:

tasks.jar < manifest < attributes["Main-Class"] = "MainKt" >configurations[«compileClasspath»].forEach < file: File ->from(zipTree(file.absoluteFile)) > duplicatesStrategy = DuplicatesStrategy.INCLUDE >

The manifest section specifies the entry point of the program, and the rest tells the build tool to recursively scan the project for dependencies and include them in the build.
The resulting JAR appears in the build/libs directory.

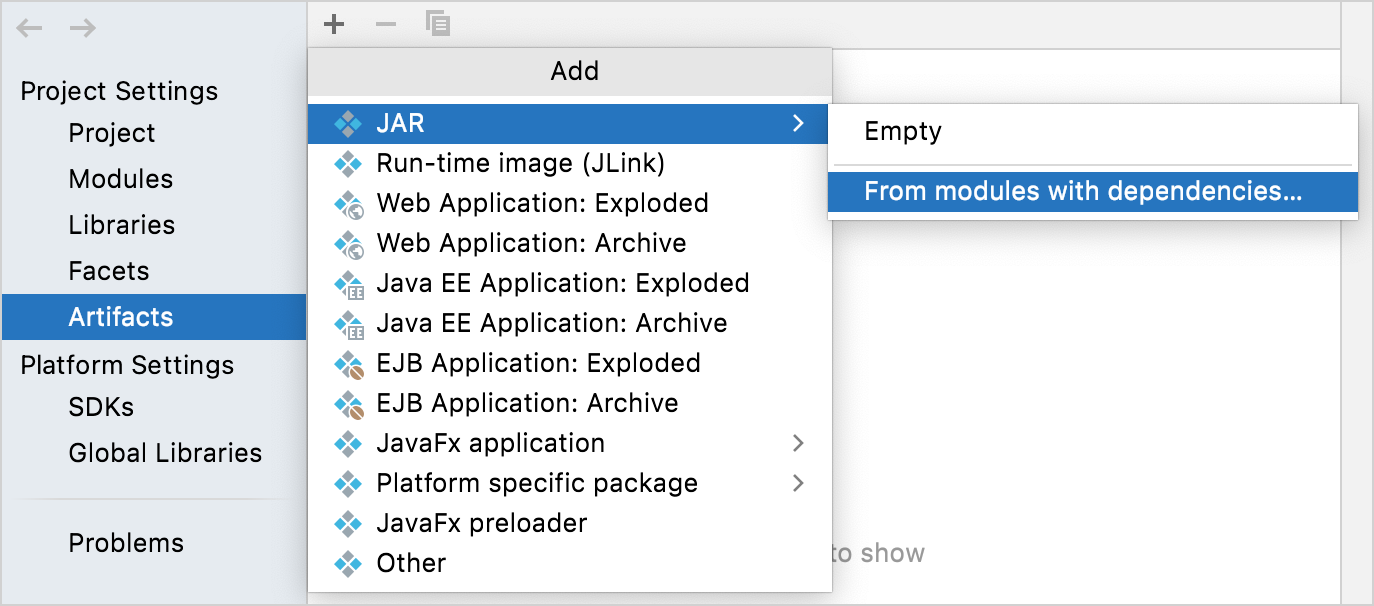
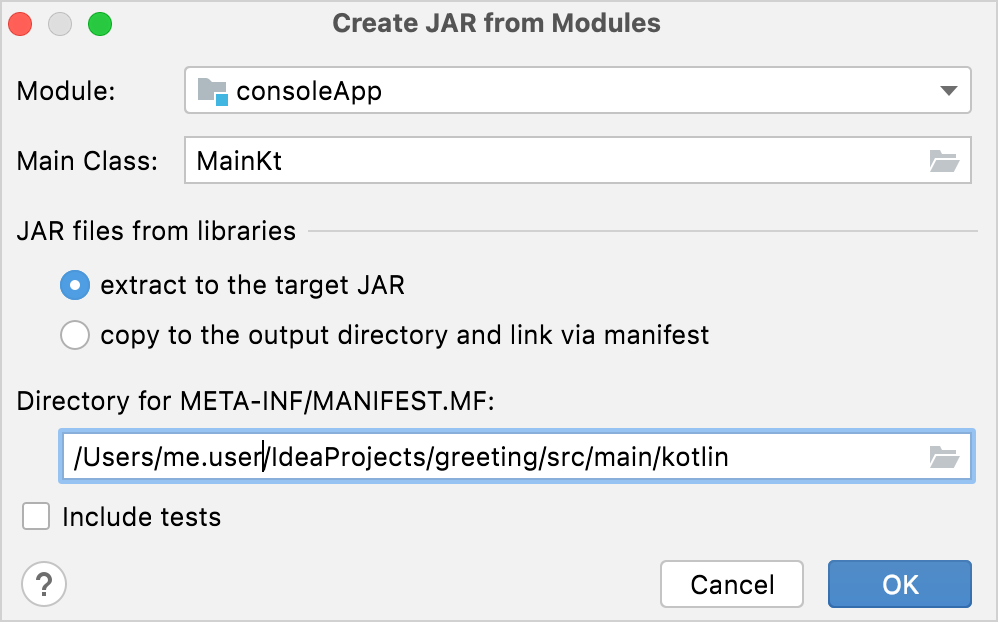
- Go to File | Project Structure Ctrl+Alt+Shift+S and open the Artifacts tab.
- Click Add , then JAR , then From modules with dependencies .

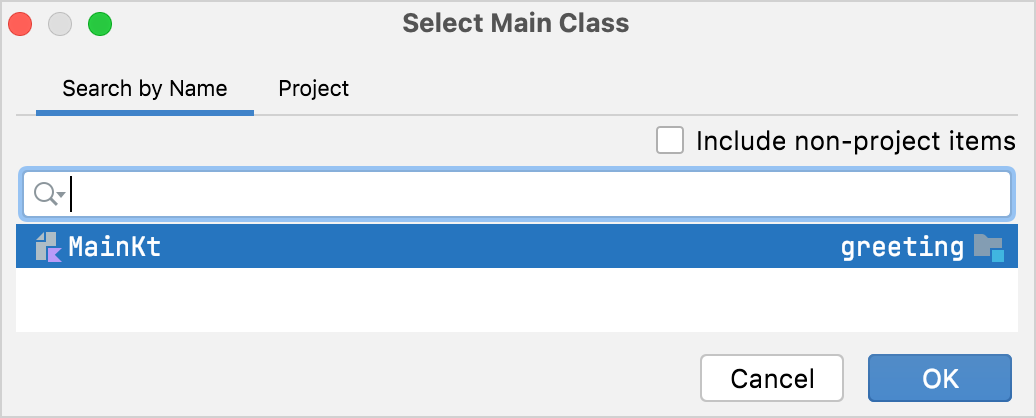
- In the Main Class field, click the Browse button, and select Main.kt as the main class. Specify the absolute path to /src/main/resources as the manifest directory, for example: /Users/me.user/IdeaProjects/greeting/src/main/resources

- Click OK in the Create JAR from Modules dialog.


- Click OK in the Project Structure dialog.
- From the main menu, select Build | Build Artifacts , then click Build .


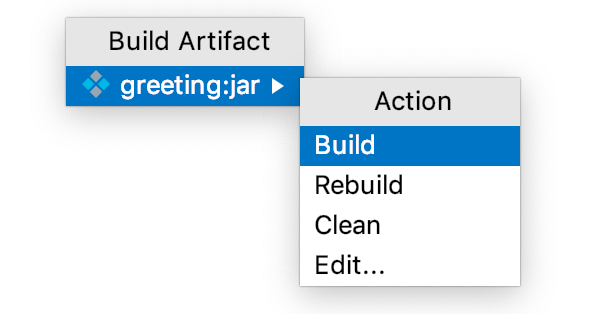
The resulting JAR appears in the out/artifacts directory.

Run the JAR
Run from IntelliJ IDEA
- In the Project tool window, right-click the .jar file and select Run . This is a quick way to run a .jar file from IntelliJ IDEA.
Run from CLI
- Open the terminal and from the containing folder, run: java -jar consoleApp.jar java -jar greeting.jar java -jar greeting-1.0-SNAPSHOT.jar This is how the users of your application would run it. JDK 1.8 or later is required to run the .jar