- Calculator Program in Java Swing/JFrame with Source Code
- Simple Calculator Program in Java Using Swing
- Creating a New Calculator Project in NetBeans
- Creating Display Window for Calculator
- How to Build a Simple Calculator in Java Using Netbeans – Step by Step with Screenshots
- Random Codes
- Create a Simple GUI based Calculator in NetBeans
Calculator Program in Java Swing/JFrame with Source Code
Hello friends, today we will learn how we can create a Simple Calculator Program in Java Using Swing with Source Code. This is going to be our first application using swing programming, where we will develop a simple calculator using Swing. This is going to be a simple Java GUI calculator project which will perform basic arithmetic operations like addition, subtraction, multiplication, division, etc. It can also be used for finding the square, square root, and reciprocal of any number.
Before starting this tutorial, I assume that you have the basic concept of swing components, and also you should have the idea of JButton Click Event , which means the response of a button when we click on it. If you already know about the Basics, then we can move ahead to create a calculator using swing components in Java.
I will use NetBeans IDE(integrated development environment) for the coding part of my calculator program. You can use any IDE like IntelliJ IDEA, Eclipse or you can just use notepad++ to code your program. It doesn’t matter whatever IDE or editor you will use the programming logic will be the same.
So friends, lets get started with our tutorial Simple Calculator Program in Java Using Swing or can say simple calculator program in Java using JFrame/frame step by step. You can also download the Java Calculator Source Code at the end of this tutorial.
Watch Video Tutorial
Simple Calculator Program in Java Using Swing
Creating a New Calculator Project in NetBeans
First of all, we need to create a new project in Netbeans. For this, follow these steps.
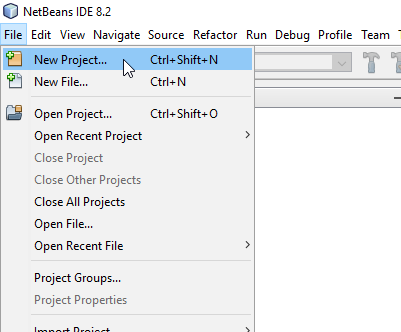
- Open the NetBeans IDE and then click on the File menu and then select New Project.
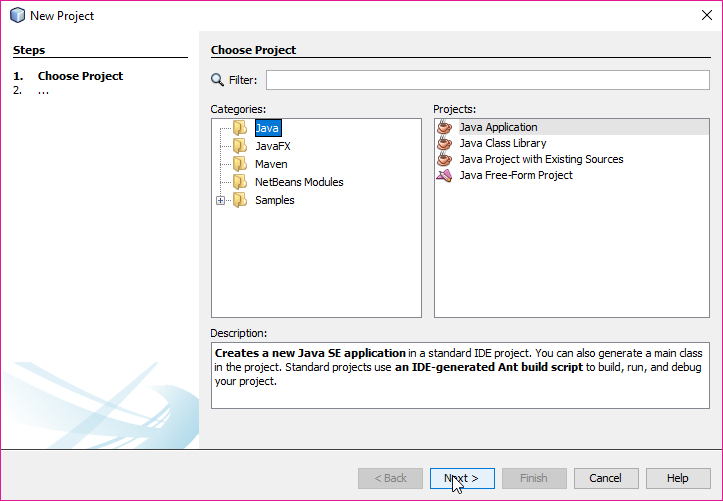
- After that, a window will be opened. From there, select Java in categories and Java Application in projects and then click on the Next Button.
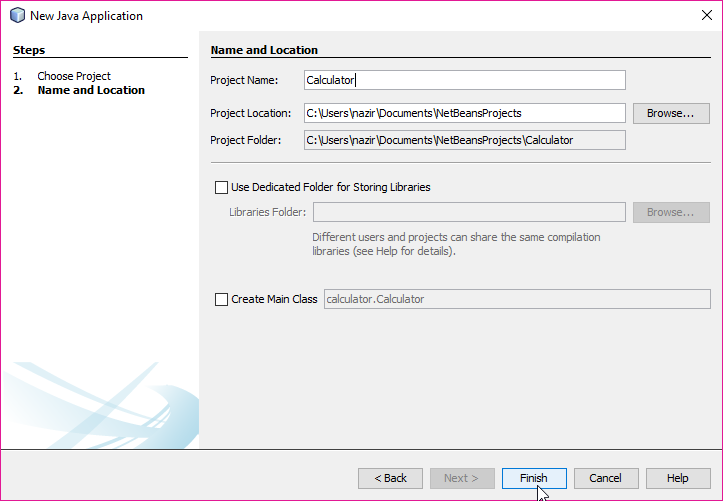
- After you click on the Next button again a new window will be opened and there you have to give the name of the Project (Calculator in this Example) and also uncheck the create Main class option.
- Then click on the Finish Button.
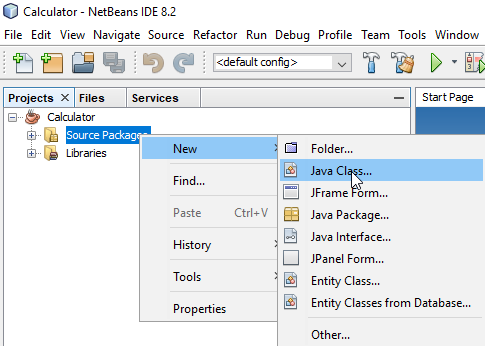
- Now expand your project using the + icon and right-click on the source packages.
- Then select new>>Java class.
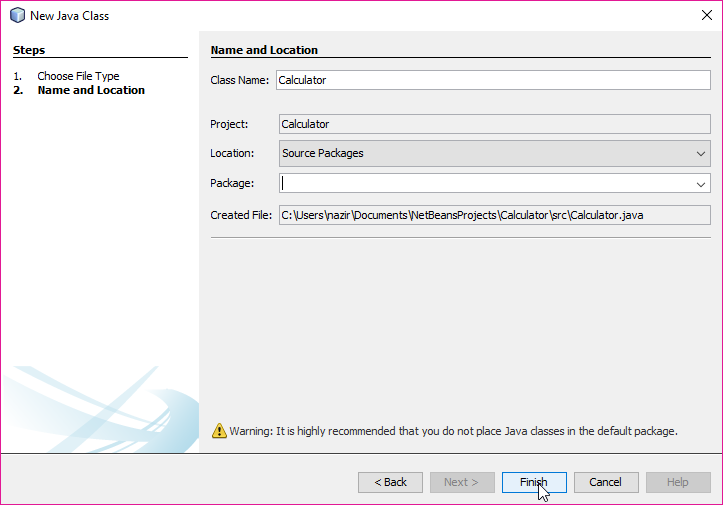
- A new window will be opened where you have to give the name of your Java class (Calculator in this Example).
- Then click on the Finish button.
Creating Display Window for Calculator
Now we will create a display window or frame for our calculator.
- Create an object of the JFrame class and set some of its properties like its title, visibility, background color, layout property etc. using the method of the JFrame class.
How to Build a Simple Calculator in Java Using Netbeans – Step by Step with Screenshots
This tutorial would take you through the procedure of building a simple calculator in Java. So I would advice, you print it out and follow the instructions. If you are completely new to Java and Netbeans you can take these two lessons:
You can print out this page so that you can easily follow along (you can also open it in a different display)

Step 2: Add a JFrame Form to the Application
Right-click on the name of the application in the Projects tab by the left of the window and Choose New > JFrame Form
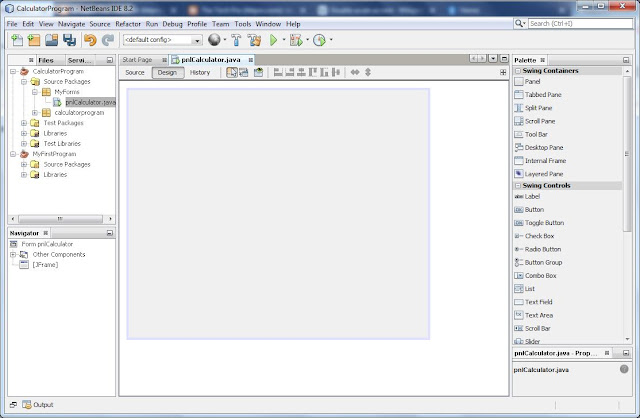
Enter the name pnlCalculator next to the Class Name and click on Finish. You can see that the form is added as shown below
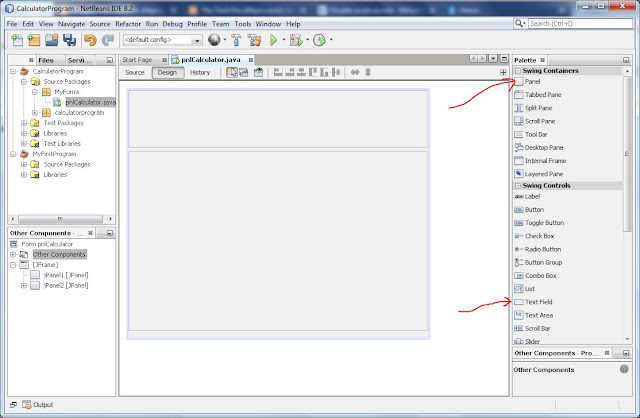
Step 3: Add two JPanels to the form and then resize and position them as shown. You can get Panels at the right hand side in the palettes tab.
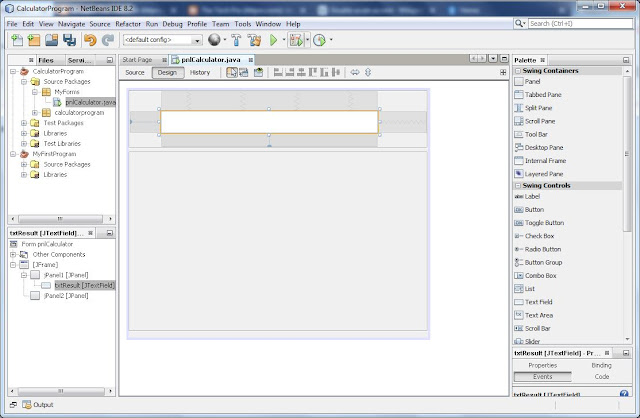
Step 4a: Place a TextField in the Form
See Step 4b to delete the jTextField1.
You need to place a TextField on the form, by clicking on TextField from the Palette and clicking in the upper part of the form. Drag to position it as shown in the figure below.
Step 4b: Modify TextField
Right-click on the TextField and click on Edit Text. Delete the text there.
Right-click again and click on ‘Change Variable Name…’.
Delete what is there and enter txtResult
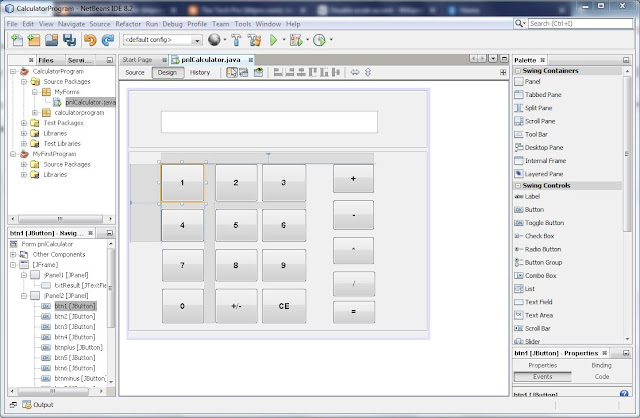
Step 5: Place and Buttons on the Form. (Don’t change the name here) You can find buttons on the palette tab. Just add the button, resize them until you have enough buttons on the screen
Step 6: Change the text of the buttons
To change the name of a button, right click on the button and choose “Edit Text”. For button 1, just type 1, for button 2, type 2 and so on exactly as it appears below.
At the end of this step, your form would look like this
Step 7: Change the Variable Names of the buttons.
To do that, right-click on a button and click “Change Variable Name“. Change the names according to the outline below. You need to carefully enter the names correctly, otherwise the program may have issues
1- btn1
2 – btn2
3 – btn3
4 – btn4
5 – btn5
6 – btn6
7 – btn7
8 – btn8
9 – btn9
0 – btn0
+/- btnPlusMinus
CE – btnClear
+ – btnPlus
– btnMinus
/ btnDivision
* btnMultiplication
Step 8: Preview your design
Click on the Projects tab, locate the name of the Form. In this case it is pnlCalculator.java. Right-click on it and click on Run File.

You wait for a couple of seconds and if you did everything correctly, the form below would be displayed.

You can then close the preview form.
Step 9: View your source code and locate where you will write your first code. Once in the code view, you can scroll up a little to find the position where you would write your first code.

Step 10: Type the code below in the position you identified in Step 9. (You can also copy and paste it there)
static int value1;
static int value2;
static String operator;
I have highlighted the position to help you find it(remember you may have to scroll up)
You would see something like:
Private void btn1MouseClicked……
Below the next line that says…//TODO, you can write your code.

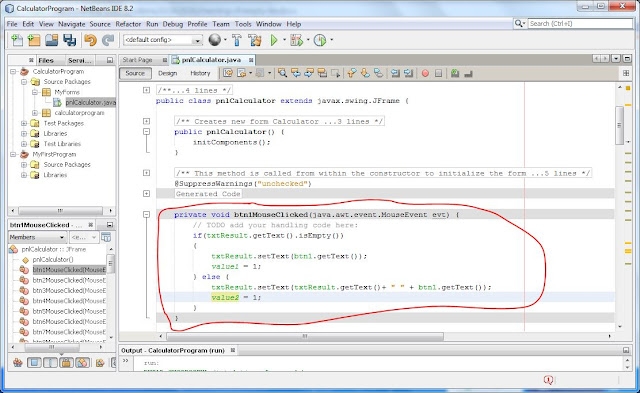
Step 12: Now Write the code for button 1. This means that we need to write a code to specify what happens when 1 is clicked. To to that:
Write the code below in the position as shown in the figure( you can also copy and paste)
if(txtResult.getText().isEmpty())
txtResult.setText(btn1.getText());
value1 = 1;
> else txtResult.setText(txtResult.getText()+ ” ” + btn1.getText());
value2 = 1;
>
Your code would now look like the one in the figure below:
Step 13: Test Your Program
You can test your program using the procedure you applied in Step 8. When the form displays, Click on 1 to see what happens. If you did everything right, 1 would appear in the display.
Close the form
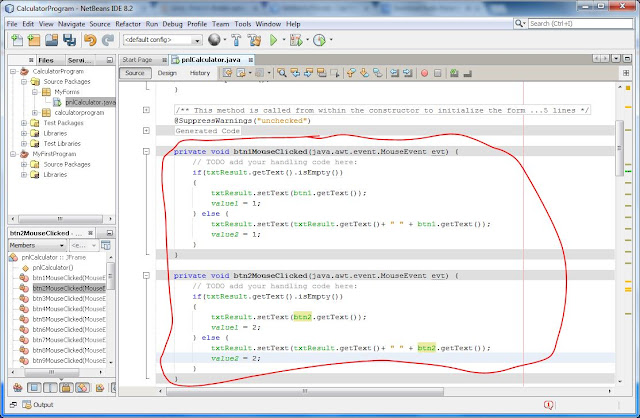
Step 14: Write the code for Button 2(btn2). Right-click on button 2, Choose Events, Choose Mouse, Choose MouseClicked.
This takes you to where you would write the code for button 2
Step 15: Write the code below in the position as shown in the figure( you can also copy and paste)
if(txtResult.getText().isEmpty())
txtResult.setText(btn2.getText());
value1 = 2;
> else txtResult.setText(txtResult.getText()+ ” ” + btn2.getText());
value2 = 2;
>
If you have written it in the right position, your code would be as shown in the figure below:
Step 16: Do the same for buttons 3, 4, 5, 6, 7, 8, 9 and 0
Step 17: Take some time to look through the codes to make sure you got it right. And also get used to various parts of the code. But don’t modify anything!
Step 18: Test the program again
Step 19: Code for the CE (Clear) button
Right-click on CE button, choose events, choose Mouse, choose MouseClick. This takes you to where you would write the code for this button. Copy and paste the code below in the position
This is the code that would clear the display when the CE button is clicked. Very simple, right?
Step 20: Code for the +(plus) and -(minus), /(division) and multiplication buttons
For the plus button, write the code below:
if(!(txtResult.getText().isEmpty())) operator = “plus”;
txtResult.setText(txtResult.getText()+ ” +”);
>
For the minus write the code below:
if(!(txtResult.getText().isEmpty())) operator = “minus”;
txtResult.setText(txtResult.getText()+ ” -“);
>
For the division button, write the code below
if(!(txtResult.getText().isEmpty())) operator = “division”;
txtResult.setText(txtResult.getText()+ ” /”);
>
For the multiplication button, write the code below:
if(!(txtResult.getText().isEmpty())) operator = “multiplication”;
txtResult.setText(txtResult.getText()+ ” *”);
>
Step 21: Test your program. Run the program, test the 0 – 9 buttons as well as the operations. Also test the clear button
Attempt to enter:
4 + 5 and click (=)
Note that nothing happens when you click the equals button.
Note: you can only work with 1 to 9 at this time
Now let’s write code for the equality sign to perform the calculation.
Step 22: Write code for the equality button
This is the code for the equality button(you already know how to find where to place this code)
double answer = 0;
if(operator == “plus”)
answer = value1 + value2;
else if(operator==”minus”)
answer = value1 – value2;
else if (operator ==”multiplication”)
answer = value1 * value2;
else if(operator == “division”)
answer = value1/value2;
String Result = Double.toString(answer);
txtResult.setText(Result);
Step 23: Test the program (Congratulations!)
Run the program and try a few calculations. What are your observations. You can leave a comment in the comment box below to let me know what you observe. Are there some questions, leave it in the comment box below.
Get Ready for the Next Steps
In the next tutorials we would tidy up by doing the following:
- Modify this program to handle any number (not just 0 to 9)
- Answer your questions
- Handle errors, in case user enters wrong inputs
I would publish it in a couple of days. Just click follow in the button under my name to get notified when I publish the next step. You can also subscribe to the YouTube channel to watch step by step video
Random Codes
Create a Simple GUI based Calculator in NetBeans
NetBeans drag and drop allows the users to work with Graphical User Interface very easily. Today let us create a simple calculator using JAVA and NetBeans.

For this project I am using NetBeans 7.4. To begin with we need to create a simple project by going to File menu and chose New Project or simply press Ctrl+Shift+N. From the pop up window select Java Application and click Next. In the next Window give your project a name like Calculator and uncheck the last option that is Create a main class. Now on the left hand side, in the Project’s pane you will have your project named Calculator and if you browse to the Source Packages, there is a default package. Right Click on that and then New and Add a new JFrame form. In the next Popup give a class name and also set a name for your Package.
Now you have a JFrame that has two windows Source and Design. In the design view you can customize the outlook of your program while source view will be used to add functionality to your GUI. First let us design the outlook of our calculator.
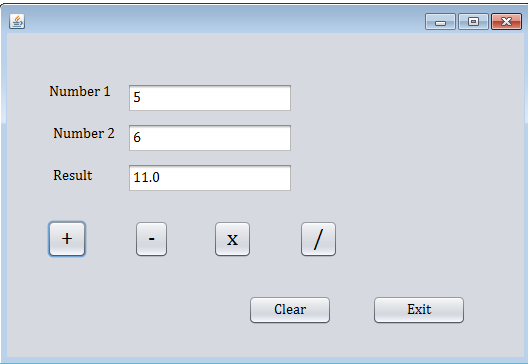
On the right hand side you can see a pane named as Palette having different options. In that go to Swing Controls and drag a Label to your JFrame. In the same way drag 3 labels in total. After that you need to drag 3 TextFields to your JFrame. Now finally you need 6 Buttons on your JFrame. After that you need to arrange them according to your needs, Select the first label and right click and then Edit Text or simply press F2 to edit the text. Edit and write Number 1. Same for the label 2 and write Number 2. For the label 3 edit the text and write Result. Now one by one select the all 3 TextFields and delete the text they have. After that select the each Button and edit the text to Add, Sub, Mul, Div, Clear and Exit respectively.
Now as we are done with the GUI, we need to add code to our project. Lets begin with the simplest function that is Exit. Right click the Exit Button, Go to Events then Actions and then Action Performed. You will see a window with a code. That code is auto-generated by NetBeans while you work using Drag and Drop. Go to the next line from here your cursor is and write the following line of code.
jTextField1.setText(""); jTextField2.setText(""); jTextField3.setText(""); Now we need to add the code for the sum of two numbers. Right click on the Add button,then Events then Actions and then Action Performed. Add the following code
float n1, n2, ans; n1 = Float.parseFloat(jTextField1.getText()); n2 = Float.parseFloat(jTextField2.getText()); ans = n1+n2; jTextField3.setText(String.valueOf(ans));
float n1, n2, ans; n1 = Float.parseFloat(jTextField1.getText()); n2 = Float.parseFloat(jTextField2.getText()); ans = n1-n2; jTextField3.setText(String.valueOf(ans));
float n1, n2, ans; n1 = Float.parseFloat(jTextField1.getText()); n2 = Float.parseFloat(jTextField2.getText()); ans = n1*n2; jTextField3.setText(String.valueOf(ans));
float n1, n2, ans; n1 = Float.parseFloat(jTextField1.getText()); n2 = Float.parseFloat(jTextField2.getText()); ans = n1/n2; jTextField3.setText(String.valueOf(ans));
This was all about creating a simple calculator. You can modify it by creating buttons for all the numbers and adding additional functions like square root, square etc.