Сегодня сделаем простейший калькулятор на JavaScript, но не просто так, а с умыслом. Позднее мы представим, что мы тестировщики, и попробуем протестировать этот калькулятор. Вернее, не протестировать, а дико сломать.
Что делаем
На старте у нас будет самый простой калькулятор, который сможет только складывать, вычитать, умножать и делить два числа. Этого уже будет достаточно, чтобы потренироваться и в коде, и в дальнейшем тестировании.
Логика работы
Так как это простой калькулятор, то поступим так:
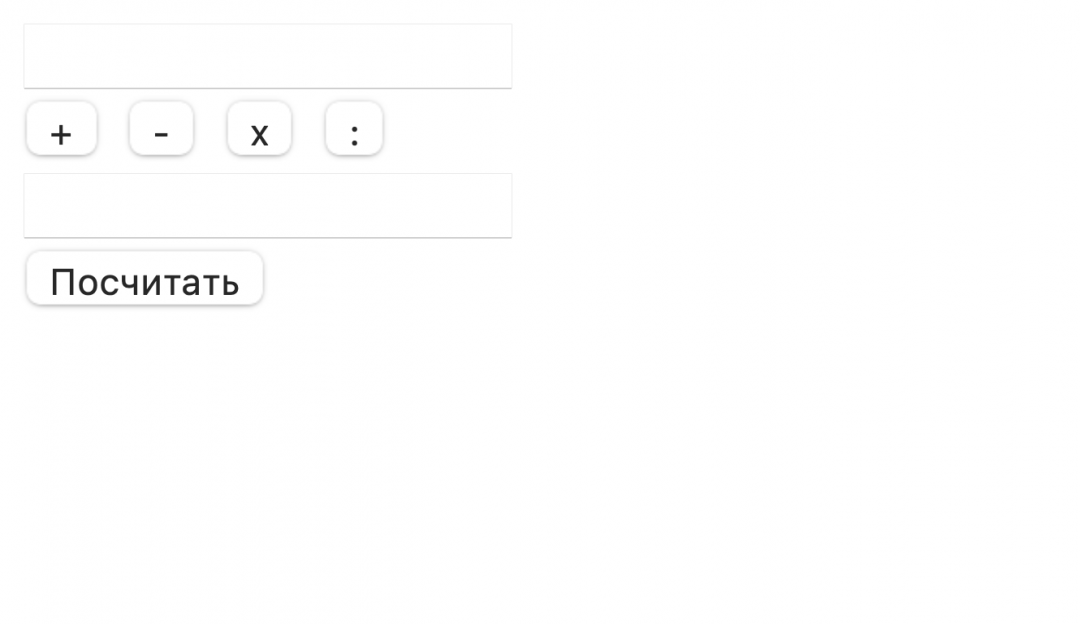
Сделаем поле ввода для первого числа.
Под ним разместим 4 кнопки с математическими действиями.
Потом сделаем поле ввода для второго числа.
И внизу будет кнопка «Посчитать».
Размещаем кнопки и поля ввода на странице
Разместим кнопки с полями на странице, а потом будем писать скрипт.
+
Обрабатываем нажатия на кнопки математических действий
Сейчас у нас есть 4 кнопки, но нажимать их бесполезно — всё равно ничего не произойдёт, потому что нет обработчиков нажатий. Но что нам прописывать в обработчике?
Первый вариант — привязать к каждой кнопке свою функцию, а потом для каждой операции выполнять свои действия внутри этого обработчика. Но раз у нас есть кнопка «Посчитать», то нам придётся при нажатии на неё из этих четырёх функций вытаскивать действие и нужные команды, запоминать выбранное и как-то использовать в вычислениях. Сложно и громоздко.
Второй вариант — просто записывать в какую-то переменную, какая кнопка была нажата. А потом, при нажатии «Посчитать», просто смотреть в эту переменную и выполнять соответствующее действие. Так и поступим.
👉 Воспользуемся хитростью, про которые многие забывают: в обработчике onclick необязательно писать только функцию — туда можно отправить любую JS-команду. Главное, не забыть потом в скрипте предусмотреть эту переменную, которую мы используем.
In this tutorial, we are going to create a simple JavaScript calculator. The calculator is able to perform addition, subtraction, multiplication, and division on 2 or more than 2 numbers.
Calculator can come out to be a very useful application in day-to-day life. You can use a calculator to calculate your shopping bill, calculate your loan, perform simple mathematical calculations, etc.
We are going to create a simple calculator in this article prerequisites for this tutorial are:
Before proceeding further let’s have a look at what we are going to build.
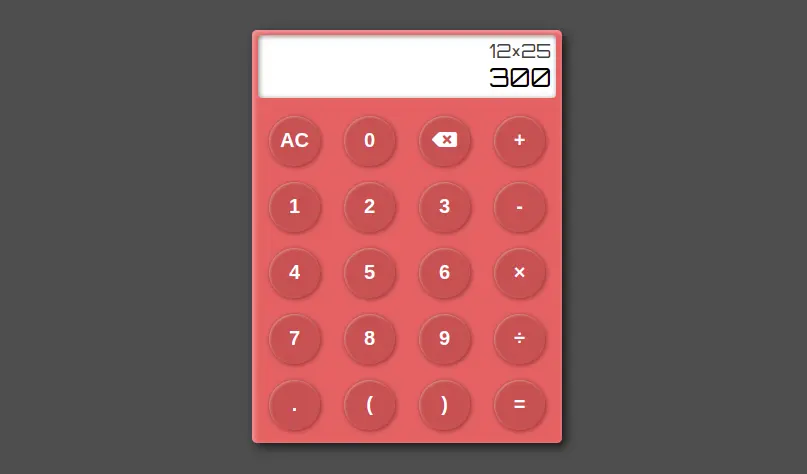
Simple JavaScript Calculator
A simple calculator is used to perform simple mathematical calculations like addition, subtraction, multiplication, and division.
Let’s start creating our simple calculator. We are going to use:
HTML (index.html) — To create the structure of the calculator
CSS (style.css) — To style the calculator
JavaScript (script.js) — To create the logic of the calculator
We will start building our calculator step by step. First, the structure of the calculator will be created (using HTML), then we will style it (using CSS), and finally, we will create the logic of the calculator (using JavaScript).
1. HTML — Creating the structure of the calculator
When you create the structure of anything in HTML, the structure need not be perfect in the first attempt. You can always modify the structure later. So, let’s start creating the structure of our calculator.
To start with first create a container (a div element with a class container) and inside it create another div element with a class calculator. This div element will be our calculator container.
Now, inside the calculator container, create 2 div elements one to display the result and another to display the input.
The output element will further contain 2 pre elements. The first one is called upper output, which displays the expression, and the second one is called lower output, which displays the result.
The input element will contain all kinds of input buttons we can have like, numbers, operators, clear, brackets, etc. Also, attach onclick event to all these buttons with a javascript function.
AC
In the above code, you can see the buttons are in a certain order because we want our buttons to be in specific places. With different orders, we can create different layouts of the calculator.
Finally, connect the CSS and Javascript files to the HTML file. Also, add font-awesome icons to the HTML file.
Here is the complete HTML code of the calculator. Save it as index.html file.
AC
2. CSS — Styling the calculator
To style the calculator, you need to create a CSS file. In the CSS file, target the elements using the CSS selector and add the styles to them.:
For buttons direction and flow, you can use CSS flexbox.
Here is the complete CSS code of the calculator. Save it as a style.css file.
We have completed the design of the calculator. Now, we need to create the JavaScript code to make the calculator work.
3. Javascript Calculator Code
Let’s now write javascript code for the calculator.
I. Selecting the elements
In the HTML part, you can see there are 2 output elements. Select both of them using the querySelector method.
// Select the output elements // upper output is for showing the expression let outputUpper = document.querySelector('#upper'); // lower output is for showing the result let outputLower = document.querySelector('#lower');
‘outputLower’ is a place where the expression given by the user and the output of the result will be shown.
‘outputUpper’ is a place where the expression given by the user will be shown in small size just above the result so that the user can see both their expression and result at the same time.
// function to get number input function pressNum(e) < if (outputLower.innerHTML === '0') < outputLower.innerHTML = e.innerHTML; >else < outputLower.innerHTML += e.innerHTML; >>
The above function will be called when any number button is pressed. It will check if the outputLower (expression) is 0 or not. If it is 0, then it will replace the 0 with the number pressed. If it is not 0, then it will add the number pressed to the outputLower.
The function is getting the number pressed by using this keyword.
III. Now create a function to input the operators
// function to get operator input function pressOperator(e) < // check last operator let lastOperator = outputLower.innerHTML.slice(-1); if (lastOperator.includes('+', '-', '×', '÷')) < output.innerHTML = outputLower.innerHTML.slice(0, -1) + e.innerHTML; >else < outputLower.innerHTML += e.innerHTML; >>
The above function will be called when any operator button is pressed. It will check if the last operator in the expression is +, -, ×, or ÷. If it is +, -, ×, or ÷, then it will replace the last operator with the operator pressed. If it is not +, -, × or ÷, then it will add the operator pressed to the outputLower.
We are checking and replacing the last operator because if someone presses + operator more than once then it becomes ++ or +++ which is not a valid operator. Or there could be a case of +*, +/+, etc. So we replace the last operator with the newly pressed operator.
IV. Now create a function to clear the calculator
We have 2 buttons to clear the calculator. One is clear button and other is clear all button.
// function to clear the calculator // clear all function pressAllClear() < outputUpper.innerHTML = ''; outputLower.innerHTML = '0'; >// clear one function pressClear()
To clear one number, we will use ‘outputLower.innerHTML.slice(0, -1)’ method. This will remove the last number from the expression. To clear all numbers, we will use ‘outputLower.innerHTML = ‘0’;’ method. This will replace the expression with 0.
V. Create function for writing dot and brackets
// function to get dot and bracket input function pressDot() < outputLower.innerHTML += '.'; >function pressBracket(e)
VI. Now create function to calculate the result
// function to calculate the result function pressEqual() < let exp = outputLower.innerHTML; outputUpper.innerHTML = exp; exp = exp.replace(/×/g, '*').replace(/÷/g, '/'); let result; try < result = eval(exp); // if decimal number more than 4 decimal places if (result.toString().indexOf('.') !== -1) < result = result.toFixed(4); >> catch (e) < result = 'Error'; >outputLower.innerHTML = result; >
The above function will be called when the equal button (=) is pressed. It will calculate the result of the expression and show it in the outputLower .
We are using the eval() method to calculate the result.
Here, we are executing the expression within the try and catch block. If there is any error in the expression, then it will show an error.
We are also checking if the result is a decimal number or not. If it is a decimal number, then we will show it with 4 decimal places.
Finally, the result is shown in the outputLower and the corresponding expression is shown in the outputUpper .
VII. Now create function to clear expression and all clear screen
// clear one function pressClear() < outputLower.innerHTML = outputLower.innerHTML.slice(0, -1); >// clear all function pressAllClear()
To clear one number, we will use ‘outputLower.innerHTML.slice(0, -1)’ method. This will remove the last number from the expression. To clear all numbers, we will use ‘outputLower.innerHTML = ‘0’;’ method. This will replace the expression with 0.
VIII. Now add event listeners for keyboard buttons
Finally, add an event listener for keyboard buttons, so that when any button is pressed, it will call the corresponding function and the user will be able to run the calculator from the keyboard itself.
// add event listeners for keyboard buttons document.addEventListener('keydown', function (e) < switch (e.key) < case '0': pressNum(document.querySelector('button:nth-child(2)')); break; case '1': pressNum(document.querySelector('button:nth-child(5)')); break; case '2': pressNum(document.querySelector('button:nth-child(6)')); break; case '3': pressNum(document.querySelector('button:nth-child(7)')); break; case '4': pressNum(document.querySelector('button:nth-child(9)')); break; case '5': pressNum(document.querySelector('button:nth-child(10)')); break; case '6': pressNum(document.querySelector('button:nth-child(11)')); break; case '7': pressNum(document.querySelector('button:nth-child(13)')); break; case '8': pressNum(document.querySelector('button:nth-child(14)')); break; case '9': pressNum(document.querySelector('button:nth-child(15)')); break; case '+': pressOperator(document.querySelector('button:nth-child(4)')); break; case '-': pressOperator(document.querySelector('button:nth-child(8)')); break; case '*': pressOperator(document.querySelector('button:nth-child(12)')); break; case '/': pressOperator(document.querySelector('button:nth-child(16)')); break; case '.': pressDot(); break; case '(': pressBracket(document.querySelector('button:nth-child(18)')); break; case ')': pressBracket(document.querySelector('button:nth-child(19)')); break; case 'Enter': // prevent default action e.preventDefault(); pressEqual(); break; case 'Backspace': pressClear(); break; case 'Escape': pressAllClear(); break; >>);
In the above code, you can see we are using a button position to get the button. We are using ‘document.querySelector(‘button:nth-child(2)’)’ to get the button with position 2. This will get the button with the number 0. and so on.
In this complete guide to JavaScript calculator, you have learned to create an awesome simple calculator. You can use it to calculate any mathematical expression. The keyboard event is also attached to the calculator. You can also use the calculator on your website or mobile app.
How to create calculator function in JavaScript?? Yes, Today we are making a JavaScript function which is return some mathematics output. So, let’s start with JavaScript code. (1) Let’s make a JavaScript file and give any name here I am giving index.js. (Note:- We must need a html file to run our JS code in browser) (2) Next step make a function name calculator() in js file. And pass three parameter x, y and o. (3) Parameters explanation :- (a) x is a first number (b) y is a second number (c) o is a operator (4) We are using switch statement as shown in following code. (4) Let’s understand above code :- (a) first pass o parameter because it will decide which mathematics operation will conduct. o is String and x and y number (b) If any user call this function by passing three parameters like calculator(2,3,’+’) then the first case is executed. (c) When anyone not enter valid input the it will return «enter valid numbers». (5) Let’s call the above function and see output. 👉 Happy Coding. 🙏 Thank you for reading.
Top comments (0)
Read next
Serve a static HTML page using NodeJS and ExpressJS
How to add a custom font to a Rails app
Como criar um App iOS em ViewCode
Zustand vs Redux: Choosing the Right State Management Library for Your React App
I am a front-end web developer and learning back-end devolepment. I am a student in computer science. I am from India and excited to join new community.

 (3) Parameters explanation :-
  (4) Let’s understand above
  👉 Happy Coding.