- Darken Background Image CSS
- Properties for Darken Background Image in CSS:
- Example # 1:
- Example # 2:
- Example # 3:
- Conclusion
- About the author
- Aqsa Yasin
- Как сделать затемнение фона (картинки) на CSS
- CSS затемнение картинки или фона
- Затемнение всего сайта
- Затемнение элемента при наведении
- Честное затемнение элемента
Darken Background Image CSS
![]()
Darken image means we are making our image appear in dark mode. The CSS provides different properties for making the image or background image darker. We can use these properties and set their values according to our choice and make our image a darker image. The CSS provides this opportunity for us to make the images darker using three different properties. In this tutorial, we will make our background image darker by utilizing the CSS properties and will show you the darker as well as the original image.
Properties for Darken Background Image in CSS:
We will use the following three properties which the CSS provides to darken the background image. These properties are:
- Using filter property.
- Using background-image property and set its value in linear gradient.
- Using background-blend-mode property.
Now, we are going to utilize all these properties in our codes below and you will learn from these examples how to use these properties and how to set the value of these properties because we will also explain all codes.
Example # 1:
We’re utilizing Visual Studio Code to show the examples provided. So, we’ll open the new file and select the “HTML” language, which will result in the production of an HTML file. Then, in the newly generated file, we start writing the code. The “.html” file extension is automatically appended to the file name when we save the completed code. Now, we get basic tags by putting “!” marks and pressing “Enter”. When the basic HTML tags have appeared in this file created, we’ll begin by adding a heading.
Then, we also put a paragraph below this heading and insert the image after this paragraph. If the image is inserted, we have another paragraph and also a div class with the name “darkened-image”. Here, the HTML code is completed. Now, save it and let’s move to the CSS file where we will add the “filter” property for darkening the background image.
For “h1”, we set the “font-family” value to “Algerian” and also apply “color” to this heading as “green”. The “font-size” of the paragraph text is “20px” and its “color” is “red”, “bold” in its “font-weight”. Then, we are going to utilize the “filter” property for the div class “darkened-image”. This property helps in making the image darker. We used this property here so the image will appear darker in the output. We set its value using the “brightness” value and select “60%” brightness for this image.
In the “background-image”, we put the same path of the image which we have given in the HTML file. So, we apply this darkened property to the image which we have inserted above and we will see that original image as well as the darkened image on the output screen. We also set the “width” and “height” of the div as “200px” and “620px” respectively. This “height” property will set the height of the div and the “width” property will set the width of the div.
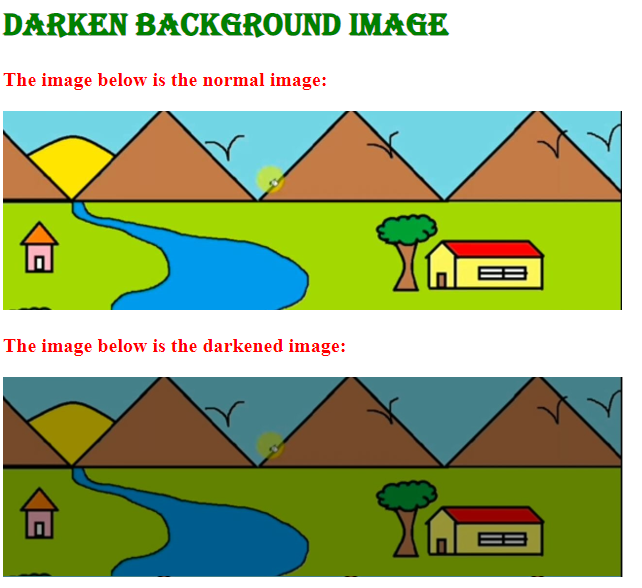
We make this image a darker image with the help of the CSS “filter” property and setting the “brightness” as the value of this property. We have applied “60%” brightness to this image to make it darker than the original image.
Example # 2:
We have a heading here and then add the image. After this image, we again place a heading and then we have a div container. We will utilize the second property for making this image a darker.

We apply “color” to this heading as “maroon” and set the “font-family” value for “h1” to “Algerian”. The “height” of the image is set to “240px” and its “width” is “630px”. Then, we mention the div container “darkened-image” and put the “background-image” property in which we utilize the “linear-gradient” and set its value in “rgba” form. Here, we use two “rgba” values and set them to “rgba(0, 0, 0, 0.5)” where “0.5” is the alpha value. We also insert the image in the “url ()”. We insert the path of the image in this “url ()”. The “height” of this div is “240px” and also, we define its “width” to “630px”.
In the output, both the original and the darkened versions of the image can be seen. The original image and the darkened image may clearly be distinguished from one another in the screenshot below. The darkened image is rendered because we have utilized the “background-image” property and set its value in the “linear-gradient” type.
Example # 3:
We have used the above HTML code and we insert another image in this code. We will use the “background-blend-mode” for creating the darkened image effect on the image.

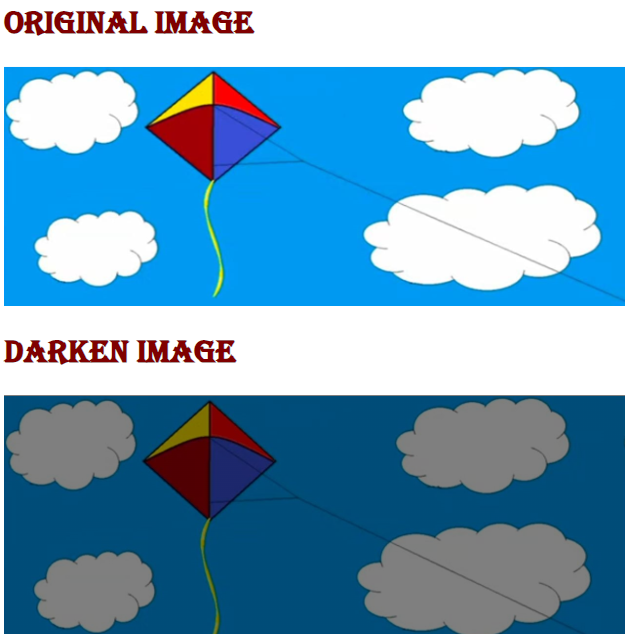
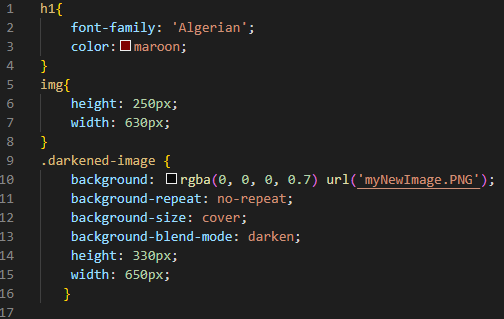
We set the “font-family” value for “h1” to “Algerian” and apply “color” to this heading to “maroon”. The image’s “width” is “630px” and its “height” is “250px”. We utilize the div class name as “darkened-image” and are going to apply some properties to it. We utilize the “background” property and place the “rgba” value here. The “rgba” value we are utilizing is “(0, 0, 0, 0.7)” and then we have the “url” property which we utilize for giving the path of the image. We give the image’s path as “myNewImage.PNG”.
After this, we have the “background-repeat” property and utilize the “no-repeat” keyword as the value of this property. Now, we also set the “background-size” and place “cover” so the image covers all the background. The “background-blend-mode” property is for applying the darkening effect to the image. We set it as the “darken” keyword. So, when this image renders on the output screen, it will appear as a darkened image because of this property. The “height” of the div named “darkened-image” is adjusted to “330px” and we also set its “width” which is “650px”. Now, look at the output of how these images will appear.
Both the original and the darker forms of the image are visible in the result. Here in the snapshot below, it is possible to easily tell the difference between the original image and the darkened image. We used the “background-blend-mode” attribute and placed the “darker” keyword as the value of this attribute to render the darkened picture.

Conclusion
We have thoroughly covered this concept and looked at numerous instances of how to darken the background image in CSS. As was previously mentioned, we have used three different properties for darkening the background image. We have utilized all three properties in our codes. We also covered how to use these properties and how to set their value. We have discussed that we have the “filter” property, “background-image” property, and also the “background-blend-mode” property for making the background image darker. We also provided the outcomes of all these codes in which we have rendered both the darken as well as the original image on the output screen. For your benefit, we have created a comprehensive tutorial in which the code is both provided and thoroughly explained, along with the results.
About the author
Aqsa Yasin
I am a self-motivated information technology professional with a passion for writing. I am a technical writer and love to write for all Linux flavors and Windows.
Как сделать затемнение фона (картинки) на CSS
Сразу оговоримся, что решить такую задачу, как затемнение фона для картинки, можно различными способами. Нет какого-то одного правильного метода. Вы делаете так, как вам удобно и как лучше подходит для вашего конкретного случая.
Для начала пропишем html для наглядности:


Здесь мы вставили свою картинку внутрь блока с классом item-photo.
.item-photo < position: relative; >.item-photo img < width: 100%; >.item-photo:after
Что мы здесь делаем? Мы добавляем через псевдоэлемент :after прозрачный фон поверх блока с классом item-photo.
Обратите внимание на эту строчку
background-color: rgba(0,0,0,0.5);Здесь мы задаем фон нашему псевдоэлементу. Если бы мы вместо 0.5 прописали бы 1, то картинку полностью покрыл бы черный фон. Вы можете поэкспериментировать и выбрать любое другое число в пределах 0 и 1.
Еще можно задать градиент, вместо простой заливки. То есть, к примеру, чтобы затемнение было к низу картинки. Вот как это можно сделать:
.item-photo < position: relative; >.item-photo img < width: 100%; >.item-photo:after

Это один из методов, как сделать затемнение для картинки. Вы можете предложить свой вариант в комментариях — уверены, он будет очень полезен для новичков.
CSS затемнение картинки или фона
Затемнение в работе сайтов применяется часто. Типичные варианты — при наведении курсора мыши или после показа какого-либо элемента, чтобы подчеркнуть необходимость действий со стороны пользователя.
Содержимое сайта затемнить просто. Этим же способом можно воспользоваться, если потребуется сделать фоновое изображение темнее. А в качестве альтернативы приведу ещё пару вариантов, которые приходилось использовать.

Затемнение всего сайта
Используем очень простой способ. Создаём спец-элемент, после чего применяем к нему стили.
style type="text/css">
#mask background-color:rgba(0,0,0,.3);
height:100%;
position:fixed;
width:100%;
top:0;
left:0;
>
style>

div id="mask">div>
Код безусловно приводит к выводу полупрозрачного прямоугольника на активное окно. Обычно этого не требуется, поэтому задаётся дополнительное свойство display:none; , чтобы изначально элемент был скрыт. В ходе каких-либо действий пользователя элемент показается и/или скрывается. Манипуляции производятся с помощью JavaScript или библиотеки jQuery, как в примере ниже. Для этого на элемент, вызывающий «маску», вешаем событие:
полный код (по аналогии легко сделаете для показа):
При этом, нужно помнить про css свойство z-index , когда выводите блок со свойством position , которое установлено в absolute или fixed . Большее значение располагает элемент выше, и наоборот.
Затемнение элемента при наведении
В простейшем случае, затемнение можно рассматривать как способ снятия полупрозрачности. Попробуем это сделать:
style type="text/css">
img  opacity:.25; >
img:hover  opacity:1; >
style>
Изначально блёклая картинка при наведении курсора приобретает резкость.
Если фон тёмный, а изображение светлое, меняем «последовательность»: сначала элемент показываем, как есть, а при наведении курсора добавляем прозрачность.
Честное затемнение элемента
Предыдущие способы не всегда удобны — первый требует наличия дополнительного элемента и его абсолютного позиционирования по границам предка, второй действует на всё содержимое контейнера, что иногда недопустимо.
Например, есть блок с фоновым изображением. В нём — блок с текстом.
Нужно затенить фон, при этом не трогать текст. Как узнали ранее, свойство opacity не подходит. Внесение изменений в код тоже не всегда допустимо. Чтобы не было сомнения, добавляем прозрачности:
Плашка с текстом поблекла. Явно не то, что ожидаем.
Первый способ решить проблему — с помощью дополнительного элемента. Главное, не забыть про z-index , чтобы плашка с текстом всегда оставалась на переднем плане.
Самый лёгкий вариант (исключая затемнение в редакторе и заливки изменённой картинки на сервер) — добавить свойство box-shadow с включенным значением inset, выводящем тень «внутрь» элемента.
В CSS это выглядит так (добавить для блока-родителя плашки):
box-shadow:0 0 0 128px rgba(0, 0, 0, 0.33) inset; Где 128px — половина высоты элемента. Если высота блока больше, чем ширина, то задавайте половину высоты. Чтобы не путаться, просто запомните: нужна половина от большего измерения.
Кстати, цвета тени смешиваются с фоном, что даёт забавный эффект:
box-shadow:0 0 0 128px rgba(0, 0, 153, 0.33) inset;