- Flake8: Your Tool For Style Guide Enforcement
- Using Flake8
- FAQ and Glossary
- User Guide
- Plugin Developer Guide
- Contributor Guide
- Release Notes and History
- General Indices
- Invoking Flake8
- Flake8: Your Tool For Style Guide Enforcement
- Using Flake8
- FAQ and Glossary
- User Guide
- Plugin Developer Guide
- Contributor Guide
- Release Notes and History
- General Indices
- Flake8 + PyCharm: туториал
- Шаг 1. Установка Flake8
- Шаг 2. Плагин File Watcher
- Шаг 3. Настраиваем Watcher
- Шаг 4. Отображаем стилистические проблемы в коде
- Git hook!
Flake8: Your Tool For Style Guide Enforcement
To install Flake8, open an interactive shell and run:
pythonversion> -m pip install flake8
If you want Flake8 to be installed for your default Python installation, you can instead use:
python -m pip install flake8
It is very important to install Flake8 on the correct version of Python for your needs. If you want Flake8 to properly parse new language features in Python 3.5 (for example), you need it to be installed on 3.5 for Flake8 to understand those features. In many ways, Flake8 is tied to the version of Python on which it runs.
Using Flake8
To start using Flake8, open an interactive shell and run:
flake8 path/to/code/to/check.py # or flake8 path/to/code/
If you have installed Flake8 on a particular version of Python (or on several versions), it may be best to instead run python -m flake8 .
If you only want to see the instances of a specific warning or error, you can select that error like so:
flake8 --select E123,W503 path/to/code/
Alternatively, if you want to add a specific warning or error to ignore:
flake8 --extend-ignore E203,W234 path/to/code/
Please read our user guide for more information about how to use and configure Flake8.
FAQ and Glossary
User Guide
All users of Flake8 should read this portion of the documentation. This provides examples and documentation around Flake8’s assortment of options and how to specify them on the command-line or in configuration files.
Plugin Developer Guide
If you’re maintaining a plugin for Flake8 or creating a new one, you should read this section of the documentation. It explains how you can write your plugins and distribute them to others.
Contributor Guide
If you are reading Flake8’s source code for fun or looking to contribute, you should read this portion of the documentation. This is a mix of documenting the internal-only interfaces Flake8 and documenting reasoning for Flake8’s design.
- Exploring Flake8’s Internals
- Contributing to Flake8
- Writing Documentation for Flake8
- Writing Code for Flake8
- Releasing Flake8
- What Happens When You Run Flake8
- How Checks are Run
- Command Line Interface
- Built-in Formatters
- Option and Configuration Handling
- Plugin Handling
- Utility Functions
Release Notes and History
General Indices
© Copyright 2016, Ian Stapleton Cordasco Revision b9a7794c .
Invoking Flake8
Once you have installed Flake8, you can begin using it. Most of the time, you will be able to generically invoke Flake8 like so:
Where you simply allow the shell running in your terminal to locate Flake8. In some cases, though, you may have installed Flake8 for multiple versions of Python (e.g., Python 3.8 and Python 3.9) and you need to call a specific version. In that case, you will have much better results using:
Since that will tell the correct version of Python to run Flake8.
Installing Flake8 once will not install it on both Python 3.8 and Python 3.9. It will only install it for the version of Python that is running pip.
It is also possible to specify command-line options directly to Flake8:
python -m flake8 --select E123This is the last time we will show both versions of an invocation. From now on, we’ll simply use flake8 and assume that the user knows they can instead use python -m flake8 instead.
It’s also possible to narrow what Flake8 will try to check by specifying exactly the paths and directories you want it to check. Let’s assume that we have a directory with python files and sub-directories which have python files (and may have more sub-directories) called my_project . Then if we only want errors from files found inside my_project we can do:
And if we only want certain errors (e.g., E123 ) from files in that directory we can also do:
flake8 --select E123 my_projectIf you want to explore more options that can be passed on the command-line, you can use the —help option:
And you should see something like:
Usage: flake8 [options] file file . Options: --version show program's version number and exit -h, --help show this help message and exit .
© Copyright 2016, Ian Stapleton Cordasco Revision b3cee186 .
Flake8: Your Tool For Style Guide Enforcement
To install Flake8, open an interactive shell and run:
pythonversion> -m pip install flake8
If you want Flake8 to be installed for your default Python installation, you can instead use:
python -m pip install flake8
It is very important to install Flake8 on the correct version of Python for your needs. If you want Flake8 to properly parse new language features in Python 3.5 (for example), you need it to be installed on 3.5 for Flake8 to understand those features. In many ways, Flake8 is tied to the version of Python on which it runs.
Using Flake8
To start using Flake8, open an interactive shell and run:
flake8 path/to/code/to/check.py # or flake8 path/to/code/
If you have installed Flake8 on a particular version of Python (or on several versions), it may be best to instead run python -m flake8 .
If you only want to see the instances of a specific warning or error, you can select that error like so:
flake8 --select E123,W503 path/to/code/
Alternatively, if you want to add a specific warning or error to ignore:
flake8 --extend-ignore E203,W234 path/to/code/
Please read our user guide for more information about how to use and configure Flake8.
FAQ and Glossary
User Guide
All users of Flake8 should read this portion of the documentation. This provides examples and documentation around Flake8’s assortment of options and how to specify them on the command-line or in configuration files.
Plugin Developer Guide
If you’re maintaining a plugin for Flake8 or creating a new one, you should read this section of the documentation. It explains how you can write your plugins and distribute them to others.
Contributor Guide
If you are reading Flake8’s source code for fun or looking to contribute, you should read this portion of the documentation. This is a mix of documenting the internal-only interfaces Flake8 and documenting reasoning for Flake8’s design.
- Exploring Flake8’s Internals
- Contributing to Flake8
- Writing Documentation for Flake8
- Writing Code for Flake8
- Releasing Flake8
- What Happens When You Run Flake8
- How Checks are Run
- Command Line Interface
- Built-in Formatters
- Option and Configuration Handling
- Plugin Handling
- Utility Functions
Release Notes and History
General Indices
© Copyright 2016, Ian Stapleton Cordasco Revision b3cee186 .
Flake8 + PyCharm: туториал
Flake8 — инструмент, позволяющий просканировать код проекта и обнаружить в нем стилистические ошибки и нарушения различных конвенций кода на Python. Flake8 умеет работать не только с PEP 8 , но и с другими правилами, к тому же поддерживает кастомные плагины.
Я покажу, как настроить Flake8, чтобы он автоматически подсвечивал проблемы прямо в коде
Шаг 1. Установка Flake8
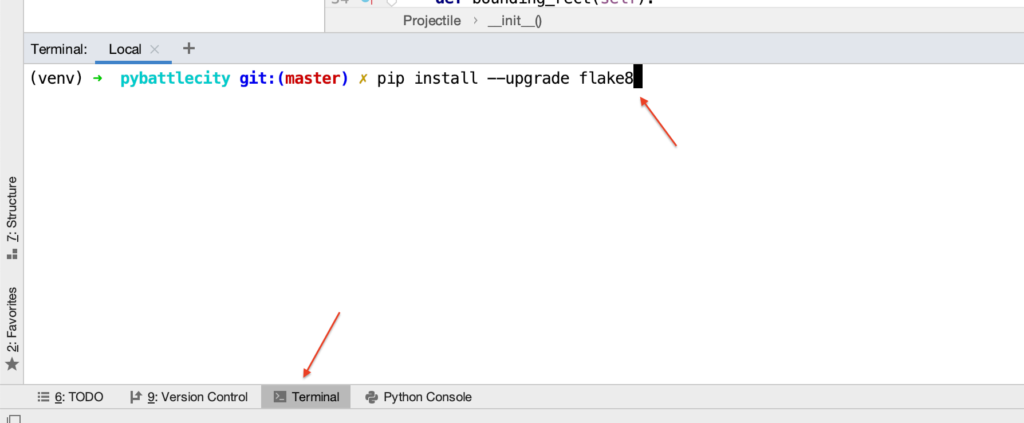
Flake8 – это по сути модуль Python, поэтому его можно установить в одну из виртуальных сред Python. Я обычно использую venv, который хранится в папке проекта, в него и установим. Это легко с помощью терминала прямо в PyCharm.
pip install --upgrade flake8
Опционально можно его сохранить в списке зависимостей проекта командой (внимание: остальные зависимости тоже перезапишутся, если они отличаются от установленных).
pip freeze > requirements.txtШаг 2. Плагин File Watcher
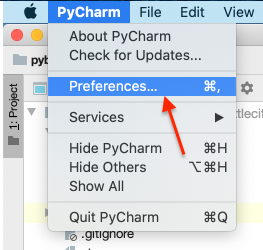
У вас должен быть установлен плагин File Watcher, это официальный плагин, но он не всегда по умолчанию загружен – у меня вот не было его. Идем в настройки (на Маке – меню PyCharm – Preferences, в других системах посмотрите в меню File).

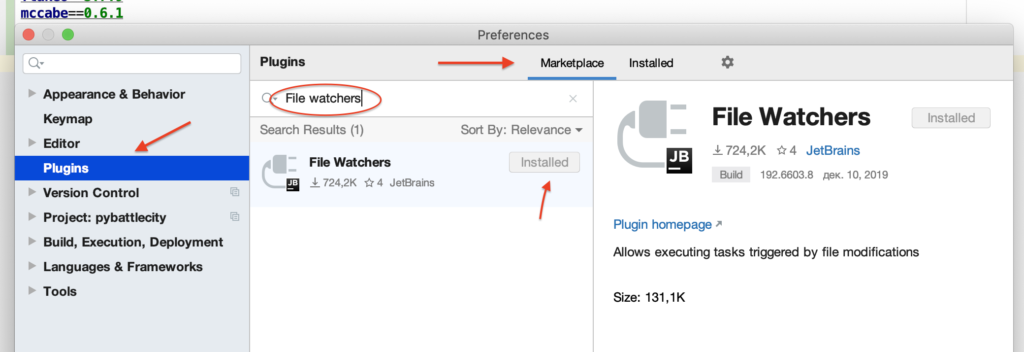
Там идем в Plugins – Marketplace – вбиваем в поиске File Watchers – Install – Restart IDE.

Шаг 3. Настраиваем Watcher
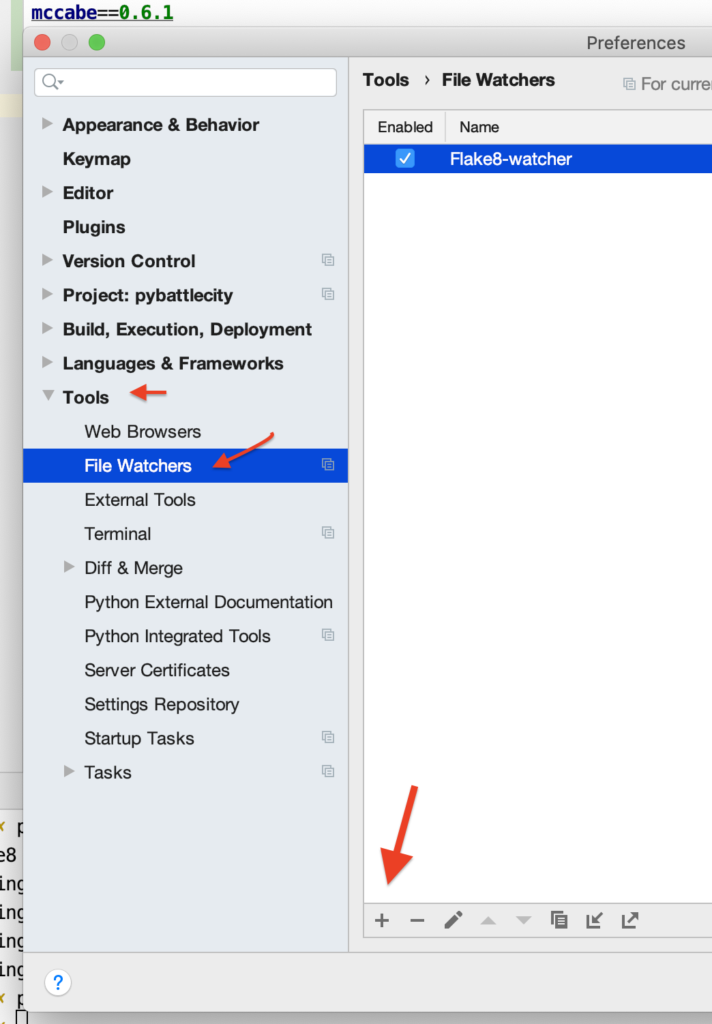
Нам нужно, чтобы при редактировании файла IDE смотрела за изменениями и прогоняла по файлу Flake8, если что-то изменилось. Для этого надо создать File Watcher – смотрителя, который будет выполнять команду.
Там же в настройках идем в Tools – File Watches – жмем на плюсик.

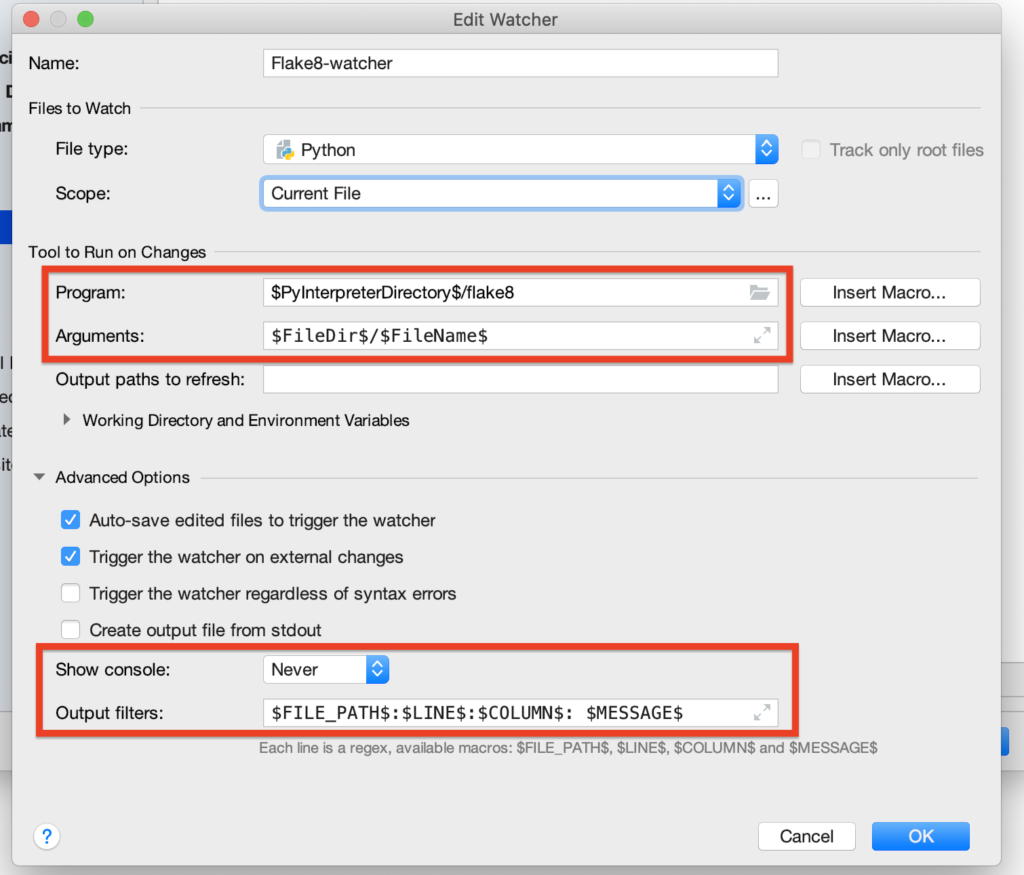
Далее настраиваем смотрителя. Имя можно придумать любое. Остальные настройки:

- File type – Python
- Score – Current File, я выбрал только для текущего файла, чтобы расходовать меньше ресурсов и энергии. Вы можете выбрать на весь проект.
- Program – это путь до установленного Flake8 – я использую переменную, которая связана с путем к интерпретатору Python, файл flake8 лежит в ней же: $PyInterpreterDirectory$/flake8
- Arguments – аргументы для flake8 – путь к анализируемому файлу: $FileDir$/$FileName$
- Show console – Never – мы не будем никогда показывать консоль, а ошибки должны будут подчеркиваться прямо в коде!
- Output filters – это формат строки с описанием ошибки, которую выдает flake8, если находит стилистические проблемы. По этому формату IDE поймет, где именно возникла проблема (файл, строка, колонка, сообщение) – скопируйте это: $FILE_PATH$:$LINE$:$COLUMN$: $MESSAGE$
Это базовая настройка flake8. Конечно, вы можете настраивать инспекции индивидуально, но об этом расскажу как-нибудь потом.
Шаг 4. Отображаем стилистические проблемы в коде
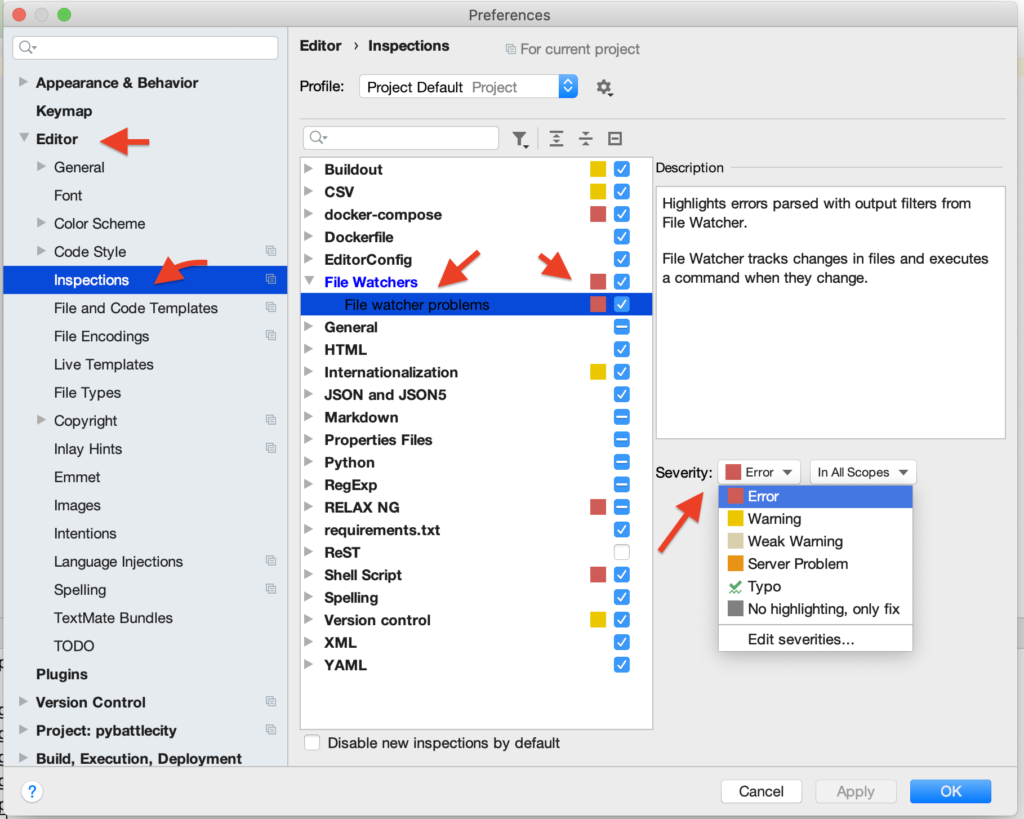
Теперь нам нужно заставить PyCharm подчеркивать проблемы в нужных местах кода. Сделать это несложно, нужно включить соответствующую инспекцию.
В настройках ищем: Editor – Inspections – File Watchers – File Watcher Problems – должна стоять галочка, затем правее выбираем Severity: Error. Жмем ОК и все готово!

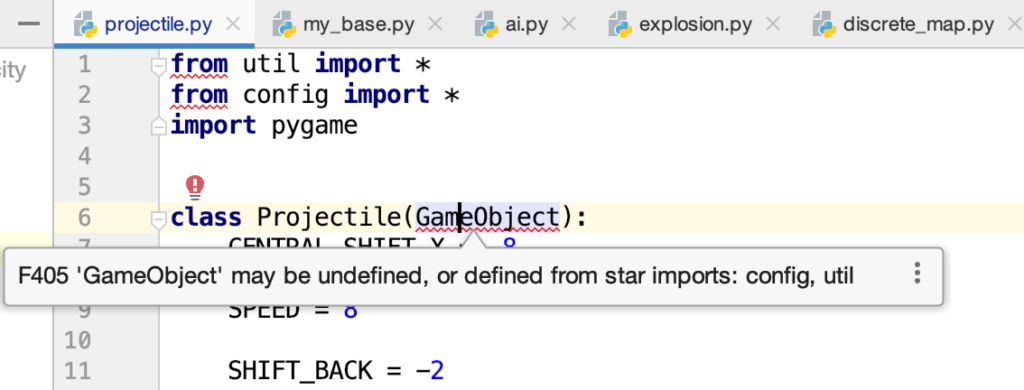
Поздравляю. Начните редактировать файл и увидите, если возникнут сообщения о стилистических проблемах:

Git hook!
Создадим хук для системы контроля версий GIT. Вы же пользуетесь ей, я надеюсь. Так вот pre-commit-hook – это действие, выполняемое перед коммитом. Будем запускать flake8 перед каждым коммитом, что плохо оформленный код не попадал в репозиторий. Сделать это очень просто в пару консольных команд:
flake8 --install-hook git git config --bool flake8.strict trueЕсли в коде нет проблем, то коммит будет зафиксирован. А если они есть – вам придется прежде их исправить.
🐉 Специально для канала @pyway. Подписывайтесь на мой канал в Телеграм @pyway 👈