- JUnit 5
- Create a project
- Add dependencies
- Create a project
- Add dependencies
- Create a project
- Add dependencies
- Write application code
- Create tests
- Run tests and view their results
- Prepare for testing
- Add testing libraries
- Manually add a testing library
- Add libraries using the Dependencies tool window
- Test Sources Root
- Create a test root for your project
- Change the test root
- Use another test root
- Add one more test root
- Test Resources Root
- Configure the folder for test resources
JUnit 5
In this tutorial, you will learn how to set up JUnit for your projects, create tests, and run them to see if your code is operating correctly. It contains just the basic steps to get you started.
If you want to know more about JUnit, refer to the official documentation. To learn more about testing features of IntelliJ IDEA, refer to other topics in this section.
You can choose to follow the tutorial using either Maven or Gradle.
Create a project
- From the main menu, select File | New | Project .
- Select New Project . Specify the name for the project, for example, junit-tutorial .
- Select Maven as a build tool. In Language , select Java .
- From the JDK list, select the JDK that you want to use in your project. If the JDK is installed on your computer, but not defined in the IDE, select Add JDK and specify the path to the JDK home directory. If you don’t have the necessary JDK on your computer, select Download JDK .
- Click Create .
For more information on working with Maven projects, refer to Maven.
Add dependencies
For our project to use JUnit features, we need to add JUnit as a dependency.

- Open pom.xml in the root directory of your project. To quickly navigate to a file, press Ctrl+Shift+N and enter its name.
- In pom.xml , press Alt+Insert , select Add dependency .
- In the tool window that opens, type org.junit.jupiter:junit-jupiter in the search field. Locate the necessary dependency in the search results and click Add next to it.
- Now we need to apply the changes in the build script. Press Ctrl+Shift+O or click Load Maven Changes in the notification that appears in the top-right corner of the editor.
Create a project
- From the main menu, select File | New | Project .
- Select New Project . Specify the name for the project, for example, junit-tutorial .
- Select Gradle as a build tool. In Language , select Java .
- From the JDK list, select the JDK that you want to use in your project. If the JDK is installed on your computer, but not defined in the IDE, select Add JDK and specify the path to the JDK home directory. If you don’t have the necessary JDK on your computer, select Download JDK .
- Click Create .
For more information on working with Gradle projects, refer to Gradle.
Add dependencies
For our project to use JUnit features, we need to add JUnit as a dependency.

- Open build.gradle in the root directory of your project. To quickly navigate to a file, press Ctrl+Shift+N and enter its name.
- In build.gradle , press Alt+Insert , select Add dependency .
- In the tool window that opens, type org.junit.jupiter:junit-jupiter in the search field. Locate the necessary dependency in the search results and click Add next to it.
- Now we need to apply the changes in the build script. Press Ctrl+Shift+O or click Load Gradle Changes in the notification that appears in the top-right corner of the editor.
Create a project
- From the main menu, select File | New | Project .
- Select New Project . Specify the name for the project, for example, junit-tutorial .
- Select IntelliJ as a build tool. In Language , select Java .
- From the JDK list, select the JDK that you want to use in your project. If the JDK is installed on your computer, but not defined in the IDE, select Add JDK and specify the path to the JDK home directory. If you don’t have the necessary JDK on your computer, select Download JDK .
- Click Create .
Add dependencies
For our project to use JUnit features, we need to add JUnit as a dependency.

- From the main menu, select File | Project Structure ( Ctrl+Alt+Shift+S ) or click on the toolbar.
- Under Project Settings , select Libraries and click | From Maven .
- In the dialog that opens, specify the necessary library artifact, for example: org.junit.jupiter:junit-jupiter:5.9.1 .
- Apply the changes and close the dialog.
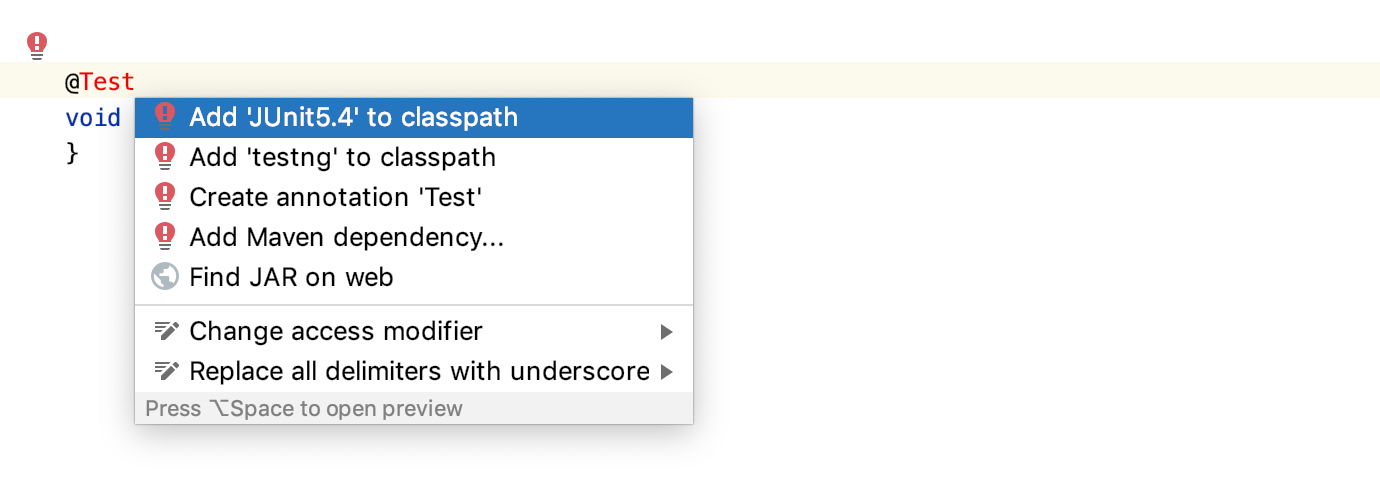
The procedure above shows the ‘manual’ way so that you know what happens behind the scenes and where you set up the testing framework. However, if you just start writing tests, IntelliJ IDEA will automatically detect if the dependency is missing and prompt you to add it.
Write application code
Let’s add some code that we’ll be testing.
- In the Project tool window Alt+1 , go to src/main/java and create a Java file called Calculator.java .
- Paste the following code in the file:
Create tests
Now let’s create a test. A test is a piece of code whose function is to check if another piece of code is operating correctly. In order to do the check, it calls the tested method and compares the result with the predefined expected result . An expected result can be, for example, a specific return value or an exception.
- Place the caret at the Calculator class declaration and press Alt+Enter . Alternatively, right-click it and select Show Context Actions . From the menu, select Create Test .

- Select the two class methods that we are going to test.

- The editor takes you to the newly created test class. Modify the add() test as follows:


@Test @DisplayName(«Multiply two numbers») void multiply() < assertAll(() ->assertEquals(4, Calculator.multiply(2, 2)), () -> assertEquals(-4, Calculator.multiply(2, -2)), () -> assertEquals(4, Calculator.multiply(-2, -2)), () -> assertEquals(0, Calculator.multiply(1, 0))); >
To navigate between the test and the code being tested, use the Ctrl+Shift+T shortcut.
Run tests and view their results
After we have set up the code for the testing, we can run the tests and find out if the tested methods are working correctly.

- To run an individual test, click in the gutter and select Run .
- To run all tests in a test class, click against the test class declaration and select Run .
You can view test results in the Run tool window.

IntelliJ IDEA hides passed tests by default. To see them, make sure the Show Passed option is enabled in the Run tool window.
Prepare for testing
IntelliJ IDEA works with multiple Java testing frameworks out of the box, for example, JUnit, Spock, TestNG, or Cucumber.
In the IDE, you can create a test class directly from the source code together with the necessary test methods. You can switch between test classes and source code with a shortcut, run multiple tests, view statistics for each test, and export test results to a file.
IntelliJ IDEA also features code coverage that allows you to analyze your code and understand which areas of your code are covered by tests and which areas require more testing.
For information on how to test your code in other languages, refer to:
Add testing libraries
IntelliJ IDEA allows you to add missing libraries as you code: once the IDE detects that you’re using some code from the library that is not added to your project yet, it will prompt you to download and install it.
You can also add libraries to your project manually. For example, this can be helpful if you need a specific library version or distribution.
Manually add a testing library
Follow these steps to add a library if you’re building your project with the native IntelliJ IDEA builder:
- From the main menu, select File | Project Structure ( Ctrl+Alt+Shift+S ) or click on the toolbar.
- Under Project Settings , select Libraries and click | From Maven .
- In the dialog that opens, specify the necessary library artifact, for example: org.junit.jupiter:junit-jupiter:5.9.1 or org.testng:testng:6.14.3 .
- Apply the changes and close the dialog.
IntelliJ IDEA allows you to add missing libraries as you code: once the IDE detects that you’re using some code from the library that is not added to your project yet, it will prompt you to download it. In this case, the IDE automatically adds the necessary dependencies to your pom.xml .
You can also add libraries to your project manually. For example, this can be helpful if you need a specific library version or distribution.
Add libraries using the Dependencies tool window
Follow these steps if you’re using Maven in your project:

- In your pom.xml , press Alt+Insert and select Add dependency .
- In the tool window that opens, type the necessary dependency in the search field, for example: org.junit.jupiter:junit-jupiter . Locate the necessary dependency in the search results and click Add next to it.
- When the dependency is added to pom.xml , press Ctrl+Shift+O or click in the Maven tool window to import the changes.
For more information on how to work with Maven, refer to Maven dependencies.
In Gradle projects, add the necessary dependencies to your build file manually.
- In your build.gradle , press Alt+Insert and select Add dependency .
- In the tool window that opens, type the necessary dependency in the search field, for example: org.junit.jupiter:junit-jupiter . Locate the necessary dependency in the search results and click Add next to it.
- When the dependency is added to build.gradle , press Ctrl+Shift+O or click in the Gradle tool window to import the changes.
Test Sources Root
Before you start creating tests, make sure that the Test Sources Root is configured for your project. The Test Sources Root is a folder that stores your test code. In the Project tool window, this folder is marked with the icon.
The IDE processes the code from different sources differently. For example, compilation results for sources and test sources are normally placed into different folders. That is why, if the test sources root is missing, you need to create one. Otherwise, your code might be processed incorrectly.
Create a test root for your project
Follow these steps if you’re building your project with the native IntelliJ IDEA builder:

- In the Project tool window ( Alt+1 ), create a new directory in which you will store your test code.
- Right-click the new directory and select Mark Directory As | Test Sources Root . The tests folder should be marked with the icon.
Maven uses a standard directory layout for applications. Generally, it’s recommended that you conform to this layout in your projects. For example, when you create a test folder in IntelliJ IDEA for a Maven project, the IDE suggests setting the standard name and location for such a folder. In this case, the IDE is also already aware that this test folder is your Test Sources Root .
However, you can override the standard directory layout by modifying the build file.
Change the test root
- In the Project tool window ( Alt+1 ), create a new directory in which you will store your test code.
- In your pom.xml , change the testSourceDirectory element. Replace src/new-test/test with the path to the new folder that you want to use as a test root.
The new test root should be marked with the icon in the Project tool window.
Just like Maven, Gradle also has a strict project directory layout. When you create a test folder in IntelliJ IDEA for a Gradle project, the IDE suggests setting the standard name and location for such a folder. In this case, the IDE is also already aware that this test folder is your Test Sources Root .
However, you can override the standard directory layout by modifying the build file.
Use another test root
- In the Project tool window ( Alt+1 ), create a new directory in which you will store your test code.
- Open your build.gradle and add the following code. Replace src/new-test/test with the path to the new folder that you want to use as a test root.
Add one more test root
- In the Project tool window ( Alt+1 ), create a new directory in which you will store your test code.
- Open your build.gradle and add the following code. Replace src/new-test/test with the path to the new folder that you want to use as a test root.
The new test root should be marked with the icon in the Project tool window.
For more information on different types of folders, refer to Folder categories.
Test Resources Root
Test Resources Root is a folder that stores files associated with your test sources. In the Project tool window, this folder is located in the test root and is marked with .
For Maven and Gradle projects, the test resources folder is usually created automatically. If you’re building your project with the native IntelliJ IDEA builder, you might need to create the resource root manually.
Configure the folder for test resources

- From the main menu, select File | Project Structure ( Ctrl+Alt+Shift+S ) or click on the toolbar.
- Under Project Settings , click Modules and then open the Sources tab on the right.
- Right-click the test folder and select New Folder . Name the folder resources .
- Right-click the new folder and select Test Resources . The folder will be marked with the icon.
- Apply the changes and close the dialog.