- Load JSON file locally using pure Javascript
- JavaScript Alternative To jQuery’s
- The Improper Way
- The correct method
- – Create A New XMLHttpRequest
- Usage
- – Parse JSON string into object
- How to Fetch and Display JSON Data in HTML Using JavaScript
- Fetching the JSON data
- Displaying the JSON data
- Step 1 – Get the div element from the body
- Step 2 – Loop through every object in our JSON object
- Step 3 – Append each person to our HTML page
- Why use V anilla JavaScript?
- Recent Posts
- About Us
- Display JSON Data in HTML Page
- Display JSON data in HTML page using JavaScript
- 1. Display JSON Data As List
- 2. Display JSON Data As Table
- Conclusion
Load JSON file locally using pure Javascript
In this tutorial, we will see how to Load JSON file locally using pure Javascript. the proper way to include or load the JSON file in a web application, Instead of using JQuery we’ll The correct method using XMLHttpRequest
JavaScript Alternative To jQuery’s
Having a pure javascript alternative to jQuery’s $.getJSON() and $.parseJSON() . By far the main troublemaker is the belief that by including a .JSON file between the head tags of your HTML document you can access structured JSON.
The Improper Way
Many examples will evidence that you can access the data with a simple function such as the one below. In fact, what this is not actually loading a JSON document but creating a Javascript object. This technique will not work for true JSON files.
// 'JSON' data included as above data = '[]'; // Function to 'load JSON' data function load() < var someData_notJSON = JSON.parse(data); console.log(someData_notJSON[0].Need-For-Speed); // Will log "Is My Favourate Game" > If you’re not particular about using an actual JSON file then creating a Javascript object in a separate .js file may be the way to go. If like me you do need to work with JSON in pure Javascript here’s what you’ll need to do.
The correct method
– Create A New XMLHttpRequest
The clue here is the jQuery method $.getJSON() which is shorthand for $.ajax() . It may seem an odd way requesting a local file in this way but it offers the most flexibility with least confusion.
function loadJSON(callback) < var xobj = new XMLHttpRequest(); xobj.overrideMimeType("application/json"); xobj.open('GET', 'appDataServices.json', true); // Replace 'appDataServices' with the path to your file xobj.onreadystatechange = function () < if (xobj.readyState == 4 && xobj.status == "200") < // Required use of an anonymous callback as .open will NOT return a value but simply returns undefined in asynchronous mode callback(xobj.responseText); >>; xobj.send(null); > The function above will create a new instance of an XMLHttpRequest and load asynchronously the contents of appDataServices.json . I have gone with asynchronous but you can change the argument to false if you want a synchronous load. Thankfully all modern browsers support the native JSON.parse method. Remember our anonymous callback? here’s how you use it.
Usage
– Parse JSON string into object
How to Fetch and Display JSON Data in HTML Using JavaScript

![]()
In this tutorial, I will show you how to fetch and display data from a JSON file using vanilla JavaScript.
So how will we achieve this?
First, we will fetch the JSON data by using the fetch API. This will return a promise with our JSON data. Then we will append the data dynamically by creating HTML elements on the fly. We will then append our JSON data to those elements.
Getting JSON data from an API and display it on a web page is a common thing you will do quite often. I have created similar posts on the big frameworks like React, Vue and Angular. Check it out if you are using any of those frameworks.
First, create a people.json file and fill it with the following data:
We will save this file in the same directory as our index.html file.
Fetching the JSON data
To be able to display this data in our HTML file, we first need to fetch the data with JavaScript.
We will fetch this data by using the fetch API. We use the fetch API in the following way:
fetch(url) .then(function (response) < // The JSON data will arrive here >) .catch(function (err) < // If an error occured, you will catch it here >);
The url parameter used in the fetch function is where we get the JSON data. This is often an http address. In our case it is just the filename people.json . We don’t have to drill down to any directory since the json file is in the same directory as our index.html .
The fetch function will return a promise. When the JSON data is fetched from the file, the then function will run with the JSON data in the response.
If anything goes wrong (like the JSON file cannot be found), the catch function will run.
Let us see how this will look in out example:
fetch('people.json') .then(function (response) < return response.json(); >) .then(function (data) < appendData(data); >) .catch(function (err) < console.log(err); >); Here we are fetching our people.json file. After the file has been read from disk, we run the then function with the response as a parameter. To get the JSON data from the response, we execute the json() function.
The json() function also returns a promise. This is why we just return it and chain another then function. In the second then function we get the actual JSON data as a parameter. This data looks just like the data in our JSON file.
Now we can take this data and display it on our HTML page. Notice that we are calling a function called appendData . This is where we create the code which will append the data to our page.
Notice that in our catch function, we are just writing the error message to out console. Normally you would display an error message to the user if something went wrong.
Displaying the JSON data
Before we display our JSON data on the webpage, let’s just see how the body of our index.html file looks like.
Pretty simple right? We have just a simple div with the id myData . Our plan is to fill our JSON data inside this div dynamically.
There are several ways to display the data in our HTML. We could create a table and make it look really good with nice styling. However, we will do this in a simple and ugly way.
Our goal is to just simply display the full name of the people in our JSON file.
Step 1 – Get the div element from the body
Remember the div with the myData id from our index.html ? We want to fetch that div using JavaScript. We need this because we are going to fill the div with the people in our JSON file.
This is how we will do it:
var mainContainer = document.getElementById("myData"); We get the element by executing the getElementByID function. This will find the element with the id myData . This is vanilla JavaScript and this is how we did front-end development in the “old” days :).
Step 2 – Loop through every object in our JSON object
Next step is to create a simple loop. We can then get every object in our list of JSON object and append it into our main div.
Step 3 – Append each person to our HTML page
Inside the for-loop we will append each person inside its own div. This code will be repeated three times for each person.
First, we will create a new div element:
var div = document.createElement("div"); Next we will fill that div with the full name from our JSON file.
div.innerHTML = 'Name: ' + data[i].firstName + ' ' + data[i].lastName;
Lastly, we will append this div to our main container:
mainContainer.appendChild(div);
That’s it. Now we have finished appending the JSON data to our index.html page. The full appendData function looks like this:
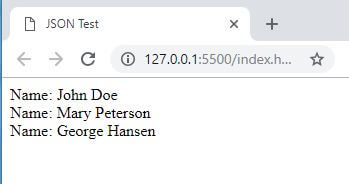
When we run our index.html page, it will look something like this:
Not the most beautiful application, but it got the job done.
Let us look at the entire HTML file with the JavaScript:
fetch('people.json') .then(function (response) < return response.json(); >) .then(function (data) < appendData(data); >) .catch(function (err) < console.log('error: ' + err); >); function appendData(data) < var mainContainer = document.getElementById("myData"); for (var i = 0; i < data.length; i++) < var div = document.createElement("div"); div.innerHTML = 'Name: ' + data[i].firstName + ' ' + data[i].lastName; mainContainer.appendChild(div); >> Try to copy and paste this in your own editor. As an exercise, you can try to style the output to look nicer. Remember to include the people.json file as well. This file must be in the same directory as your index.html file for this to work.
Why use V anilla JavaScript?
You might be wondering what is the point of creating this in vanilla JavaScript. Doesn’t modern web application use frameworks and libraries like Angular, ReactJS or VueJS?
Well, yeah, you are probably right, most of the time. But some web pages are just static with very little logic.
If you just want to tweak some minor parts of the website, it might be overkill to include big libraries which will slow down the site.
Besides, frameworks and libraries come and go. Good old vanilla JavaScript is here to stay. So take every opportunity to learn it, you don’t know when you might need it.
I am a full-stack web developer with over 13 years of experience. I love learning new things and are passionate about JavaScript development both on the front-end and back-end.
Recent Posts
In this article, we will look at sorting an array alphabetically in JavaScript. We will cover both arrays with strings and arrays with objects. Sorting an Array with Strings When sorting an.
In this tutorial, I will show you how to programmatically set the focus to an input element using React.js and hooks. We will use two hooks, useRef and useEffect. Set up the Project All you.
About Us
We are a team of passionate web developers with decades of experience between us.
This site will focus mostly on web development. We love writing and we want to share our knowledge with you.
Hope you’ll enjoy and have fun coding!
Display JSON Data in HTML Page
JSON format is highly used to store data in a structured way. Even data received from a server is in JSON format. Here we will see how to display JSON data in HTML page using JavaScript in form of tables and lists.
JSON data has a structure like a javascript object. Data is stored in key-value pairs, where the key is a string and value can be any type of data.
First, you may think to display these data directly as text on the webpage but this doesn’t look appealing also is not readable.
SSo in this article, we will fetch JSON data from a local or remote server and display it in a better way.
Display JSON data in HTML page using JavaScript
To start working with let our JSON data be following. Source link.
Now we will fetch this JSON data from the remote server and display it on the webpage.
To read JSON data from the local or remote servers we will use the fetch() method.
The fetch() method takes the URL of the JSON file as an argument and returns a Promise object.
After resolving the Promise object we will get the JSON data in the Response object.
fetch(URL) // get the JSON data .then(response => response.json()) // use (display) the JSON data .then(data => console.log(data))We have the JSON data in data stored in a variable. Now we can use it to display the data in the webpage.
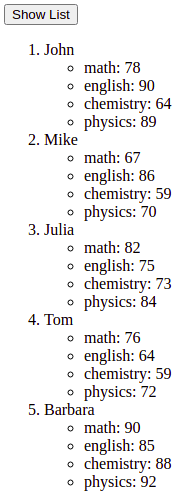
1. Display JSON Data As List
To display the JSON data in a list we will create HTML elements dynamically and insert data in them.
Elements we need to create here are ul and li .
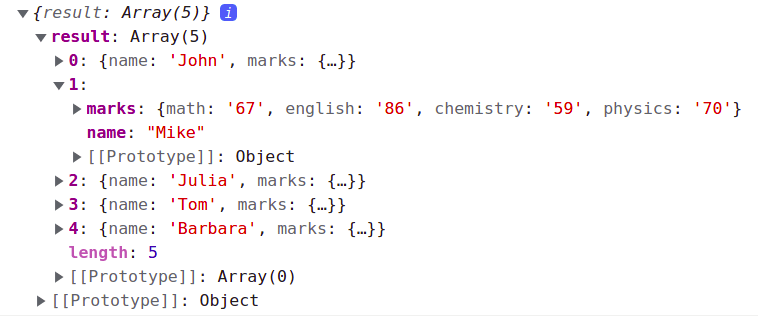
Before we start keep the data structure of JSON data in mind. The image below shows to get the first student name we have to use data.result[0].name and to get first student marks we have to use data.result[0].marks , where to access marks of math subject we have to use data.result[0].marks.math .
Keeping the above structure in mind we first create a ul element and assign it to a variable.
const mainUL = document.createElement('ul')This ul element will be the main element any list element ( li ) will represent a student and their marks and will be created dynamically.
Now we can create a for loop that will iterate over the data.result array and create a li element for each student and set innerHTML of the li element to the student name.
Now create another list that will contain all the marks of the student and append it to the li element (studentLI) created just before.
for(let i = 0; i < data.result.length; i++) < const studentLI = document.createElement('li'); studentLI.innerHTML = data.result[i].name; // create list for marks const marksUL = document.createElement('ul'); for(var key in data.result[i].marks) < const marksLI = document.createElement('li'); marksLI.innerHTML = key + ': ' + data.result[i].marksHtml load json from file; marksUL.appendChild(marksLI); >// append marks list to studentLI studentLI.appendChild(marksUL); >Now we have created a list of students and their marks. Now we can append the ul element to the mainUL element.
// append studentLI to mainUL mainUL.appendChild(studentLI);Finally, append it to the body. Here is the complete code to display the list of students and their marks.
2. Display JSON Data As Table
To display the JSON data in a table we will create a function that takes JSON data as an argument and creates a table and append it to the body.
In the function createtable() create the basic structure of the table so that we have the heading of the table as ‘name’ and ‘marks’. Below these marks create another list to show the subject as shown in the code below.
var table = ""; // add a row for name and marks table += ` Name Marks Math English Chemistry Physics Now we can create a for loop that will iterate over the data.result array and create a tr element for each student and set innerHTML of the tr element to the student name.
// now loop through students // show their name and marks var tr = ""; for(let i = 0; i < data.result.length; i++) < tr += ""; tr += `$ `; for (var key in data.result[i].marks) < tr += `$ `; > tr += " " >Finally, append the table to the body. Here is the complete Javascript code for fetching JSON data and displaying it as a table.
function showTable() < fetch("./lib/examples/students.json") .then(response =>response.json()) .then(data => createTable(data)); > function createTable(data) < var table = ""; // add a row for name and marks table += ` Name Marks Math English Chemistry Physics "; tr += `$ `; for (var key in data.result[i].marks) < tr += `$ `; > tr += " " > table += tr + "
"; // append table to body document.body.innerHTML += table; >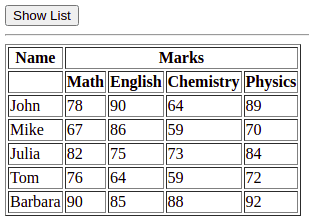
Conclusion
In this short tutorial, we saw how to fetch and display JSON data in HTML pages using javascript. We displayed data as a list and table with a complete explanation of the code.