- PROИТ
- JavaScript: кнопка Назад (Back) в браузере
- How to get the previous url in javascript?
- Method 1: Using document.referrer
- Method 2: Using window.history.back()
- Method 3: Using window.history.go(-1)
- Method 4: Using window.location.href
- Window history.back()
- Note
- See Also:
- Syntax
- Parameters
- Return Value
- Browser Support
- COLOR PICKER
- Report Error
- Thank You For Helping Us!
- 3 Ways To Redirect On Click In Javascript (Simple Examples)
- TLDR – QUICK SLIDES
- TABLE OF CONTENTS
- ON CLICK REDIRECTION
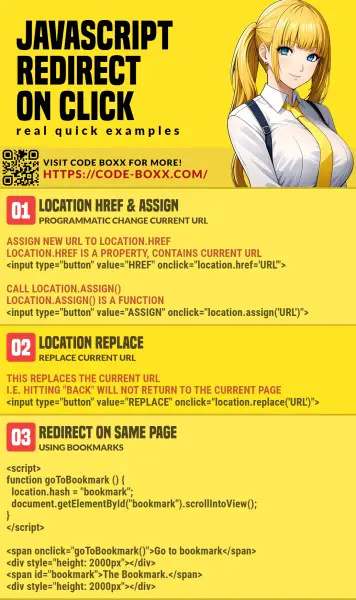
- 1) LOCATION HREF & LOCATION ASSIGN
- 2) LOCATION REPLACE
- 3) REDIRECT IN THE SAME PAGE – SCROLL TO BOOKMARK
- DOWNLOAD & NOTES
- SUPPORT
- EXAMPLE CODE DOWNLOAD
- EXTRA BITS & LINKS
- EXTRA) LOCATION OR WINDOW.LOCATION?
- EXTRA) WINDOW.NAVIGATE!?
- LINKS & REFERENCES
- INFOGRAPHIC CHEAT SHEET
- THE END
PROИТ
Office 365, AD, Active Directory, Sharepoint, C#, Powershell. Технические статьи и заметки.
JavaScript: кнопка Назад (Back) в браузере
Зачастую необходимо сделать кнопку или ссылку, по нажатию на которую пользователь будет отправлен на предыдущую просмотренную страницу.
Далее приведу примеры, как сделать это при помощи JavaScript (JS).
1) кнопка «Назад»
type="button" value=" <-- Назад " onclick="history.go(-1);return false;" /> href="#" onclick="history.back();return false;">Назад href="#" onclick="history.go(-1);return false;">Назад href="javascript:void(0);" onclick="history.back();">Назад href="javascript:history.back();">Назад Это работает во всех браузерах, включая FireFox, Google Chrome и IE.
В случае с history.go(-1) можно экспериментировать. Например, если указать history.go(1) , то пользователь будет наоборот перенаправлен «Вперед» (Forward). Если history.go(-2) , то — назад на две страницы.
Если Вам понравилась статья, пожалуйста, поставьте лайк, сделайте репост или оставьте комментарий. Если у Вас есть какие-либо замечания, также пишите комментарии.
How to get the previous url in javascript?
In JavaScript, there are different methods to retrieve the previous URL, depending on the requirement. Here are a few ways to get the previous URL in JavaScript:
Method 1: Using document.referrer
To get the previous URL in JavaScript using document.referrer , you can follow these steps:
let previousURL = document.referrer;if (previousURL && previousURL !== window.location.href)
Here is the complete code example:
// Get the previous URL using document.referrer let previousURL = document.referrer; // Check if the previous URL exists and is not equal to the current URL if (previousURL && previousURL !== window.location.href) < console.log('Previous URL:', previousURL); >// Go back to the previous page using window.history window.history.back();Note that document.referrer may not always be available or accurate, depending on the browser and how the user arrived at the current page.
Method 2: Using window.history.back()
To get the previous URL in JavaScript using window.history.back() , you can follow these steps:
- Call the window.history.back() method to go back to the previous page.
- Use the document.referrer property to get the URL of the previous page.
// Step 1: Go back to the previous page window.history.back(); // Step 2: Get the URL of the previous page const previousUrl = document.referrer; console.log(previousUrl);Alternatively, you can combine the two steps into a single function:
function getPreviousUrl() // Go back to the previous page window.history.back(); // Get the URL of the previous page const previousUrl = document.referrer; return previousUrl; > const previousUrl = getPreviousUrl(); console.log(previousUrl);Note that the document.referrer property may not always be available, depending on the browser settings or security policies. In such cases, you may need to use other methods to get the previous URL, such as parsing the browser history or using cookies.
Method 3: Using window.history.go(-1)
To get the previous URL in JavaScript using the window.history.go(-1) method, follow these steps:
- First, use the window.history.go(-1) method to navigate back to the previous page in the browser history.
- Once you have navigated back to the previous page, you can use the window.location.href property to get the URL of that page.
var previousUrl = window.location.href; console.log(previousUrl);Here’s the complete code example:
// Navigate back to the previous page window.history.go(-1); // Get the URL of the previous page var previousUrl = window.location.href; console.log(previousUrl);This code will navigate back to the previous page in the browser history and log the URL of that page to the console.
Note that this method will only work if the user has navigated to the current page from a previous page in the same browser window. If the user has opened a new window or tab, or if the previous page has been closed, this method will not work.
In summary, to get the previous URL in JavaScript using window.history.go(-1) , simply navigate back to the previous page using that method and then use window.location.href to get the URL of that page.
Method 4: Using window.location.href
To get the previous URL in JavaScript using window.location.href , you can make use of the document.referrer property. This property returns the URL of the page that linked to the current page.
const previousUrl = document.referrer; console.log(previousUrl);Another way to achieve this is by storing the current URL in a session storage and retrieving it when needed.
// Store current URL in session storage sessionStorage.setItem('currentUrl', window.location.href); // Retrieve previous URL from session storage const previousUrl = sessionStorage.getItem('previousUrl'); console.log(previousUrl);You can also use the history object to get the previous URL. The history object represents the browser’s history and provides methods to navigate through it.
// Go back to previous page history.back(); // Get previous URL const previousUrl = window.location.href; console.log(previousUrl);In summary, there are multiple ways to get the previous URL in JavaScript. Using document.referrer , session storage, or the history object are some of the most common methods.
Window history.back()
The history.back() method loads the previous URL (page) in the history list.
The history.back() method only works if a previous page exists.
Note
history.back() is the same as history.go(-1) .
history.back() is the same as clicking «Back» your browser.
See Also:
Syntax
Parameters
Return Value
Browser Support
history.back() is supported in all browsers:
| Chrome | Edge | Firefox | Safari | Opera | IE |
| Yes | Yes | Yes | Yes | Yes | Yes |

COLOR PICKER


Report Error
If you want to report an error, or if you want to make a suggestion, do not hesitate to send us an e-mail:
Thank You For Helping Us!
Your message has been sent to W3Schools.
Top Tutorials
Top References
Top Examples
Get Certified
W3Schools is optimized for learning and training. Examples might be simplified to improve reading and learning. Tutorials, references, and examples are constantly reviewed to avoid errors, but we cannot warrant full correctness of all content. While using W3Schools, you agree to have read and accepted our terms of use, cookie and privacy policy.
3 Ways To Redirect On Click In Javascript (Simple Examples)
Welcome to a quick tutorial on how to redirect on click in Javascript. Need to redirect the user after they click on a button, or after they have submitted a form?
While all these seem to do the same thing, they are actually slightly different. Read on for more examples and the differences!
TLDR – QUICK SLIDES

TABLE OF CONTENTS
ON CLICK REDIRECTION
All right, let us now get into more examples of how to do a webpage redirection in Javascript.
1) LOCATION HREF & LOCATION ASSIGN
Redirected!
You can hit "back" to go back to 1a-location-href.html.
As in the introduction above, there are 3 main ways to change the URL. First, we have location.href and location.assign() . Yes, take note:
- location.href is a property . We can retrieve the current URL from location.href , and assign a new URL to change the current page – location.href = URL .
- location.assign() is a function . We call this function to change the current page – location.assign(URL) .
2) LOCATION REPLACE
Redirected!
2a-location-replace.html is not in the navigation history.
- location.href and location.assign() – Both will record the current page into the navigation history before redirecting. For example, we do a location.assign(«PAGE-B.HTML») on PAGE-A.HTML . The user can hit “back” and go back to PAGE-A.HTML .
- location.replace() – Replaces the current URL. For example, we do a location.replace(«PAGE-B.HTML») on PAGE-A.HTML . In the navigation history, PAGE-A.HTML is replaced with PAGE-B.HTML .
- Use location.href and location.assign() if you allow the user to go back.
- Use location.replace() if you don’t want the user to go back.
3) REDIRECT IN THE SAME PAGE – SCROLL TO BOOKMARK
function goToBookmark () Go to bookmark In Javascript, we can access the bookmark portion of the URL with location.hash . But here’s the problem – If we just set location.hash = «BOOKMARK» , that will not trigger a “scroll to element”. This is why we need to manually do an ELEMENT.scrollIntoView() .
DOWNLOAD & NOTES
Here is the download link to the example code, so you don’t have to copy-paste everything.
SUPPORT
600+ free tutorials & projects on Code Boxx and still growing. I insist on not turning Code Boxx into a «paid scripts and courses» business, so every little bit of support helps.
EXAMPLE CODE DOWNLOAD
Click here for the source code on GitHub gist, just click on “download zip” or do a git clone. I have released it under the MIT license, so feel free to build on top of it or use it in your own project.
EXTRA BITS & LINKS
That’s all for this guide, and here is a small section on some extras and links that may be useful to you.
EXTRA) LOCATION OR WINDOW.LOCATION?
console.log(location); console.log(window.location); console.log(window.location === location); // trueIn some other tutorials, you will see people using window.location instead of location . Is there a difference? Apparently, the answer is no. location and window.location refers to the same thing. So go ahead and be a lazy code ninja. It is safe to use location and drop that windows part.
EXTRA) WINDOW.NAVIGATE!?
If you have been poking around the Internet, you may have also spotted some tutorials using window.navigate() to redirect the page. Take extra note that window.navigate() is an ancient Internet Exploder Explorer thing. It is not supported in most modern browsers – Don’t use this anymore.
LINKS & REFERENCES
INFOGRAPHIC CHEAT SHEET
THE END
Thank you for reading, and we have come to the end of this guide. I hope that it has helped you with your project, and if you want to share anything with this guide, please feel free to comment below. Good luck and happy coding!