- Image gallery
- Starting point
- Project brief
- Steps to complete
- Declare an array of image filenames
- Looping through the images
- Adding a click event listener to each thumbnail image
- Writing a handler that runs the darken/lighten button
- Hints and tips
- Assessment or further help
- Found a content problem with this page?
- JavaScript Array of Images
- Use Array Objects to Show an Array of Images in JavaScript
- Use Arrays to Show an Array of Images in JavaScript
- Related Article — JavaScript Array
- Related Article — JavaScript Image
Image gallery
Now that we’ve looked at the fundamental building blocks of JavaScript, we’ll test your knowledge of loops, functions, conditionals and events by getting you to build a fairly common item you’ll see on a lot of websites — a JavaScript-powered image gallery.
| Prerequisites: | Before attempting this assessment you should have already worked through all the articles in this module. |
|---|---|
| Objective: | To test comprehension of JavaScript loops, functions, conditionals, and events. |
Starting point
To get this assessment started, you should go and grab the ZIP file for the example, unzip it somewhere on your computer, and do the exercise locally to begin with.
Alternatively, you could use a site like JSBin or Glitch to do your assessment. You could paste the HTML, CSS and JavaScript into one of these online editors. If the online editor you are using doesn’t have separate JavaScript/CSS panels, feel free to put them inline / elements inside the HTML page.
Note: If you get stuck, then ask us for help — see the Assessment or further help section at the bottom of this page.
Project brief
You have been provided with some HTML, CSS and image assets and a few lines of JavaScript code; you need to write the necessary JavaScript to turn this into a working program. The HTML body looks like this:
h1>Image gallery exampleh1> div class="full-img"> img class="displayed-img" src="images/pic1.jpg" alt="Closeup of a blue human eye" /> div class="overlay">div> button class="dark">Darkenbutton> div> div class="thumb-bar">div>
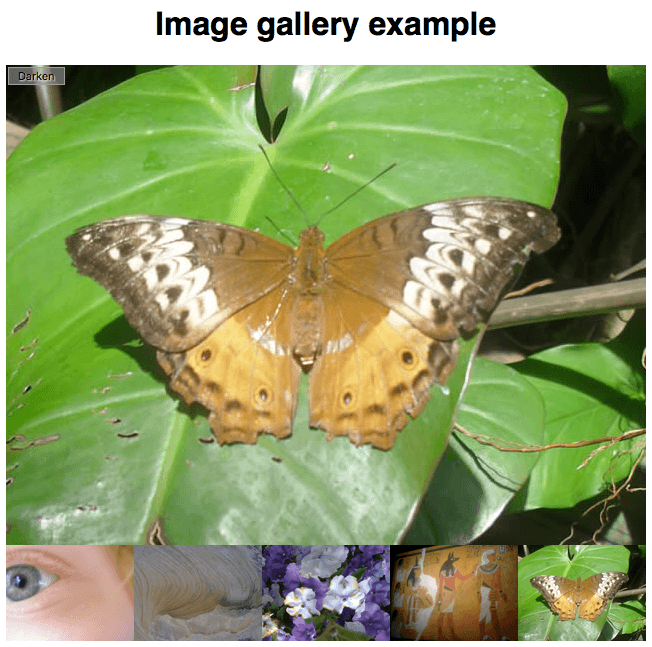
The example looks like this:
The most interesting parts of the example’s CSS file:
- It absolutely positions the three elements inside the full-img — the
in which the full-sized image is displayed, an empty that is sized to be the same size as the
and put right over the top of it (this is used to apply a darkening effect to the image via a semi-transparent background color), and a that is used to control the darkening effect.
- It sets the width of any images inside the thumb-bar (so-called «thumbnail» images) to 20%, and floats them to the left so they sit next to one another on a line.
- Declare a const array listing the filenames of each image, such as ‘pic1.jpg’ .
- Declare a const object listing the alternative text for each image.
- Loop through the array of filenames, and for each one, insert an
element inside the thumb-bar that embeds that image in the page along with its alternative text.
- Add a click event listener to each
inside the thumb-bar so that, when they are clicked, the corresponding image and alternative text are displayed in the displayed-img
element.
- Add a click event listener to the so that when it is clicked, a darken effect is applied to the full-size image. When it is clicked again, the darken effect is removed again.
To give you more of an idea, have a look at the finished example (no peeking at the source code!)
Steps to complete
The following sections describe what you need to do.
Declare an array of image filenames
You need to create an array listing the filenames of all the images to include in the gallery. The array should be declared as a constant.
Looping through the images
We’ve already provided you with lines that store a reference to the thumb-bar inside a constant called thumbBar , create a new element, set its src and alt attributes to a placeholder value xxx , and append this new
element inside thumbBar .
- Put the section of code below the «Looping through images» comment inside a loop that loops through all the filenames in the array.
- In each loop iteration, replace the xxx placeholder values with a string that will equal the path to the image and alt attributes in each case. Set the value of the src and alt attributes to these values in each case. Remember that the image is inside the images directory, and its name is pic1.jpg , pic2.jpg , etc.
Adding a click event listener to each thumbnail image
In each loop iteration, you need to add a click event listener to the current newImage — this listener should find the value of the src attribute of the current image. Set the src attribute value of the displayed-img to the src value passed in as a parameter. Then do the same for the alt attribute.
Alternatively, you can add one event listener to the thumb bar.
Writing a handler that runs the darken/lighten button
That just leaves our darken/lighten — we’ve already provided a line that stores a reference to the in a constant called btn . You need to add a click event listener that:
- Checks the current class name set on the — you can again achieve this by using getAttribute() .
- If the class name is «dark» , changes the class to «light» (using setAttribute() ), its text content to «Lighten», and the background-color of the overlay to «rgba(0,0,0,0.5)» .
- If the class name is not «dark» , changes the class to «dark» , its text content back to «Darken», and the background-color of the overlay to «rgba(0,0,0,0)» .
The following lines provide a basis for achieving the changes stipulated in points 2 and 3 above.
.setAttribute("class", xxx); btn.textContent = xxx; overlay.style.backgroundColor = xxx;
Hints and tips
Assessment or further help
If you would like your work assessed, or are stuck and want to ask for help:
- Put your work into an online shareable editor such as CodePen, jsFiddle, or Glitch.
- Write a post asking for assessment and/or help at the MDN Discourse forum Learning category. Your post should include:
- A descriptive title such as «Assessment wanted for Image gallery».
- Details of what you have already tried, and what you would like us to do, e.g. if you are stuck and need help, or want an assessment.
- A link to the example you want assessed or need help with, in an online shareable editor (as mentioned in step 1 above). This is a good practice to get into — it’s very hard to help someone with a coding problem if you can’t see their code.
- A link to the actual task or assessment page, so we can find the question you want help with.
- Previous
- Overview: Building blocks
Found a content problem with this page?
This page was last modified on Jul 3, 2023 by MDN contributors.
Your blueprint for a better internet.
JavaScript Array of Images

- Use Array Objects to Show an Array of Images in JavaScript
- Use Arrays to Show an Array of Images in JavaScript
This tutorial instructs you about the JavaScript array of images’ creation and iteration; it exemplifies using JavaScript Arrays and Array Objects . Each example has a startup code and respective output to practice.
Use Array Objects to Show an Array of Images in JavaScript
html> head> script src="./javascript/imageArray.js">script> link rel="stylesheet" href="./css/styles.css"> title>Image Iterationtitle> head> body> h1>Click to see the next imageh1> div id="splash"> img src="./images/splash class room image.jpg" alt="classroom image" id="mainImage"> div> div id="controls"> button id="previousbtn" onclick="previousImage()">Previous Imagebutton> button id="nextbtn" onclick="nextImage()"> Next Imagebutton> div> body> html> img width: 350px; height: 350px; > #previousbtn margin-right: 75px;; > #nextbtn margin-left: 75px; > var imgArray = new Array(); imgArray[0] = new Image(); imgArray[0].src = './images/splash class room image.jpg'; imgArray[1] = new Image(); imgArray[1].src = './images/splash animal image.jpg'; imgArray[2] = new Image(); imgArray[2].src = './images/splash nature image.jpg'; imgArray[3] = new Image(); imgArray[3].src = './images/splash food image.jpg'; imgArray[4] = new Image(); imgArray[4].src = './images/splash travel image.jpg'; function nextImage() var img = document.getElementById("mainImage"); for(var i = 0; i imgArray.length;i++) if(imgArray[i].src == img.src) if(i === imgArray.length) document.getElementById("mainImage").src = imgArray[0].src; break; > document.getElementById("mainImage").src = imgArray[i+1].src; break; > > > function previousImage() var img = document.getElementById("mainImage"); for(var i = imgArray.length-1; i >=0 ;i--) if(imgArray[i].src == img.src) if(i === imgArray.length) document.getElementById("mainImage").src = imgArray[4].src; break; > document.getElementById("mainImage").src = imgArray[i-1].src; break; > > > In this code, each img element is an image object. The src is also defined by assigning a string that refers to the file name having that particular image.
The nextImage function gets the first element having id mainImage and then iterates over the last images. The previousImage function also gets the first element having id mainImage (just like the nextImage method) but loops from the current image to backward.
Use Arrays to Show an Array of Images in JavaScript
html> head> script src="./javascript/imageArray.js">script> link rel="stylesheet" href="./css/styles.css"> title>Image Iterationtitle> head> body onload="makeImage();"> div class="contents" id="content">div> button onclick="nextImage()">Next Imagebutton> body> html> img width: 350px; height: 350px; > var images = ["./images/splash class room image.jpg", "./images/splash animal image.jpg", "./images/splash nature image.jpg", "./images/splash food image.jpg", "./images/splash travel image.jpg"]; var index = 0; function makeImage() var img = document.createElement('img') img.src = images[index]; document.getElementById('content').appendChild(img); > function nextImage() var img = document.getElementById('content').getElementsByTagName('img')[0] index++; index = index % images.length; img.src = images[index]; > The makeImage function constructs the img tags and specifies their src attribute. This function is called immediately after the page is loaded using the onload event in the tag. The createElement creates the HTML element (we are creating an img element for this example).
Then it specifies the img.src to get the image. The appendChild function appends the img element within the element whose id is content .
In simple words, the makeImage function is making img tags within the tag whose id’s value is content .
The first line of code in the nextImage function gets the first img tag of the element whose id is content . The index = index % images.length; takes you to the first image if you have the last image in the output.
You see the images because this function also sets the src attribute.
Mehvish Ashiq is a former Java Programmer and a Data Science enthusiast who leverages her expertise to help others to learn and grow by creating interesting, useful, and reader-friendly content in Computer Programming, Data Science, and Technology.
Related Article — JavaScript Array
Related Article — JavaScript Image
Copyright © 2023. All right reserved