- Javascript button upload files
- How to create a custom file upload button
- 1. Use a label tag and point its for attribute to the id of the default HTML file upload button
- 2. Style the label element and hide the default HTML file upload button
- Upload File on Button Click with Preview Using JavaScript
- How to make a custom file upload button with HTML, CSS, and JavaScript
- Let’s get started!
- Connecting .css and .js file
- HTML Code
- CSS Code
- JavaScript Code
- How it works!
- Full Code
Javascript button upload files
- The basics of TOGAF certification and some ways to prepare TOGAF offers architects a chance to learn the principles behind implementing an enterprise-grade software architecture, including.
- Haskell vs. PureScript: The difference is complexity Haskell and PureScript each provide their own unique development advantages, so how should developers choose between these two .
- A quick intro to the MACH architecture strategy While not particularly prescriptive, alignment with a MACH architecture strategy can help software teams ensure application .
- Postman API platform will use Akita to tame rogue endpoints Akita’s discovery and observability will feed undocumented APIs into Postman’s design and testing framework to bring them into .
- How to make use of specification-based test techniques Specification-based techniques can play a role in efficient test coverage. Choosing the right techniques can ensure thorough .
- GitHub Copilot Chat aims to replace Googling for devs GitHub’s public beta of Copilot Chat rolls out GPT-4 integration that embeds a chat assistant into Visual Studio, but concerns .
- 4 popular machine learning certificates to get in 2023 AWS, Google, IBM and Microsoft offer machine learning certifications that can further your career. Learn what to expect from each.
- Navigate multi-cloud billing challenges Keeping track of cloud bills from multiple clouds or accounts can be complex. Learn how to identify multi-cloud billing .
- 5 Google Cloud cost optimization best practices Cost is always a top priority for enterprises. For those considering Google Cloud, or current users, discover these optimization .
- Coveware: Rate of victims paying ransom continues to plummet Incident response firm Coveware said 34% of ransomware victims paid the ransom in Q2 2023, a sharp decline from last quarter and .
- Mandiant: JumpCloud breach led to supply chain attack Mandiant researchers attribute the supply chain attack to a North Korean threat actor that abused JumpCloud’s commands framework .
- BrightTALK @ Black Hat USA 2022 BrightTALK’s virtual experience at Black Hat 2022 included live-streamed conversations with experts and researchers about the .
- AWS Control Tower aims to simplify multi-account management Many organizations struggle to manage their vast collection of AWS accounts, but Control Tower can help. The service automates .
- Break down the Amazon EKS pricing model There are several important variables within the Amazon EKS pricing model. Dig into the numbers to ensure you deploy the service .
- Compare EKS vs. self-managed Kubernetes on AWS AWS users face a choice when deploying Kubernetes: run it themselves on EC2 or let Amazon do the heavy lifting with EKS. See .
How to create a custom file upload button
I find the default HTML file upload button rather ugly. Annoying enough, there seems to be no way to style it directly. Here is how I created a custom file upload button.
1. Use a label tag and point its for attribute to the id of the default HTML file upload button
type="file" id="actual-btn"/> for="actual-btn">Choose File By doing this, clicking the label element in the browser toggles the default HTML file upload button (as though we clicked it directly). The output of the above code is below. As you can see, we only have a Choose File text (from the label element) a few pixels to the right of the actual upload button. We can click the Choose File text, and it will toggle the upload window (Click it and see)
2. Style the label element and hide the default HTML file upload button
We hide the default HTML file upload button in the browser by adding the hidden attribute to the tag like so
type="file" id="actual-btn" hidden/> label background-color: indigo; color: white; padding: 0.5rem; font-family: sans-serif; border-radius: 0.3rem; cursor: pointer; margin-top: 1rem; > Now we have this beautiful custom button, which actually works like the original file upload button: At this point, we are done. But there is one more glitch to fix. With the default file upload button, there is a no file chosen text beside the button (scroll up to the first codepen window), which gets replaced with the name of the file we will be uploading. Unfortunately, we don’t get to see that with our custom button. How do we do that? What I did was to include a span tag (with an id of file-chosen) right after our custom file upload button. In the javascript file, I listen to the change event on the original file upload button(which we have hidden). A file object is returned which contains the details(such as name, file size etc) of the file uploaded. Then I set the text content of the span element(with the id of file-chosen) to the name property of the file object returned. The final result is below. Test it out. Kindly leave your comments and questions down below
Upload File on Button Click with Preview Using JavaScript
Hello, Guys. Welcome to Our Blog, In today’s article, we’ll look at how to make an Upload File on Button Click with Preview using HTML, CSS, and JavaScript. Before that, we could see what this endeavor was about.
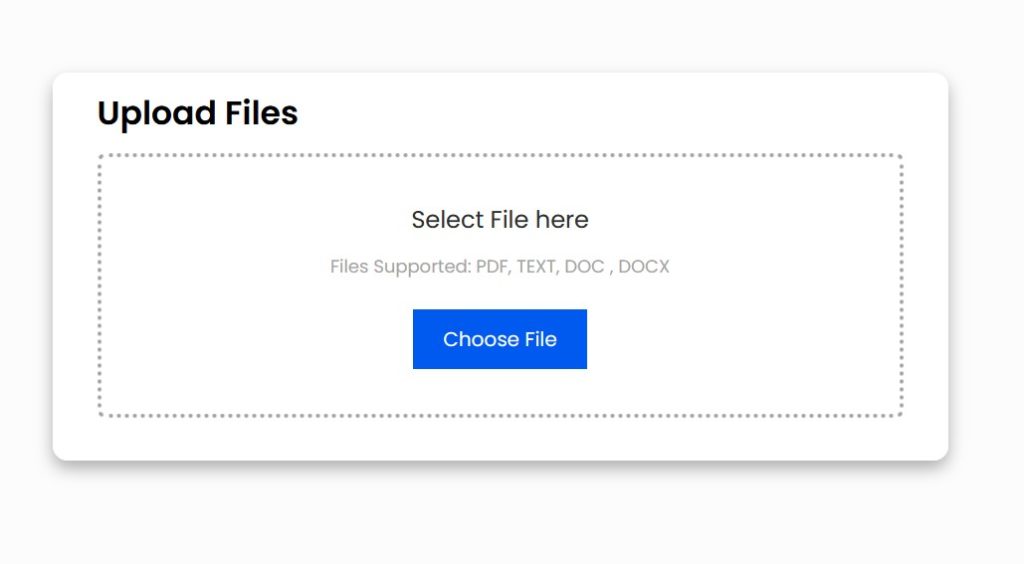
In This Project, We First Upload A File Using Upload Button Or Drag And Drop Method Then We Will Enter Our Email Address To Send That File, So The File Which Is Sent Will Appear In The Box.
The ability to drag and drop a file into position is referred to as drag-and-drop file upload. Using drag-and-drop interfaces, web apps can place files onto a web page. This type of file upload function is probably available on most websites. In this blog post, I’ll demonstrate how to implement a drag-and-drop file upload function using only pure JavaScript. There are several JavaScript frameworks that enable you to do this with just a few lines of JavaScript code.
So, Let’s Begin Our Project Journey By Adding The Source Codes. For That, We Are Using The Html Code First.
Do you want to learn HTML to JavaScript? 🔥
If yes, then here is our Master Frontend: Zero to Hero eBook! 📚 In this eBook, you’ll learn complete HTML, CSS, Bootstrap, and JavaScript from beginner to advance level. 💪 It includes 450 Projects with source code.
How to make a custom file upload button with HTML, CSS, and JavaScript
Recently, I was working on a project. One of the requirements was to create a customized file upload button. I had to make something like this:

I thought I’d easily find a detailed tutorial if I search a bit on Google but unfortunately, I didn’t. It seems to be quite simple but I had to spend a lot of time to make it.
This article is a detailed tutorial on how to make it 🙂
Let’s get started!
I’m gonna make this a beginner-friendly article, so, first of all, let’s start with the basics. Create an HTML file, I’ve named it Index, you can name it anything. Now create a .css file. I’ve named it style.css following the convention. Since we’re done with the HTML and CSS ones, let’s make a .js file now. I’ve named it script.js, again, following the concention.
Now, set up your main tags such as < !DOCTYPE html >, < head >, < body >etc in your HTML file. Then we will connect our CSS and js file with the HTML file. I’m doing this early on because my experience states that it’s better to be early. You might forget to make the connection later and spend hours trying to why your code isn’t working🤦♀️
Connecting .css and .js file
Add the following line in the < head >tag of your HTML file to connect with the css file. Make sure that the .css, .html and .js files are all in the same folder.
link rel="stylesheet" href="style.css"> I’m also gonna add an icon on the browse for a file button. I’ll use fontawesome for it. To do so, we gotta connect it. So, add the following link in the < head >tag as well.
link rel="stylesheet" href="https://use.fontawesome.com/releases/v5.8.1/css/all.css" integrity="sha384-50oBUHEmvpQ+1lW4y57PTFmhCaXp0ML5d60M1M7uH2+nqUivzIebhndOJK28anvf" crossorigin="anonymous"> Finally, this is what your < head >tag should look like:
head> meta charset="UTF-8"> meta http-equiv="X-UA-Compatible" content="IE=edge"> meta name="viewport" content="width=device-width, initial-scale=1.0"> title>File Upload Button/title> link rel="stylesheet" href="style.css"> link rel="stylesheet" href="https://use.fontawesome.com/releases/v5.8.1/css/all.css" integrity="sha384-50oBUHEmvpQ+1lW4y57PTFmhCaXp0ML5d60M1M7uH2+nqUivzIebhndOJK28anvf" crossorigin="anonymous"> /head> Just before < body >tag is closed, add this line to connect the .js file:
HTML Code
Let’s play with some divs and classes, shall we?👀
First, make the main div under which all your content will be. Then add a class to it so that styling it is much easier.
div class="up"> !-- Code here --> /div> From here onwards, I’ll start to refer to the divs with their class name.
Now, we have to make 2 more divs inside the «up» div.
One would be where the name of the selected file would be shown. The second div would be for the browse file button.
So, here’s the first div:
div class="fileName"> a>NO FILE SELECTED/a> /div> The text in < a >would be the default text shown. Once the file is selected, its name would be shown in place of this default text (this is what we would use Js and jQuery for).
Here’s the second div:
div class="file-search-button"> label for="file-upload" class="custom-file-upload"> i class="fa fa-search">/i> BROWSE FOR A FILE /label> input id="file-upload" type="file"/> /div> The < label >tag is for the < input >. We gave the id «file-upload» to the < input >. Then, via using this id, we specified that the label was for this input only. This is a good practice and avoids confusion when you got a lot of < input >and < label >tags inside one < div >. In the < input >tag, we added type=»file» to specify that this button can be used to upload anything (any kind of file like.png, .jpeg, .exe, .pdf etc).
» < i >< /i >«, by adding this, an icon indicating «search» would be added before our text.
Adding everything up, here’s what we will get:
body> div class="up"> div class="fileName"> a>NO FILE SELECTED/a> /div> div class="file-search-button"> label for="file-upload" class="custom-file-upload"> i class="fa fa-search">/i> BROWSE FOR A FILE /label> input id="file-upload" type="file"/> /div> /div> script src="script.js">/script> /body> So, this is how things look at this point:

CSS Code
It looks quite plain, so let’s style this 🙂
Add all the following code in the style.css file.
First of all, we will style the main div, «up». I want to place it in the center of the page so here’s what I’ll do:
.up< margin: 0 auto; text-align: center ; margin-top: 200px; > So, here is something really important. Take a look:

The text in the red circle is what is shown by default. Generally, this can’t be styled. At least I couldn’t do it. I couldn’t change its placement and it looked really bad right next to a beautiful button.
I only wanted the text in the green circle to be shown. That text would be later replaced by the name of the file selected.
So, in order to make the text in red disappear, we do the following:
input[type="file"] < display: none; > Since we’re done with this, let’s style the first div, «fileName».
.fileName< margin-top: 20px; color: rgb(255, 255, 255); display: inline-block; padding:15px; border-radius: 25px; cursor: pointer; background-color: #737275; border: none; width: 220px; > Here, we have added some padding and colors, etc to make it look a bit similar in shape and styling to the browse file button.
To make sure, the 1st and second div have some space between them, we’ll do this:
.file-search-button< margin-top: 30px; > Now, we’ll style the browse file button:
.custom-file-upload < color: rgb(255, 255, 255); display: inline-block; padding:15px; border-radius: 25px; cursor: pointer; background-color: #7a166d; border: none; > This styling was some pretty basic stuff. Here’s how it looks right now:

It’s in the middle of the page and with the basic styling we did earlier, looks much better now 🙂
JavaScript Code
Add the following code in the script.js file.
const fileName = document.querySelector(".fileName"); const fileInput = document.querySelector("input[type=file]"); fileInput.addEventListener("change", function( ) < if (this.files && this.files[0]) < fileName.innerHTML = this.files[0].name; > >); It’s pretty simple actually. We will first select the «query» via its class. Then we add an event listener that as soon as the button is clicked, the below-defined function would be called. What it does is that as soon as the button is clicked, the user is given the option to select a file. If no file is selected, no change would take place. But if a file is selected, the name would be stored in a variable and replace the default text!
How it works!

When we click on the browse for a file button, this new window pops up. Select a file now.

And here we can see that it works😆

Full Code
You can either follow along while reading or get the full code from my Github.
Let’s connect!